Previous Next

Jump Starting Procedure

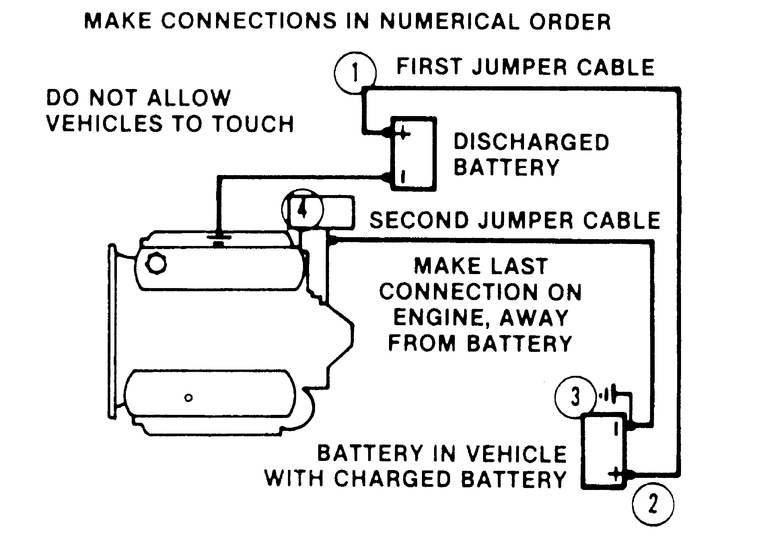
Fig. 1: Connect the jumper cables to the batteries and engine in the order shown

  1. Make sure that the voltages of the 2 batteries are the same. Most batteries and charging systems are of the 12 volt variety.
  2. Pull the jumping vehicle (with the good battery) into a position so the jumper cables can reach the dead battery and that vehicle's engine. Make sure that the vehicles do NOT touch.
  3. Place the transmissions/transaxles of both vehicles in Neutral (MT) or P (AT), as applicable, then firmly set their parking brakes.

    NOTE: If necessary for safety reasons, the hazard lights on both vehicles may be operated throughout the entire procedure without significantly increasing the difficulty of jumping the dead battery.

  4. Turn all lights and accessories OFF on both vehicles. Make sure the ignition switches on both vehicles are turned to the OFF position.
  5. Cover the battery cell caps with a rag, but do not cover the terminals.
  6. Make sure the terminals on both batteries are clean and free of corrosion or proper electrical connection will be impeded. If necessary, clean the battery terminals before proceeding.
  7. Identify the positive (+) and negative (–) terminals on both batteries.
  8. Connect the first jumper cable to the positive (+) terminal of the dead battery, then connect the other end of that cable to the positive (+) terminal of the booster (good) battery.
  9. Connect one end of the other jumper cable to the negative (–) terminal on the booster battery and the final cable clamp to an engine bolt head, alternator bracket or other solid, metallic point on the engine with the dead battery. Try to pick a ground on the engine that is positioned away from the battery in order to minimize the possibility of the 2 clamps touching should one loosen during the procedure. DO NOT connect this clamp to the negative (–) terminal of the bad battery.

    CAUTION
    Be very careful to keep the jumper cables away from moving parts (cooling fan, belts, etc.) on both engines.

  10. Check to make sure that the cables are routed away from any moving parts, then start the donor vehicle's engine. Run the engine at moderate speed for several minutes to allow the dead battery a chance to receive some initial charge.
  11. With the donor vehicle's engine still running slightly above idle, try to start the vehicle with the dead battery. Crank the engine for no more than 10 seconds at a time and let the starter cool for at least 20 seconds between tries. If the vehicle does not start in 3 tries, it is likely that something else is also wrong or that the battery needs additional time to charge.
  12. Once the vehicle is started, allow it to run at idle for a few seconds to make sure that it is operating properly.
  13. Turn ON the headlights, heater blower and, if equipped, the rear defroster of both vehicles in order to reduce the severity of voltage spikes and subsequent risk of damage to the vehicles' electrical systems when the cables are disconnected. This step is especially important to any vehicle equipped with computer control modules.
  14. Carefully disconnect the cables in the reverse order of connection. Start with the negative cable that is attached to the engine ground, then the negative cable on the donor battery. Disconnect the positive cable from the donor battery and finally, disconnect the positive cable from the formerly dead battery. Be careful when disconnecting the cables from the positive terminals not to allow the alligator clips to touch any metal on either vehicle or a short and sparks will occur.

Previous Next