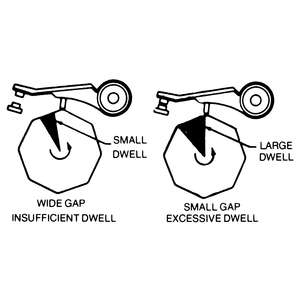
| Fig. 1: Dwell is a function of point gap. The dark area
is the number of degrees the points will be closed (illustration shows
8 cylinder set up, 4 cylinder is similar)
|
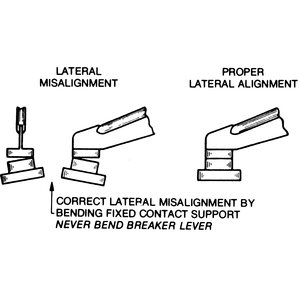
| Fig. 2: View of breaker point alignment
|
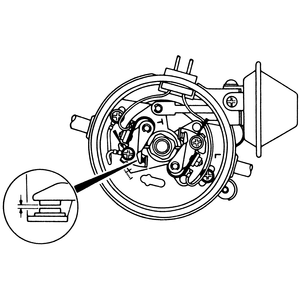
| Fig. 3: Adjusting the point gap on the rotary engine.
The arrows indicate the setscrews to be loosened
|
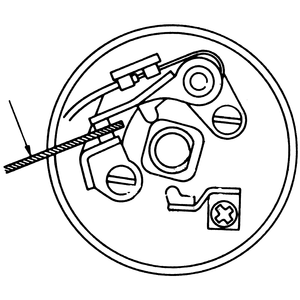
| Fig. 4: View of a feeler blade (arrow) inserted between
the contact points. Note the rubbing block (in line with feeler blade)
resting on distributor cam lobe (center)
|
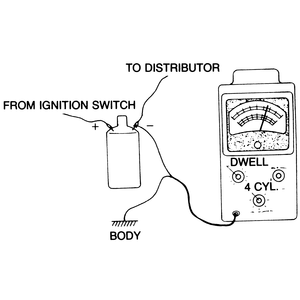
| Fig. 5: A typical dwell meter and an example of its connection.
Always follow the manufacturer's instructions
|
The dwell angle or cam angle is the number of degrees that the distributor cam rotates while the points are closed. There is an inverse relationship between dwell angle and point gap. Increasing the point gap will decrease the dwell angle and vice versa. Checking the dwell angle with a meter is a far more accurate method of measuring point opening than the feeler gauge method.
When setting ignition contact points, it is advisable to observe the following general rules:
A dwell meter virtually eliminates errors in point gap caused by the distributor cam lobes being unequally worn, or human error. In any case, point dwell should be checked as soon as possible after setting with a feeler gauge because it is a far more accurate check of point operation under normal operating conditions. The dwell meter is also capable of detecting high point resistance (oxidation) or poor connections within the distributor.
The dwell meter, actually a modified voltmeter, depends on the nature of contact point operation for its usefulness. In this electro-mechanical system, a fiber block slides under tension, over a cam. The angle that the block traverses on the cam, during which time current is made available to the coil primary winding, is an inverse function of point gap. In other words, the wider the gap, the smaller the dwell (expressed in degrees); the closer the gap, the greater the dwell.
Because the fiber block wears down gradually in service, it is a good practice to set the dwell on the low side of any dwell range (smaller number of degrees) given in specifications. As the block wears, the dwell becomes greater (toward the center of the range) and point life is increased between adjustments.
To connect the dwell meter, switch the meter to the appropriate cylinder range, as the case may be, and connect one lead to ground. The other lead should be connected to the coil distributor terminal (the one having the wire going to contact points). Follow the manufacturer's instructions if they differ from those listed. Zero the meter, start the engine and gradually allow it to assume normal idle speed. See the Tune-Up Specifications earlier in this section. The meter should agree with the specifications. Any excessive variation in dwell indicates a worn distributor shaft or bushings, or perhaps a worn distributor cam or breaker plate.
It is obvious from the above procedure that some means of measuring engine rpm must also be employed when checking dwell. An external tachometer should be employed. Hook-up is the same as for the dwell meter and both can be used in conjunction. Most commercial dwell meters have a tachometer scale built in and switching between them is possible.
There are two methods to adjust the breaker point gap, the feeler blade method and the dwell meter method, of which, the latter is preferred.
NOTE: If dwell angle is above the specified amount, the point gap is too small; if it is below the specified amount, the gap is too large.