Check the air gap, back gap and point gap with a wire gauge. If they are
not within specifications, adjust the gap by bending the stationary bracket.
After the gaps are correctly set, adjust the voltage setting. Bend the upper
plate down to increase the voltage setting, or bend it up to increase the
voltage setting.
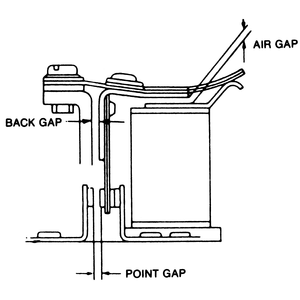
Check the air gap, the point gap, and the back gap with a feeler gauge (see
illustration).
If they do not fall within the specifications given in the Alternator and
Regulator chart above, adjust the gaps by bending the stationary contact bracket.
Connect a voltmeter between the A and E terminals
of the regulator.
NOTE: Be sure that the car's battery is fully charged before
proceeding with this test.
Start the engine and run it at 2,000 rpm (4,000 alternator rpm). The voltmeter
reading should be 13.5–14.5v.
Stop the engine.
Bend the upper plate down to decrease the voltage setting, or up to increase
the setting as required.
If the regulator cannot be brought within specifications, replace it.
When the test is completed, disconnect the voltmeter and replace the regulator
cover.