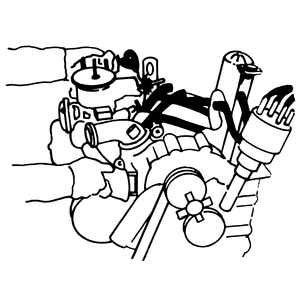
| Fig. 1: Removing the intake manifold
|
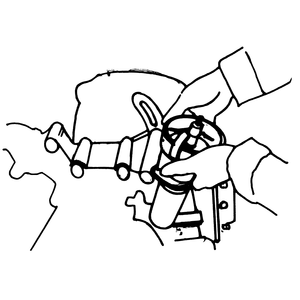
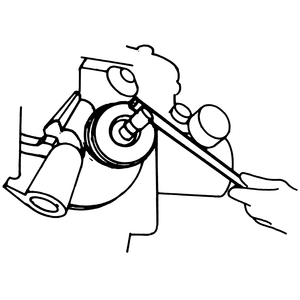
| Fig. 2: Removing the distributor
|
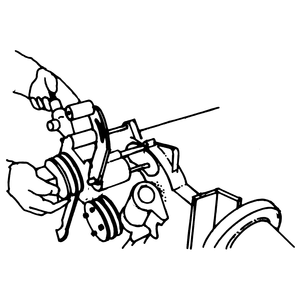
| Fig. 3: Removing the water pump
|
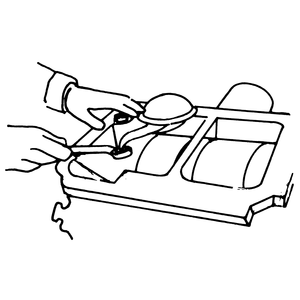
| Fig. 4: Removing the oil pump pick-up screen
|
| Fig. 5: Removing the eccentric shaft pulley
|
| Fig. 6: Removing the drive chain and sprockets

|
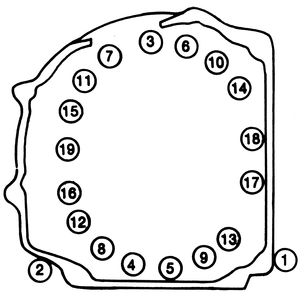
| Fig. 7: Loosen the tension bolts in the order shown
|
| Fig. 8: Removing the rear housing

|
| Fig. 9: Removing the seals from the rotor

|
NOTE: Because of the design of the rotary engine, it is not
practical to attempt component removal and installation. It is best to disassemble
and assemble the entire engine, or, go as far as necessary with the disassembly
procedure.
- Mount the engine on a stand.
- Remove the oil hose support bracket from the front housing.
- Disconnect the vacuum hoses, air hoses and remove the decel valve.
- Remove the air pump and drive belt. Remove the air pump adjusting bar.
- Remove the alternator and drive belt.
- Disconnect the metering oil pump connecting rod, oil tubes and vacuum sensing
tube from the carburetor.
- Remove the carburetor and intake manifold as an assembly.
- Remove the intake manifold gasket and two rubber rings. Discard them.
- Remove the thermal reactor and gaskets.
- Remove the spark plugs wires and distributor high tension leads, and remove
the distributor from the front cover.
- Remove the water pump and gasket.
- Invert the engine on the stand.
- Remove the oil pan and gasket.
- Remove the oil pump screen and gasket.
- Identify the front and rear rotor housing with a felt tip pen. These are
common parts and must be identified to be reassembled in their respective
locations.
- Turn the engine on the stand so that the top of the engine is up.
- Remove the engine mounting bracket from the front cover.
- Hold the flywheel with a flywheel holder and remove the eccentric shaft
pulley.
- Turn the engine on a stand so that the front end of the engine is up.
- Remove the front cover and gasket.
- Remove the O-ring from the oil passage on the front housing.
- Remove the oil slinger and distributor drive gear from the shaft.
- Unbolt and remove the chain adjuster.
- Remove the locknut and washer from the oil pump driven sprocket.
- Slide the oil pump drive sprocket and driven sprocket together with the
drive chain off the eccentric shaft and oil pump simultaneously.
- Remove the keys from the eccentric and oil pump shafts.
- Slide the balance weight, thrust washer and needle bearing from the shaft.
- Unbolt the bearing housing and slide the bearing housing, needle bearing,
spacer and thrust plate off the shaft.
- Turn the engine on the stand so that the top of the engine is up.
- If equipped with a manual transmission, remove the clutch pressure plate
and clutch disc. Loosen the pressure plate bolts evenly in small stages to
prevent distortion and possible injury from the pressure plate flying off.
Straighten the tab of the lockwasher and remove the flywheel nut. Remove the
flywheel with a puller.
- If equipped with an automatic transmission, remove the drive plate. Straighten
the tab on the lockwasher and remove the counterweight nut, while holding
the flywheel with a flywheel holder. Remove the counterweight using a puller.
- Working at the rear of the engine, loosen the tension bolts in the sequence
shown, and remove the tension bolts.
NOTE: Do not loosen the tension bolts one at a time. Loosen
the bolts evenly in small stages to prevent distortion.
- Lift the rear housing off the shaft.
- Remove any seals that are stuck to the rotor sliding surface of the rear
housing and reinstall them in their original locations.
- Remove all the corner seals, corner seal springs, side seal and side seal
springs from the rear side of the rotor. Mazda has a special tray which holds
all the seals and keeps them segregated to prevent mistakes during reassembly.
Each seal groove is marked to prevent confusion.
- Remove the two rubber seals and two O-rings from the rear rotor housing.
- Remove the dowels from the rear rotor housing.
- Lift the rear rotor housing away from the rear rotor, being very careful
not to drop the apex seals on the rear rotor.
- Remove each apex seal, side piece and spring from the rear rotor and segregate
them.
- Remove the rear rotor from the eccentric shaft and place it upside down
on a clean rag.
- Remove each seal and spring from the other side of the rotor and segregate
these.
- If some of the seals fall from the rotor, be careful not to change the original
position of each seal.
- Identify the rear rotor with a felt tip pen.
- Remove the oil seals and the springs. Do not exert heavy pressure at only
one place on the seal since it could be deformed. Replace the O-rings in the
oil seal when the engine is overhauled.
- Hold the intermediate housing down and remove the dowels from it.
- Lift off the intermediate housing being careful not to damage the eccentric
shaft. It should be removed by sliding it beyond the rear rotor journal on
the eccentric shaft while holding the intermediate housing up and, at the
same time, pushing the eccentric shaft up.
- Lift out the eccentric shaft.
- Repeat the above procedures to remove the front rotor housing and front
rotor.

