Previous Next

OVERHAUL

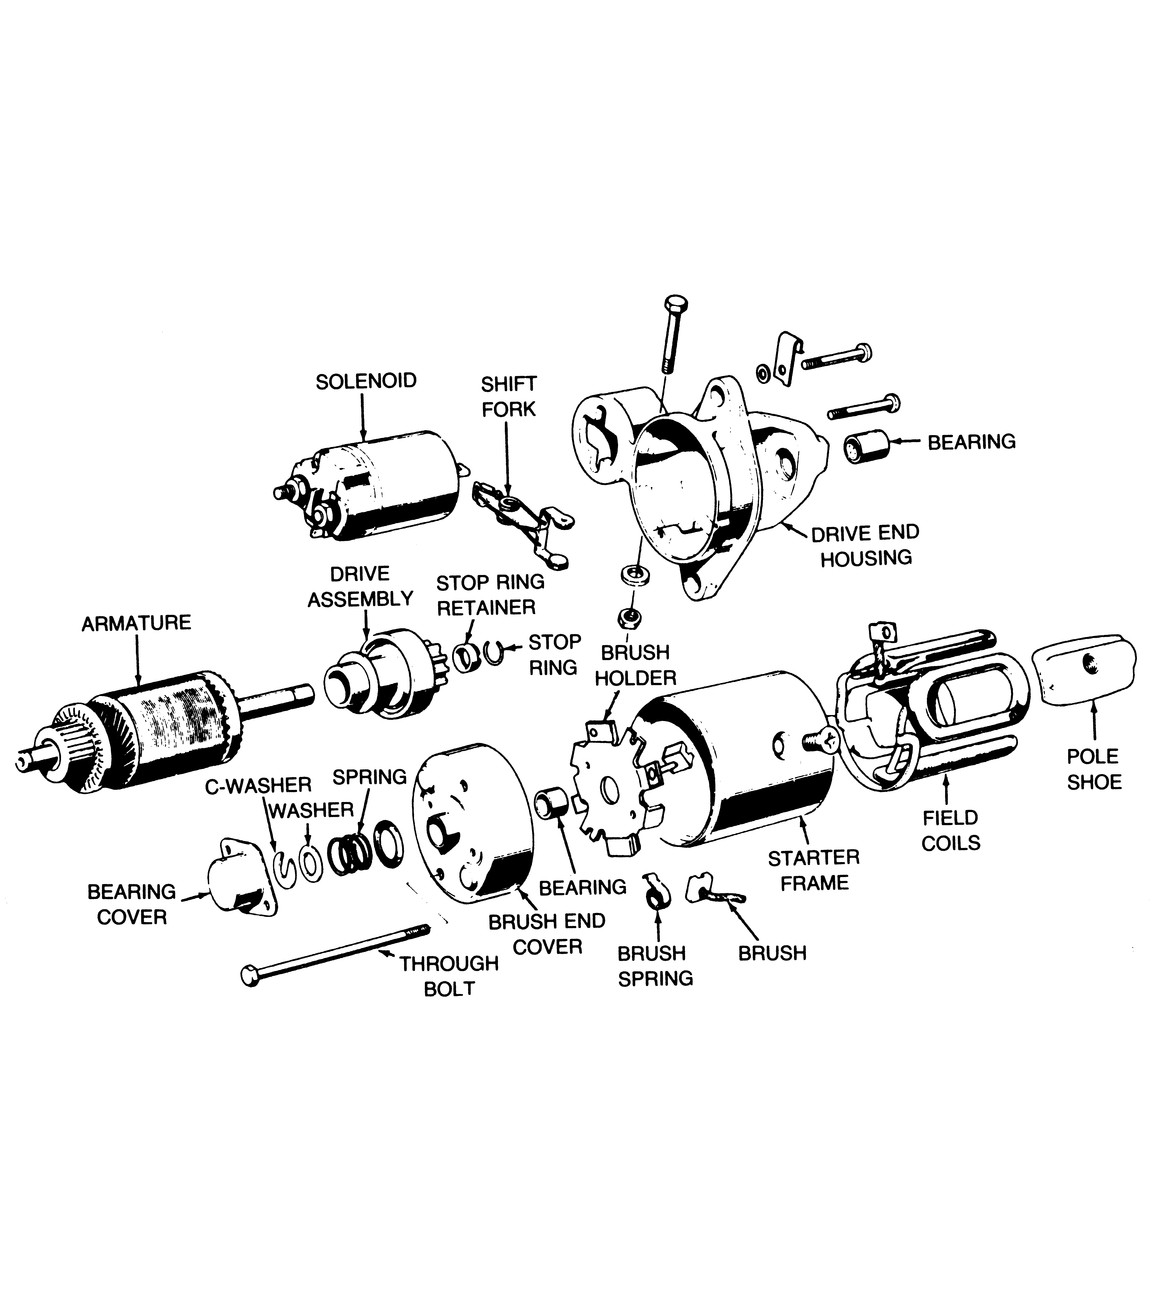
Fig. 1: Exploded view of the starter used on 1972–76 engines

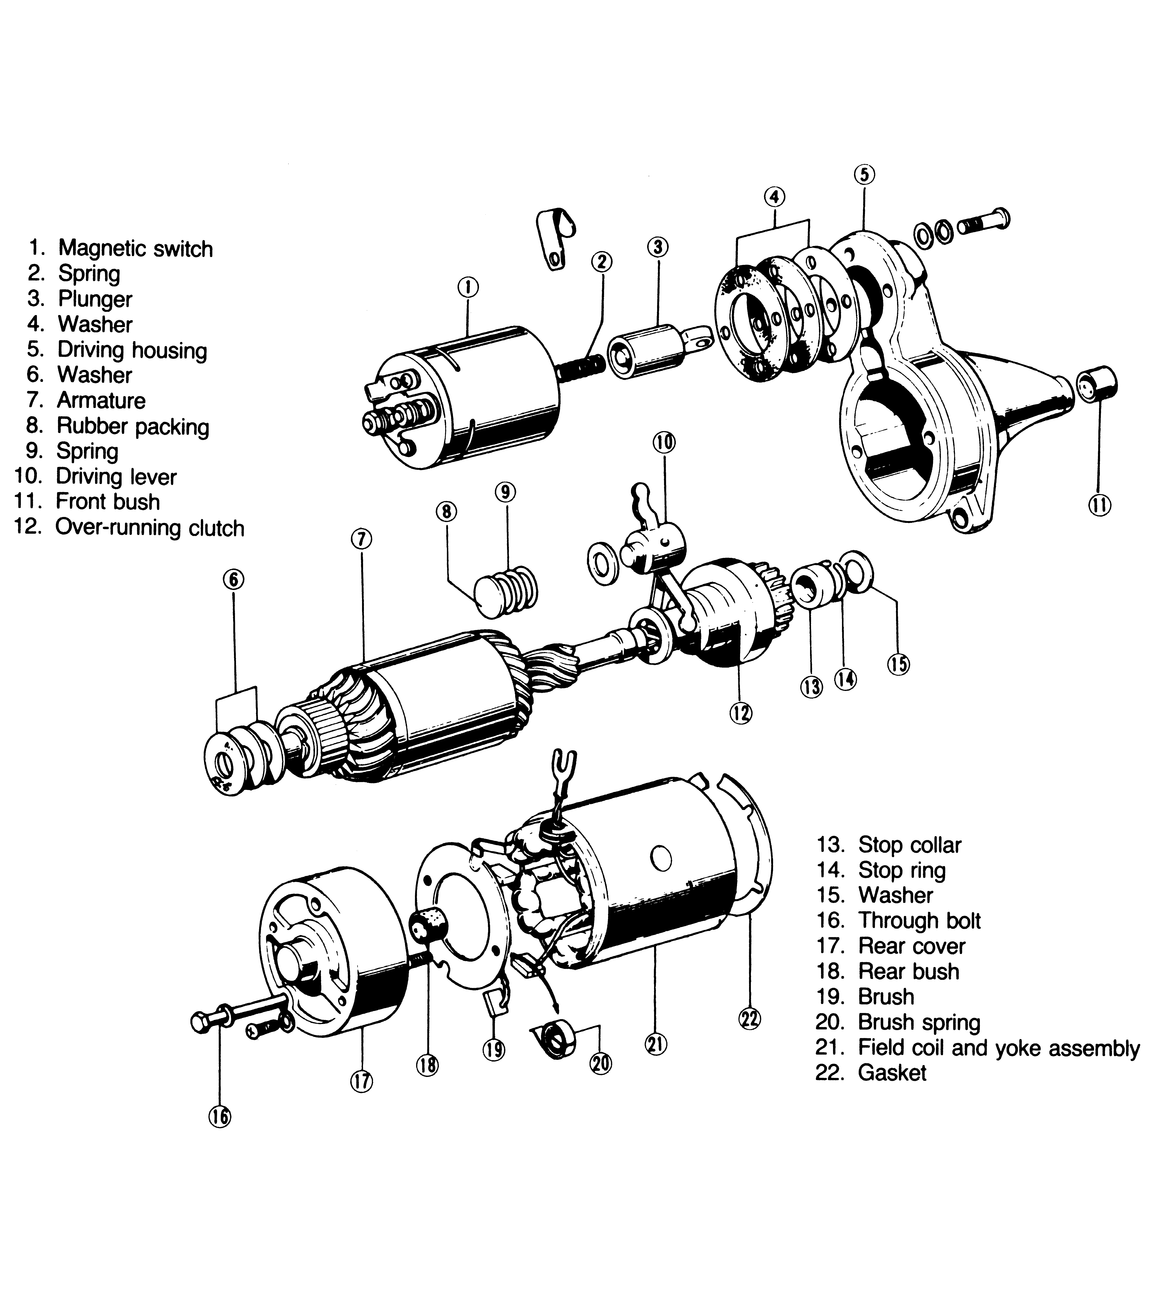
Fig. 2: Exploded view of the starter used on 1979–81 engines

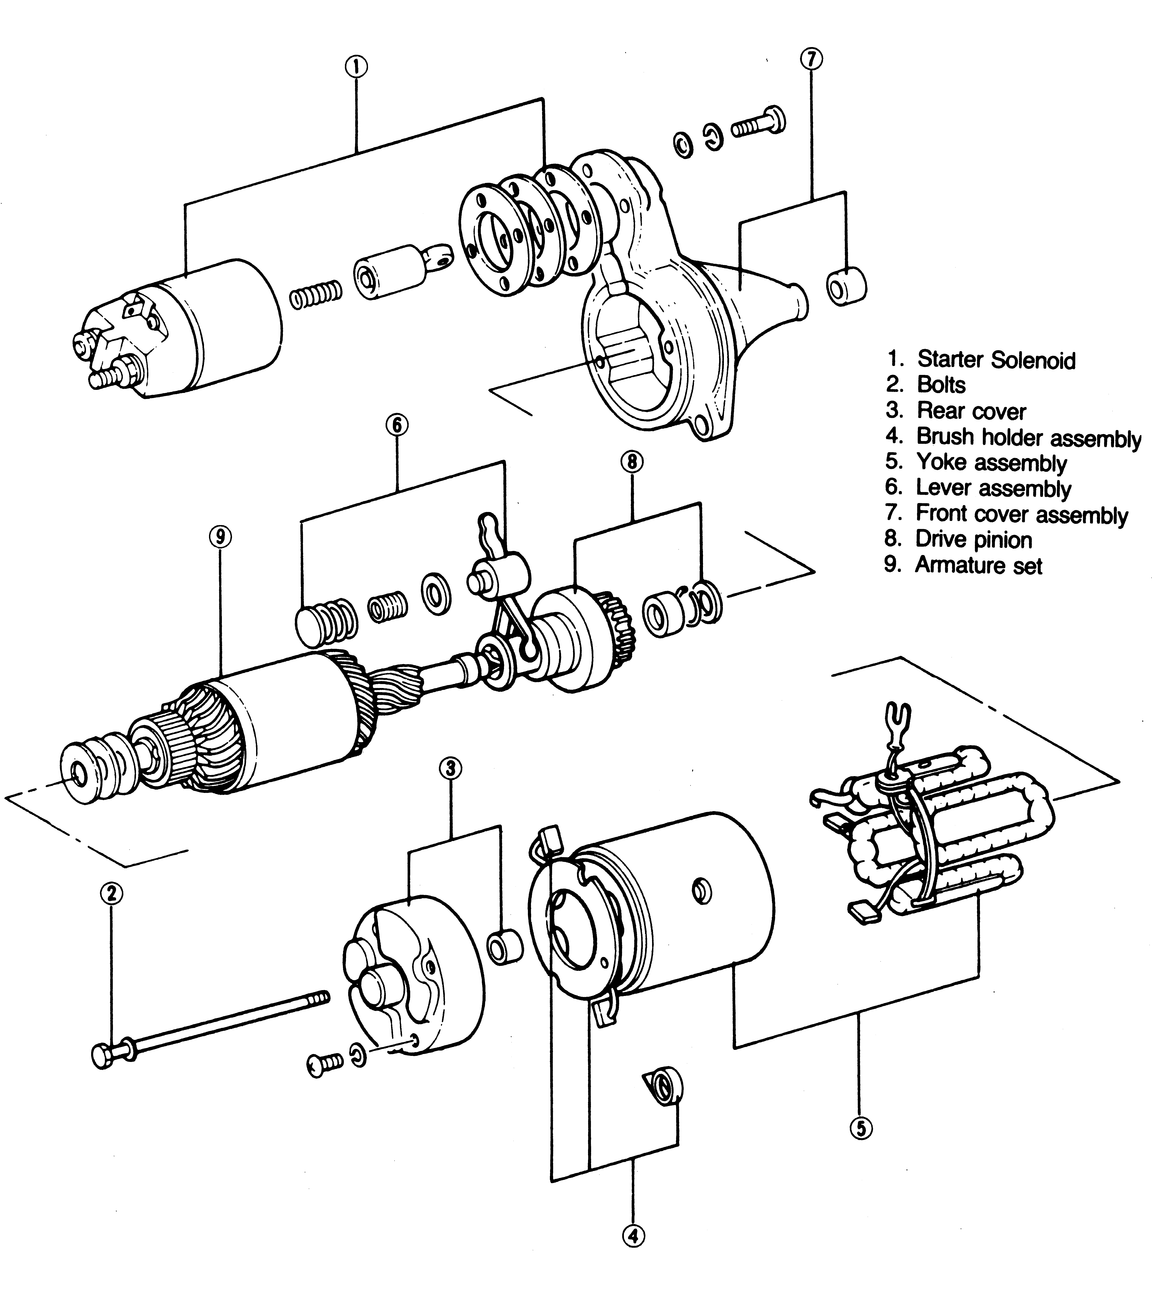
Fig. 3: Exploded view of the direct drive starter used on 1982–86 gasoline engines

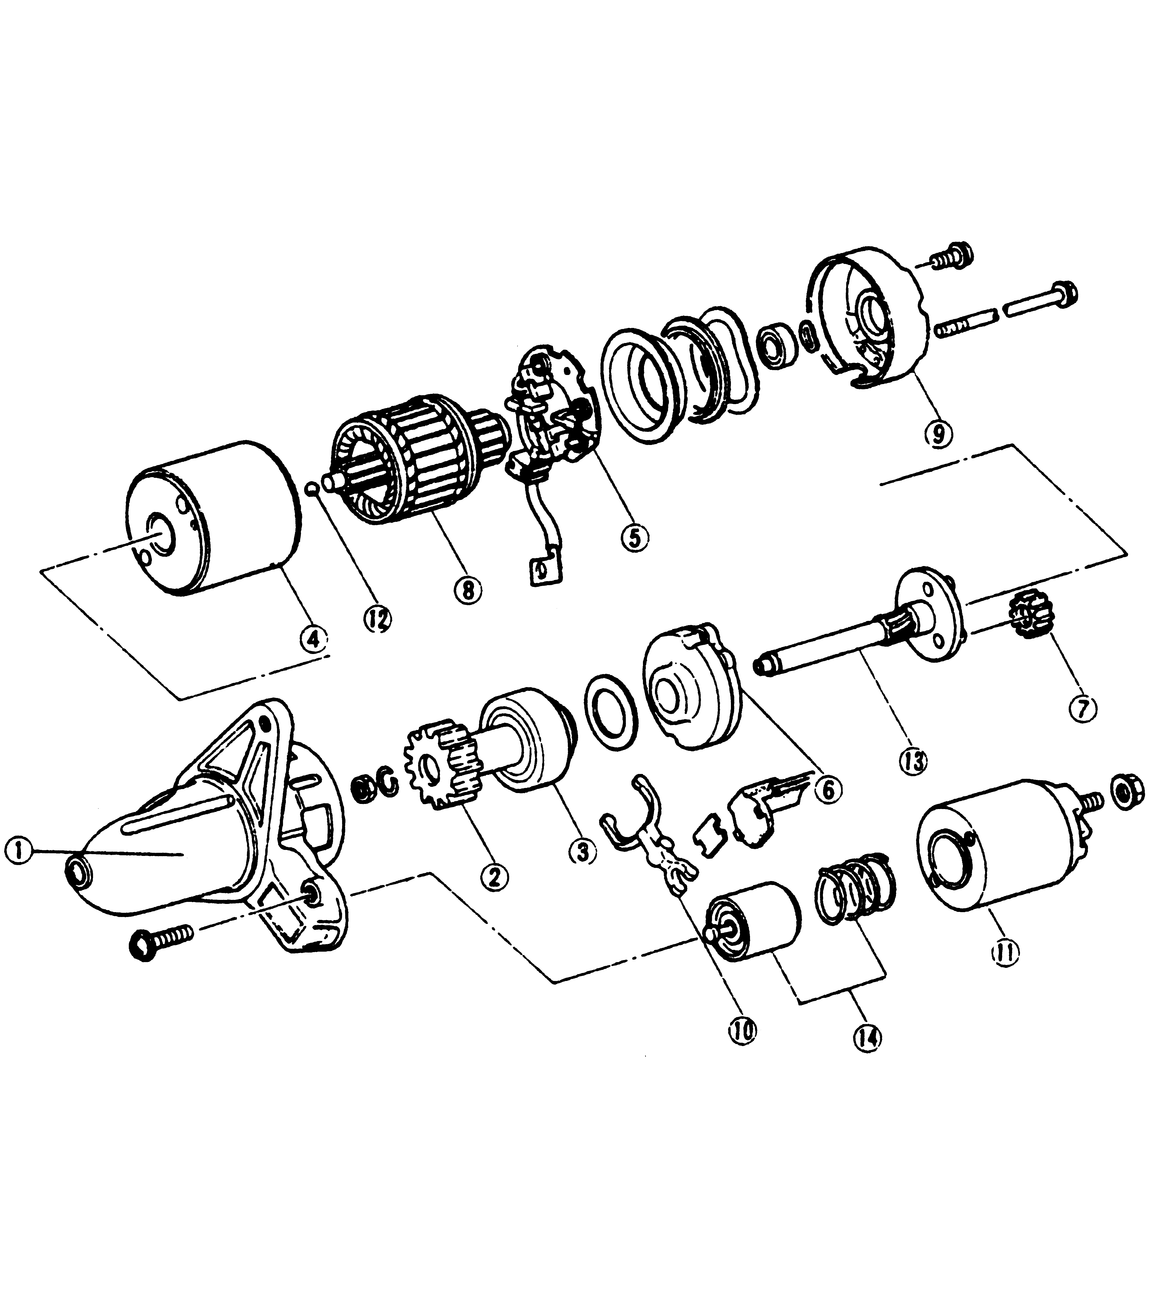
Fig. 4: Exploded view of the starter used on diesel engines

Fig. 5: Exploded view of the gear reduction type starter used on some gasoline engines

1,586cc, 1,796cc, 1,970cc and 1,998cc Engines
  1. Remove the starter from the truck.
  2. Disconnect the field strap from the solenoid.
  3. Remove the screws attaching the solenoid to the drive end housing. Disengage the solenoid plunger hook from the shift fork and remove the solenoid.
  4. Remove the shift fork pivot bolt, nut and lockwasher.
  5. Remove the through-bolts and separate the drive end housing from the starter frame. At the same time, disengage the shift fork from the drive assembly.
  6. Remove the two screws attaching the brush end bearing cover to the brush end cover.
  7. Remove the C-washer, washer and spring from the brush end of the armature shaft.
  8. Pull the brush end cover from the starter frame.
  9. Slide the armature from the starter frame and brushes.
  10. Slide the drive stop-ring retainer toward the armature and remove the stop-ring. Slide the retainer and drive assembly off the armature shaft.
  11. Remove the field brushes from the brush holder and separate the brush holder from the starter frame.
  12. Position the drive assembly on the armature shaft.
  13. Position the drive stop-ring retainer on the armature shaft and install the drive stop-ring. Slide the stop-ring retainer over the stop-ring to secure the stop-ring on the shaft.
  14. Position the armature in the starter frame. Install the brush holder on the armature and starter frame. Install the brushes in the brush holder.
  15. Install the drive end housing on the armature shaft and starter housing. Engage the shift fork with the starter drive assembly as you move the drive end housing toward the starter frame.
  16. Install the brush end cover on the starter frame making sure that the rear tabs of the brush holder are aligned with the through-bolt holes.
  17. Install the through-bolts.
  18. Install the rubber washer, spring, washer and C-washer on the armature shaft at the brush end. Install the brush end bearing cover on the brush end cover and install the attaching screws. If the brush end cover is not properly positioned, the bearing cover screws cannot be installed.
  19. Align the shift fork with the pivot bolt hole and install the pivot bolt, lockwasher and nut. Tighten the nut securely.
  20. Position the solenoid on the drive end housing. Be sure that the solenoid plunger hook is engaged with the shift fork.
  21. Install the two solenoid retaining screws and washers.
  22. Apply 12v to the solenoid S terminal (ground the M terminal) and check the clearance between the starter drive and the stop-ring retainer. The clearance should be 2.0–5.0mm (0.0787–0.1969 in.). If not, the solenoid plunger is not properly adjusted. The clearance can be adjusted by inserting an adjusting shim between the solenoid body and drive end housing.
  23. Install the field strap and tighten the nut.
  24. Install the starter. Check the operation of the starter.
2,209cc Engine
  1. Remove the wire connecting the starter solenoid to the starter.
  2. Remove the two screws holding the solenoid and, pulling out, unhook it from the engagement lever.
  3. Remove the two through bolts in the end of the starter and remove the two bracket screws. Pull off the rear bracket.

    NOTE: Since the conical spring washer is contained in the rear bracket, be sure to take it out.

  4. Remove the yoke and brush holder assembly while pulling the brush upward.
  5. Pull the armature assembly out of the mounting bracket.
  6. On the side of the armature mounting bracket there is a small dust shield held on by two screws, remove the shield. Remove the snapring and washer located under the shield.
  7. Remove the remaining bolts in the mounting bracket and separate the reduction case.

    NOTE: Several washers will come out of the reduction case when you separate it. These adjust the armature end-play: do not lose them.

  8. Remove the reduction gear, lever and lever spring from the front bracket.
  9. Use a brass drift or a deep socket to knock the stopper ring on the end of the shaft in toward the pinion. Remove the snapring. Remove the stopper, pinion and pinion shaft assembly.
  10. Remove the ball bearings at both ends of the armature.

    NOTE: The ball bearings are pressed into the front bracket and are not replaceable. Replace them together with the bracket. Inspect the pinion and spline teeth for wear or damage. If the pinion drive teeth are damaged, visually check the engine flywheel ring gear. Check the flywheel ring gear by looking through the starter motor mounting hole. It will be necessary to turn the engine over by hand to completely inspect the ring gear. Check the starter brushes for wear. Their service limit length is 11.5mm (0.4528 in.). Replace if necessary.

  11. Be sure to replace all the adjusting and thrust washers that you removed. When replacing the rear bracket, fit the conical spring pinion washer with its convex side facing out. Make sure that the brushes seat themselves on the commutator. Assemble the starter.

Previous Next