- Disconnect the battery ground.
- Drain the cooling system.
CAUTION
When draining engine coolant, keep in mind that cats and dogs are attracted
to ethylene glycol antifreeze and could drink any that is left in an uncovered
container or in puddles on the ground. This will prove fatal in sufficient
quantity. Always drain coolant into a sealable container. Coolant should
be reused unless it is contaminated or is several years old.
- Remove the distributor.
- Remove the fan shroud and fan.
- Remove the alternator.
- Disconnect the air injection pipes.
- Remove the fan pulley, hub and bracket.
- If so equipped, remove the air conditioning compressor drive belt.
- If so equipped, remove the power steering pump drive belt.
- Remove the crankshaft pulley and baffle plate.
- Remove the upper, then the lower, belt covers.
- Turn the crankshaft so that the A mark on the camshaft
pulley is at the top, aligned with the notch in the front housing.
- Loosen the tensioner lockbolt and remove the tensioner spring.
- Mark the forward rotation of the belt with paint to avoid confusion upon
installation. Remove the belt.
- Unbolt and remove the crankshaft sprocket.
- Drain the oil.
CAUTION
The EPA warns that prolonged contact with used engine oil may cause a number
of skin disorders, including cancer! You should make every effort to minimize
you exposure to used engine oil. Protective gloves should be worn when changing
the oil. Wash your hands and any other exposed skin areas as soon as possible
after exposure to used engine oil. Soap and water, or waterless hand cleaner
should be used.
- Remove the skid plate.
- Place a floor jack under the front of the engine at the crankshaft pulley
and take up the weight of the engine. Or use a shop crane to support the engine.
- Remove the crossmember.
- Remove the cotter pin and nut and, with a puller, disconnect the idler arm
from the center link.
- Remove the engine mount gusset plates from the sides of the engine.
- Remove the bell housing front cover.
- Unbolt and remove the oil pan. A flat tipped screwdriver may be used to
break the seal between the pan and block.
- Remove the oil pick-up tube.
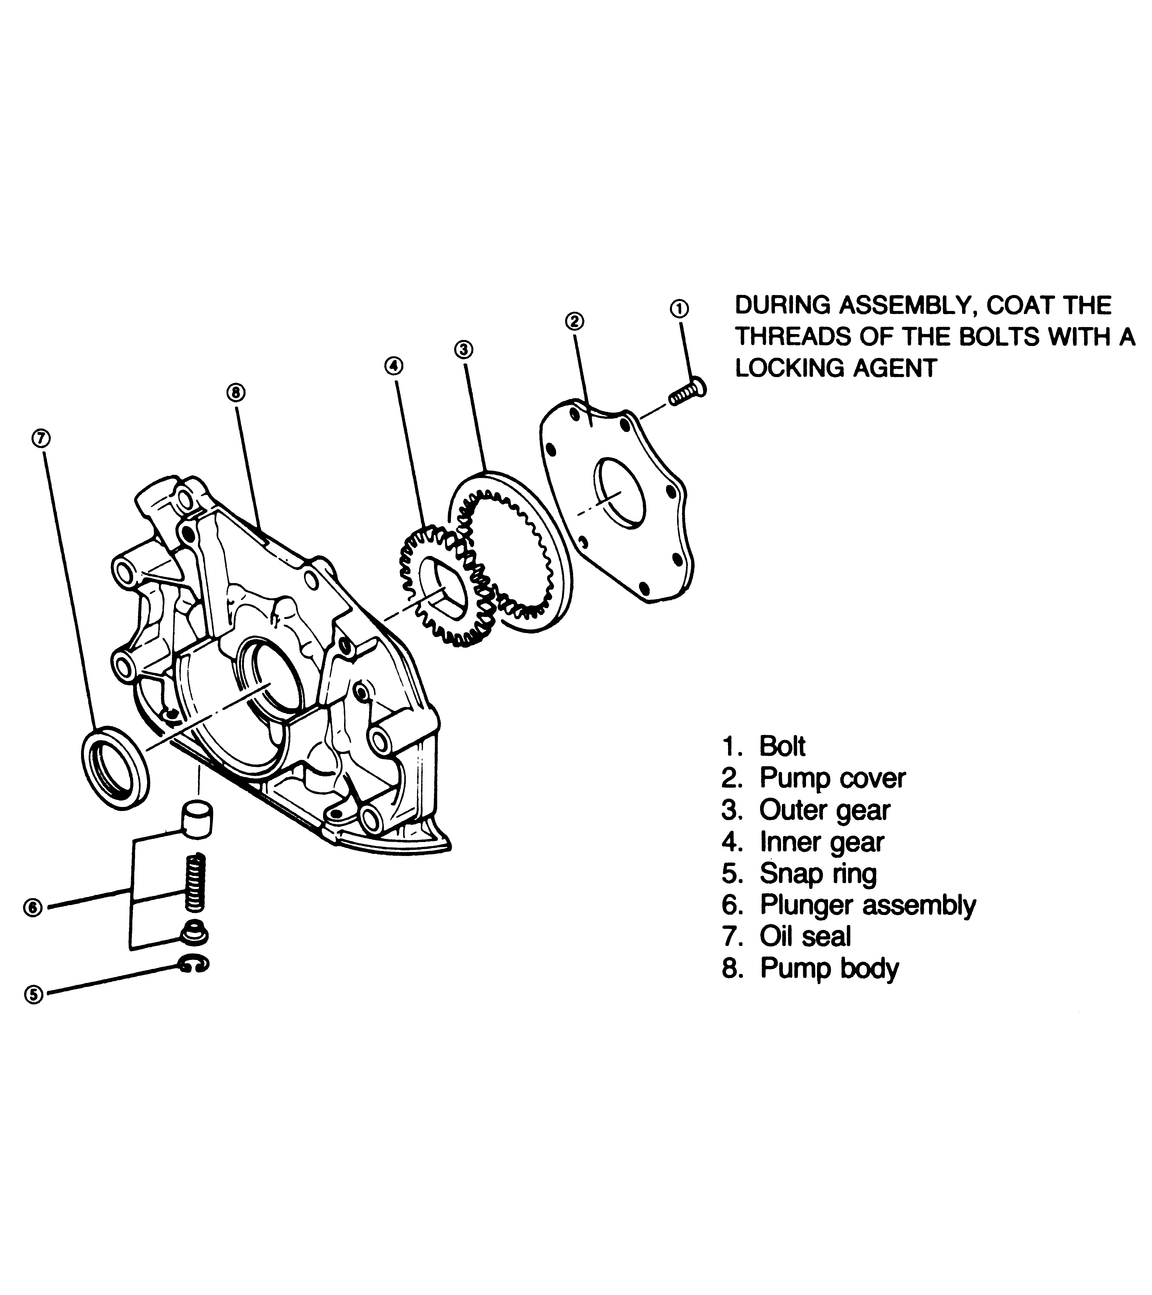
- Unbolt and remove the oil pump. To install:
- Apply a thin coating of grease to the O-ring and install it in its recess
in the pump body.
- Apply a thin bead of RTV silicone sealer to the pump mounting surface.
- Coat the oil seal lip with clean engine oil and install the pump. Torque
the bolts to 14–19 ft. lbs.
- Clean all the gasket surfaces. Straighten and portion of the pan rim that
is bent.
- Clean the oil pan, oil pump pickup tube and oil pump screen.
- If you are using a gasket, install a new oil pan gasket coated with oil
resistant sealer. Place RTV silicone sealer at the points shown in the accompanying
illustration. If you are using RTV silicone gasket material in place of a
conventional gasket, run a 1⁄8 in.
bead around the rim of the pan, going inboard of each bolt hole. Tighten the
pan bolts within 30 minutes of application. Tighten the pan bolts to 5–9
ft. lbs.
- Install the bell housing front cover. Torque the bolts to 20 ft. lbs.
- Install the engine mount gusset plates on the sides of the engine. Torque
the bolts to 35 ft. lbs.
- Install the idler arm on the center link. Torque the nut to 30 ft. lbs.
Install a new cotter pin.
- Install the crossmember.
- Remove the floor jack or shop crane used to support the engine.
- Install the skid plate.
- Install the crankshaft sprocket.
- Replace timing the belt if it has been contaminated by oil or grease, or
shows any sign of damage, wear, cracks or peeling.
- To ease installation of the belt, remove all the spark plugs.
- Make sure that the timing mark on the camshaft is aligned as described above,
and that the timing mark (notch) on the crankshaft sprocket is aligned with
the triangular shaped mark on the front housing.
- Install the tensioner and spring, positioning the tensioner all the way
to the intake manifold side and temporarily secure it there with the lockbolt.
- Install the belt onto the sprockets from YOUR right side.
If you are reusing the original belt, make sure you follow the directional
mark previously made.
- Loosen the lockbolt so that the tensioner applies tension to the belt.
- Turn the crankshaft two full revolutions in the direction of normal rotation.
This will apply equal tension to all points of the belt.
- Make sure that the timing marks are still aligned. If not, repeat the belt
installation procedure.
- Tighten the tensioner lockbolt to 30–35 ft. lbs.
- Measure the timing belt tension by pressing on the belt at the midpoint
of the longest straight run. Belt deflection should be 11–13mm (0.43–0.51
in.). If not, repeat the belt adjustment procedure, above.
- Install the upper, then the lower, belt covers. Torque the belt cover bolts
to 80 in. lbs.; the fan bracket bolts to 40 ft. lbs.
- Install the crankshaft pulley and baffle plate.
- Install the power steering pump drive belt.
- Install the air conditioning compressor drive belt.
- Install the fan pulley, hub and bracket.
- Install the air injection pipes.
- Install the alternator.
- Install the fan shroud and fan.
- Install the distributor.
- Fill the engine with the proper amount of oil.
- Fill the cooling system.
- Install the battery ground cable.
When installing the drive belts on the various accessories, check the belt
deflection as follows:
New: 7–8mm (0.275–0.315 in.)
Used: 8–9mm (0.315–0.354 in.)
- Power steering pump
New: 9–11mm (0.354–0.433 in.)
Used: 11–13mm (0.433–0.510 in.)
- Air conditioning compressor
New: 10–12mm (0.394–0.472 in.)
Used: 12–14mm (0.472–0.552 in.)