Previous Next

Timing Chain Cover

REMOVAL & INSTALLATION

1,586cc, 1,796cc and 1,970cc Engines

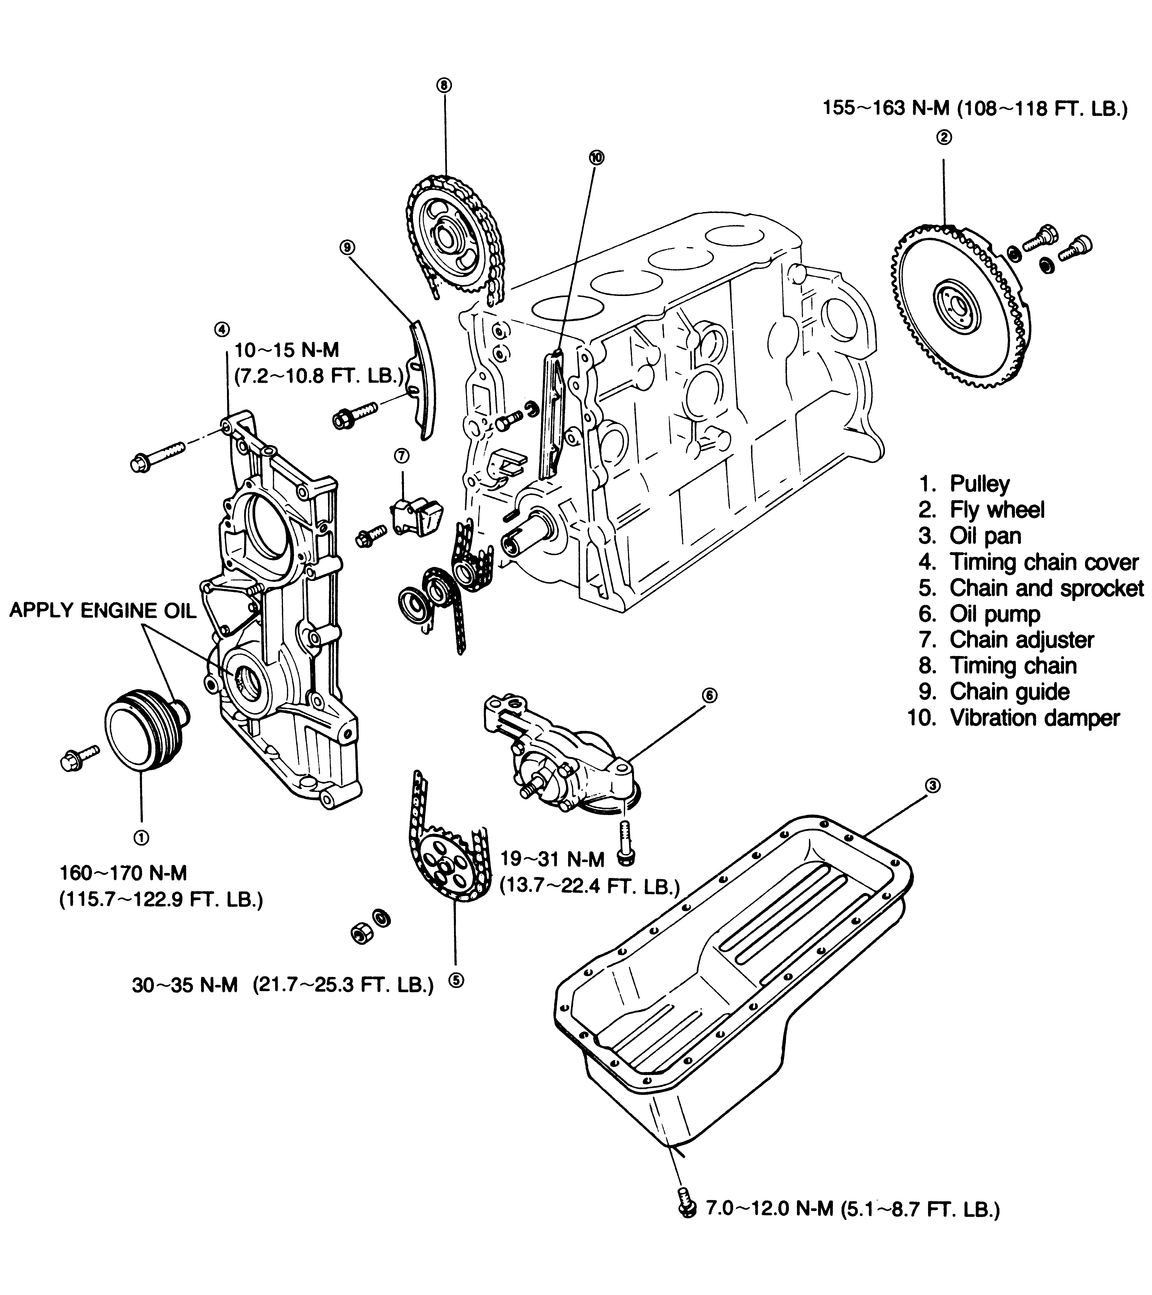
Fig. 1: Exploded view of the timing components on the 1,586cc, 1,796cc and 1,970cc engines

  1. Scribe alignment marks on the hood hinges and remove the hood.
  2. Drain the cooling system.

    CAUTION
    When draining engine coolant, keep in mind that cats and dogs are attracted to ethylene glycol antifreeze and could drink any that is left in an uncovered container or in puddles on the ground. This will prove fatal in sufficient quantity. Always drain coolant into a sealable container. Coolant should be reused unless it is contaminated or is several years old.

  3. Disconnect the upper and lower radiator hose. Remove the radiator.
  4. Remove the accessory drive belts.
  5. Remove the crankshaft pulley and the water pump.
  6. Remove the cylinder head-to-front cover bolt.
  7. Raise and support the truck.
  8. Remove the engine skid plate.
  9. Disconnect the emission line from the oil pan. Drain the oil from the engine.

    CAUTION
    The EPA warns that prolonged contact with used engine oil may cause a number of skin disorders, including cancer! You should make every effort to minimize you exposure to used engine oil. Protective gloves should be worn when changing the oil. Wash your hands and any other exposed skin areas as soon as possible after exposure to used engine oil. Soap and water, or waterless hand cleaner should be used.

  10. Remove the oil pan.
  11. Remove the alternator and bracket and lay the alternator aside.
  12. Remove the steel tube from the front of the engine.
  13. Unbolt and remove the front cover.
  14. Clean all the gasket mating surfaces.
  15. Clean the crankshaft pulley. To install:
  16. Use contact cement to cement a new front cover gasket on the block.
  17. Install the front cover and torque the attaching bolts to specifications.
  18. Install the air pump (if equipped).
  19. Install the alternator and bracket.
  20. Install the water pump and a new gasket. Torque the bolts to specifications.
  21. Connect the by-pass hose and heater hose to the water pump.
  22. Install the crankshaft pulley and attaching bolt. Torque the bolt to specifications.
  23. Install the alternator belts, and the water pump pulley.
  24. Install the fan. Adjust the tension of the belt(s).
  25. Install the radiator and the upper and lower hoses.
  26. Install the air cleaner.
  27. Install the oil pan and the emission line.
  28. Install the engine skid plate.
  29. Lower the truck to the ground.
  30. Fill the engine with oil and fill the cooling system. Run the engine and check for leaks.
  31. Install the hood.
2,209cc Diesel Engine

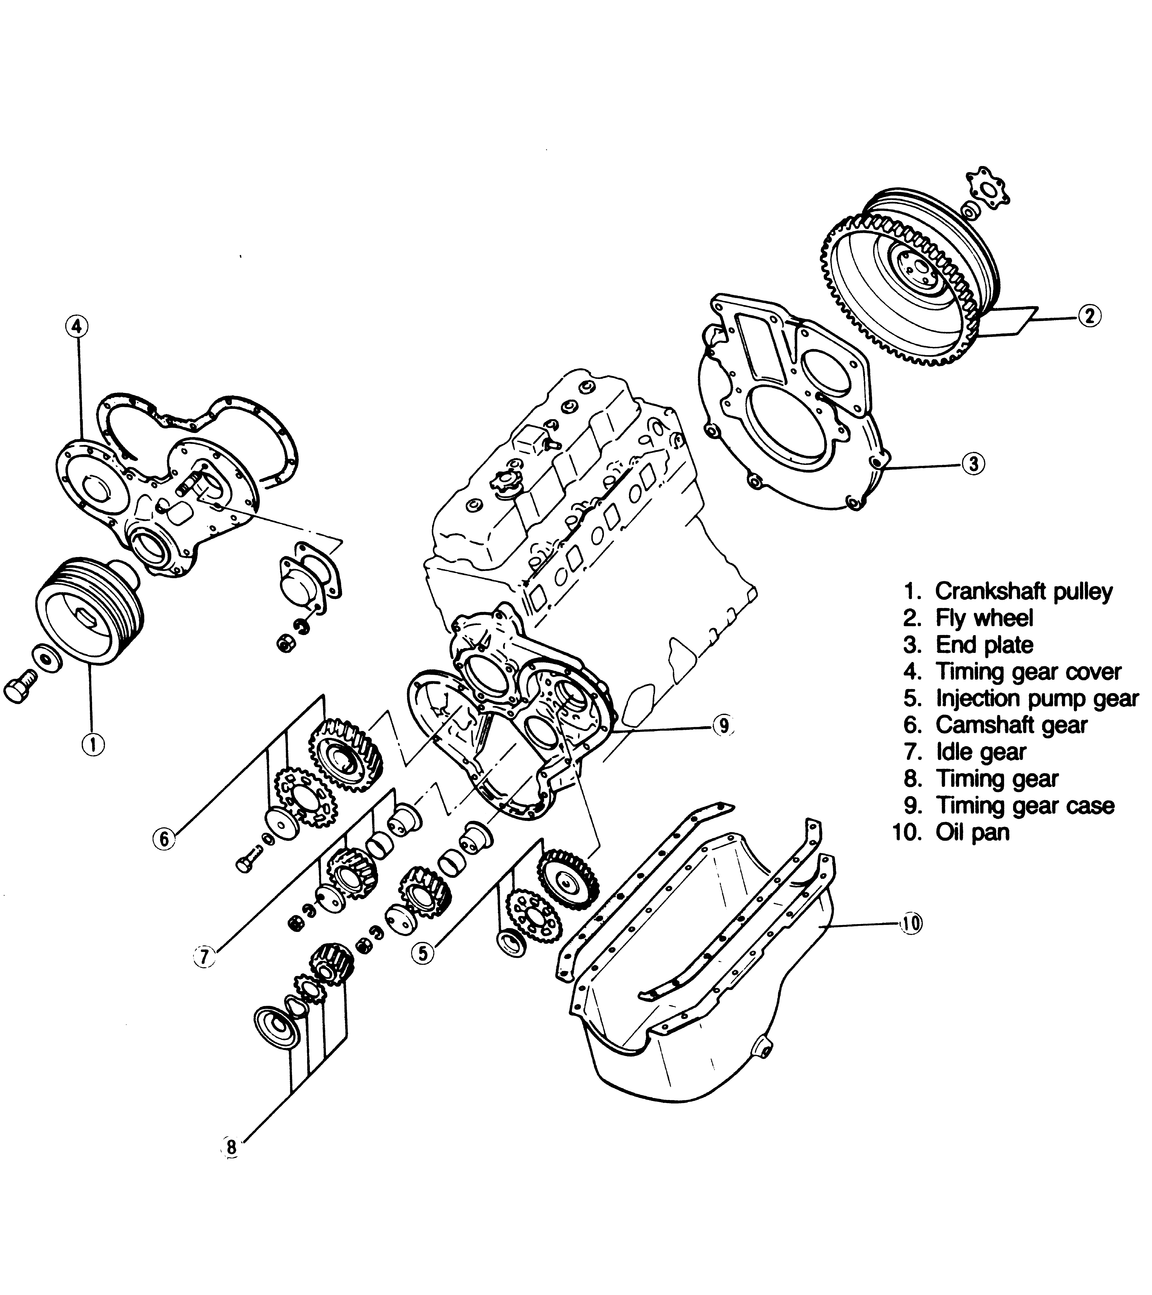
Fig. 2: Exploded view of the timing components on the diesel engine

  1. Disconnect the battery ground.
  2. Drain the cooling system.

    CAUTION
    When draining engine coolant, keep in mind that cats and dogs are attracted to ethylene glycol antifreeze and could drink any that is left in an uncovered container or in puddles on the ground. This will prove fatal in sufficient quantity. Always drain coolant into a sealable container. Coolant should be reused unless it is contaminated or is several years old.

  3. Remove the fan and fan shroud.
  4. Remove all drive belts from the engine.
  5. Remove the power steering pump and its bracket, and position it out of the way, without disconnecting the hoses.
  6. Remove the water pump.
  7. Remove the crankshaft pulley bolt and, using a puller, remove the pulley.

    Unbolt and remove the timing gear cover. Discard the gasket.

  8. Installation is the reverse of removal. Make sure that the gasket mating surfaces are clean. Use a new gasket coated with sealer. Tighten the timing gear cover bolts to 12–17 ft. lbs.; the crankshaft pulley bolts to 150–180 ft. lbs.

Previous Next