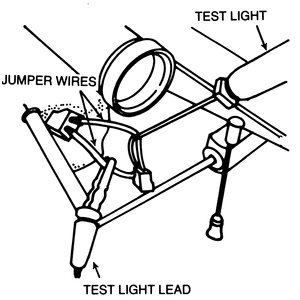
- Disconnect the hose which runs from the air cleaner to the combination valve
at the air cleaner end.
- Start the engine and run it at curb idle.
- There should be no vacuum present at the end of the hose which you disconnect
in Step 1.
- Turn the engine off.
- Disconnect the hose which runs from the coasting valve portion of the combination
valve to the intake manifold from the coasting valve end and plug up the port.
- Operate the engine at idle.
- Disconnect the anti-afterburn valve solenoid connector.
- Check for vacuum at the end of the hose which you disconnect in Step 1;
there should be vacuum present. If not, the anti-afterburn valve is defective.
- Turn the engine off. Reconnect the anti-afterburn valve electrical leads
and the hose to the coasting valve.
- Disconnect the intake manifold-to-anti-afterburn valve vacuum line at the
valve end, and plug the vacuum fitting on the valve.
- Start the engine and allow it to idle.
- Disconnect the coasting valve solenoid at the multiconnector.
- Hold your hand over the end of the vacuum line which you disconnected in
Step 10. Vacuum should be felt; if not, replace the defective coasting valve.
- Turn the engine off and reconnect the leads and hoses which were disconnected
above.
| Fig. 1: View of the idle switch (arrow), located on the
carburetor

|
- Unfasten the idle switch leads.
- Connect the test meter to the switch terminals.
- With the engine at idle, the meter should indicate a complete circuit.
- Depress the plunger on the idle switch; the circuit should be broken (on
meter reading). If the idle switch is not functioning properly, replace it
with a new one.
NOTE: Start this test with the coolant temperature below 68°F
(20°C).
- Disconnect the electrical lead from the temperature switch.
- Connect a test light between one terminal of the switch and a 12v battery.
Ground the other terminal.
- The test light should light.
- Start the engine and allow it to warm up. Once the engine reaches normal
operating temperature, the test light should go out.
- Replace the switch if it doesn't work as outlined.
- Working underneath the instrument panel, disconnect the lead at the back
of the choke switch.
- Connect an ohmmeter to the terminals on the choke switch side of the connector.
- With the choke knob on (off), the meter should show continuity (resistance
reading).
- Pull the choke knob out, about 1⁄2 "
for manual transmission trucks or 1" for automatics. The meter should show
no continuity (read zero).
- Replace the switch if defective.
| Fig. 2: View of the anti-afterburn valve, located on
the intake manifold
|
- Remove the outlet hose from the anti-afterburn valve.
- Hold a hand over the outlet fitting and raise the engine rpm. Quickly release
the accelerator. Air should flow for approximately three seconds. If the valve
passes air for more than three seconds, or does not pass air at all, it should
be replaced.
| Fig. 3: View of the coasting richer valve, located on
the carburetor

|
- Remove the coasting richer valve from the carburetor.
- Connect the coasting richer valve to the battery.
- As power is applied to the valve, the solenoid plunger should be pulled
into the valve body.
- Reinstall the coasting richer valve. Connect a test light.
- Raise the rear wheels and support the truck on stands. Block the front wheels.
- Start the engine and raise the engine speed above 30 mph. Release the accelerator
pedal. The test light should come ON and remain ON until the speed falls below
17–23 mph.
- If the system is operating properly, no further tests are required. If not,
proceed with the other tests.
- Remove the stands and lower the truck. Disconnect the test light.
The clutch switch is activated by the clutch pedal. When checking the circuit,
the test light should be ON when the clutch pedal is fully released, and should
be OFF when the clutch pedal is fully depressed.
| Fig. 4: Checking the accelerator switch with a test light — on
1972–78 trucks, the switch is located on the carburetor; on 1979
and later trucks, the switch is located on the arm of the accelerator
pedal
|
The accelerator switch is actuated by a throttle lever link on the carburetor
through 1978; the switch is located on the accelerator pedal on 1979 and later
models. When checking the switch with a circuit tester, the test light should
be ON when the accelerator pedal is fully released and should be OFF when the
pedal is depressed.
- Remove the instrument cluster and attach a test light to the speedometer
switch.
- Reconnect the speedometer cable and ground wire.
- Raise both wheels off the ground and support the truck on stands. Block
the front wheels.
- Start the engine.
- Depress the accelerator pedal to accelerate the engine and confirm that
the speed switch is ON at speeds of 17–23 mph and OFF at speeds below
17–23 mph.
- If not, replace the switch.
- Lower the truck and remove the test light.Reinstall the instrument cluster.
Check the speed switch relay with a test light to be sure that it is operating
at 17–23 mph.
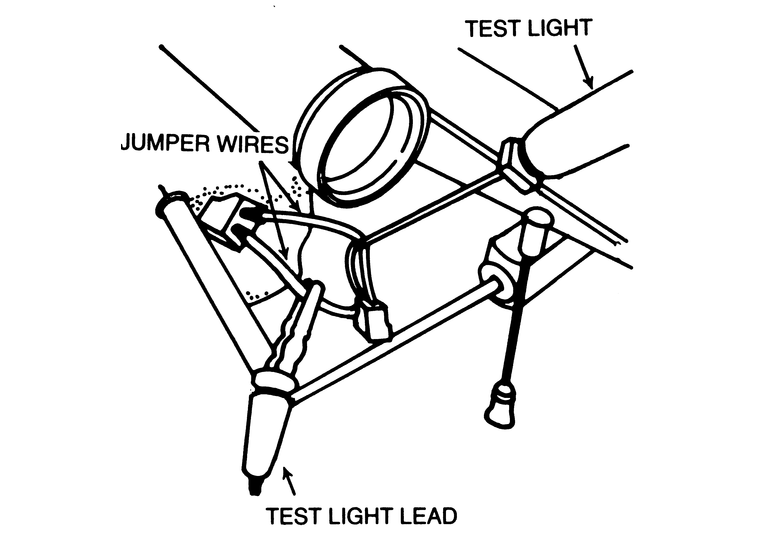
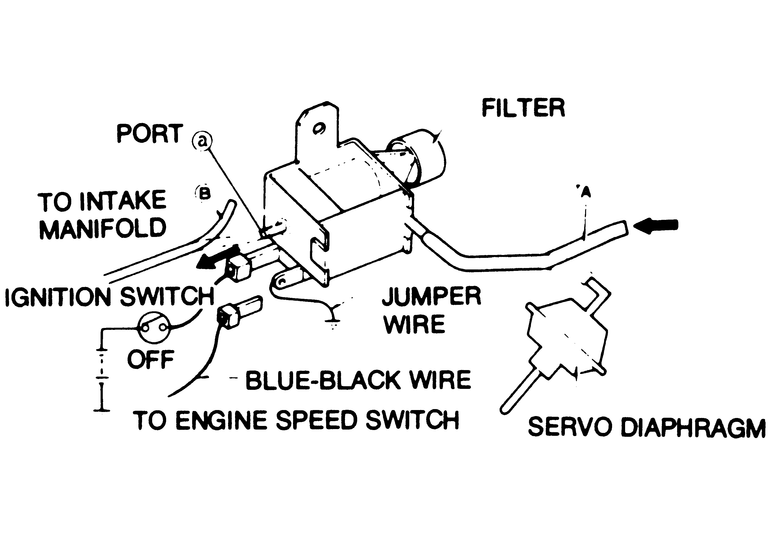
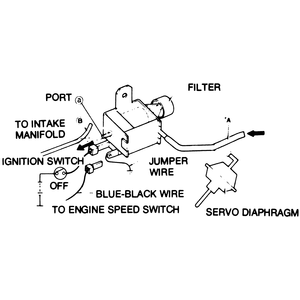
| Fig. 5: Three-way solenoid valve check — with
ignition switch OFF
|
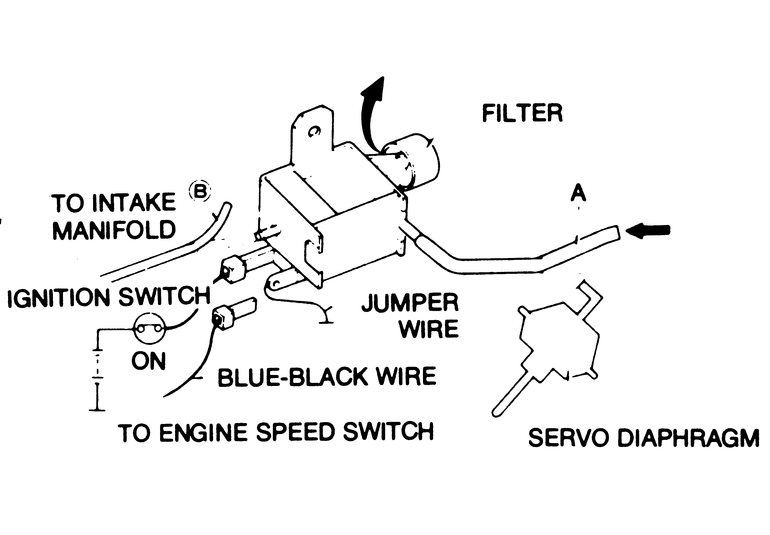
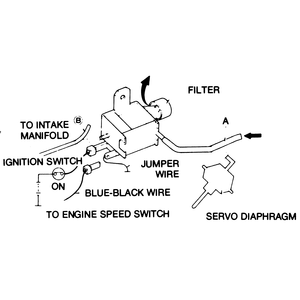
| Fig. 6: Three-way solenoid valve check — with
ignition switch ON
|
- Start the engine and allow it to reach normal operating temperature. Check
the idle speed and adjust as necessary.
- Disconnect the wire at the three way solenoid valve. This wire is coded
either black with a white stripe or brown with a red stripe on some models.
- When the wire is disconnected, the engine speed should increase to 1,000
rpm for 49 States trucks, or 1,100 rpm for California models.
- If the engine speed does not increase, the three way solenoid valve or the
servo diaphragm is not operating correctly. Check the servo diaphragm using
the following procedure; if the servo diaphragm is operating correctly, the
three way valve is faulty and should be replaced.
- Start the engine and set the idle speed to specification.
- Stop the engine and disconnect the vacuum line between the vacuum control
valve and the diaphragm at the diaphragm.
- Disconnect the vacuum line between the intake manifold and the vacuum control
valve at the manifold on models through 1978. On 1979 and later models, disconnect
the vacuum hose at the vacuum amplifier and the vacuum hose at the three way
solenoid valve. Connect the vacuum hose from the servo diaphragm to the vacuum
amplifier so that the intake manifold vacuum is applied directly to the servo
diaphragm.
- Disconnect and plug the vacuum line between the carburetor and distributor.
- Connect a vacuum line from the intake manifold to the servo diaphragm on
models through 1978.
- Connect a tachometer and start the engine. The engine should idle at 1,300–1,500
rpm for models through 1978, or 900–1,100 rpm, 1979 (1,000–1,200
rpm for 1979 and later California models). If the engine speed is not correct,
adjust by means of the servo diaphragm adjusting screw. If the correct speed
is not obtainable, replace the diaphragm.
- Disconnect the vacuum hose between the vacuum control valve and the intake
manifold at the manifold.
- Attach a vacuum gauge in the line using a T-fitting.
- Connect a tachometer to the engine. Start the engine and raise the speed
to 3,000 rpm, then suddenly release the throttle. The vacuum reading should
rise above 21.3 in.Hg, drop to that figure and hesitate there for one or two
seconds, then drop to the normal idle vacuum of 16–18 in.Hg. Note that
these readings are for sea level, and should be corrected accordingly.
- If the vacuum reading is not within specification, adjust the vacuum control
valve by turning the adjusting screw in the top of the valve. If the correct
reading is unobtainable, replace the valve.
- Disconnect the vacuum hose between the vacuum switch and the vacuum control
valve.
- Using a T-fitting, connect a vacuum gauge between the vacuum switch and
an external vacuum source.
- Raise the vacuum reading above 8 in.Hg, then allow the vacuum to drop. The
switch should click at approximately 6 in.Hg. If it does not, or if it clicks
at a higher reading, replace the switch.
- Disconnect the air hose from the side of the air by-pass valve.
- Connect a tachometer to the engine. Start the engine and raise the speed
above 2,000 rpm.
- Release the throttle and check for air flow from the port on the side of
the air by-pass valve. If there is no airflow, replace the valve.