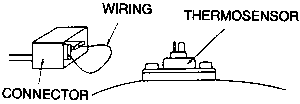
| Fig. 1: The No. 1 thermosensor is located next to the
thermostat housing

|
NOTE: Begin this test procedure with the engine cold.
- Remove the air cleaner.
- Examine the no. 1 thermosensor, which is located next to the thermostat
housing, for leakage around the boot and for signs of wax leakage.
- Disconnect the multiconnector from the thermosensor and place the prods
of an ohmmeter on the thermosensor terminals. The ohmmeter should read over
7kwith the engine cold and less than 2.3kafter the engine has been warmed
up.
- Replace the thermosensor with a new one, if the reading on the ohmmeter
is not within specifications.
- If the no. 1 thermosensor is functioning properly, proceed with the appropriate
test for the thermodetector below.
Use the following chart to determine the correct ohmmeter reading for the ambient
temperature at the time of the test:
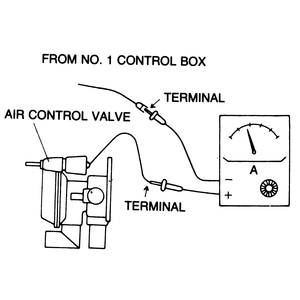
| Fig. 2: Testing the No. 1 control box
|
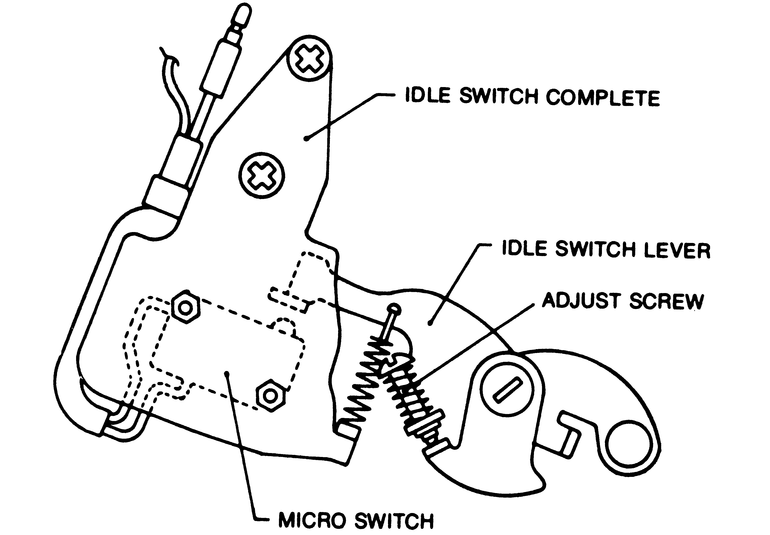
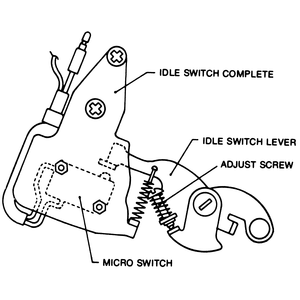
| Fig. 3: 1972 idle switch — the 1973 switch
uses a multi-connector
|
| Fig. 4: Using a jumper wire to short together the pins
of the No.1 thermosensor
|
NOTE: If all of the other components of the airflow control
system are functioning properly and the system wiring and vacuum lines are in
good condition, then the fault probably lies in the no. 1 control box. Perform
the following tests to verify this.
- Disconnect the no. 1 thermosensor. Disconnect the idle switch multiconnector.
- Start the engine and run it to the speeds specified below. The timing light
should come on in these speed ranges:
- Manual Transmission: 3,600–4,400 rpm
- Automatic Transmission: 4,300–5,300 rpm
NOTE: These speeds should be held for an instant only.
- Connect an ammeter to the air control valve solenoid leads and to ground.
- Current should flow when the engine speed is between 900–4,000200
rpm, manual or 7,500–5,200, automatic.
- Current flow should cease above 3,600–4,400 rpm, manual transmission
or 4,300–5,300 rpm, automatic transmission.
- Short together the pins of the no. 1 thermosensor multiconnector with a
jumper wire. Connect the timing light to the trailing side of the distributor,
if it is not already in place.
- The timing light should go on when the engine is below 3,600–4,400
rpm, automatic, or below 4,300–5,200 rpm, manual.
- On automatic transmission equipped models, connect an ammeter to the
air control valve solenoid. Current should flow to the solenoid when the
engine speed is below 3,400200 rpm and should cease flowing above this
speed.
- Remove the jumper wire from the multiconnector and reconnect the No. 1 thermosensor.
Reconnect the vacuum switch if it was disconnected.
- Connect the prods of the ammeter to the coasting valve solenoid terminals.
NOTE: For a further description of coasting valve operation,
see Deceleration Control Systems.
- No current should flow to the solenoid with the engine at idle. Increase
the engine speed; current should begin flowing between 1,250 and 1,500 rpm.
Decrease engine speed; current should cease flowing between 1,300 and 1,100
rpm for manual transmissions; 1,400 rpm for automatic transmissions. If the
no. 1 control box proves to be defective, replace it. Remember to disconnect
all of the test equipment and reconnect the system components when the tests
are completed.