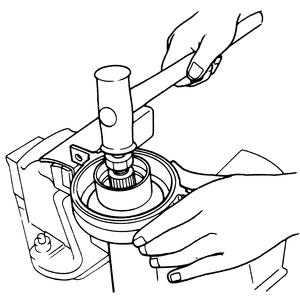
| Fig. 1: Place an old nut on the end of the driveshaft
and tap the nut lightly to force off the center support and bearing
assembly
|
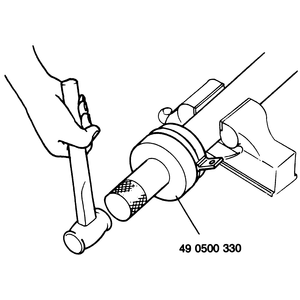
| Fig. 2: Installing the center support and bearing assembly
|
The center support bearing is a sealed unit which requires no periodic maintenance.
The following procedure should be used if it becomes necessary to replace
the bearing. You will need a pair of snapring pliers for this job.
- Remove the driveshaft assembly.
- To maintain driveline balance, matchmark the rear driveshaft, the center
yoke and the front driveshaft so that they may be installed in their original
positions.
- Remove the center universal joint from the center yoke, leaving it attached
to the rear driveshaft. See the following section for the correct procedure.
- Remove the nut and washer securing the center yoke to the front driveshaft.
- Slide the center yoke off the splines. The rear oil seal should slide
off with it.
- If the oil has remained on top of the snapring, remove and discard the
seal. Remove the snapring from its groove. Remove the bearing.
- Slide the center support and front oil seal from the front driveshaft.
Discard the seal.
- Install the new bearing into the center support. Secure it with the snapring.
- Apply a coat of grease to the lips of the new oil seals, and install them
into the center support on either side of the bearing.
- Coat the splines of the front driveshaft with grease. Install the center
support assembly and the center yoke onto the front driveshaft, being sure
to match up the marks made during disassembly.
- Install the washer and nut. Torque the nut to 116–130 ft. lbs.
- Check that the center support assembly rotates smoothly around the driveshaft.
- Align the mating marks on the center yoke and the rear driveshaft, and
assemble the center universal joint.
- Install the driveshaft. Be sure that the rear yoke and the axle flange
realigned properly.

