Disconnect the power brake vacuum line from the converter housing.
Raise and support the truck on jackstands.
Remove the bell housing access cover and remove the four converter-to-drive
plate bolts by turning the drive plate until the bolt appears and holding
the drive pulley lockbolt with a wrench.
Remove the heat insulator from the exhaust pipe.
Disconnect the exhaust pipe at the manifold and the muffler and remove
the pipe.
Remove the underbody heat shield.
Remove the driveshaft.
Disconnect the speedometer cable from the extension housing.
Disconnect the shift linkage at the transmission.
Remove the starter as explained in Chapter 3.
Remove the converter housing cover.
Support the transmission with a floor jack. Remove the transmission crossmember.
Lower the transmission slightly and remove the vacuum fitting bolt from
the intake manifold.
Remove the vacuum line clips from the length of the transmission.
Disconnect and tag all wiring from the transmission.
Disconnect and plug the cooling lines from the transmission.
Remove the transmission-to-engine bolts.
Raise the transmission to its normal position and slide it rearward. It
may be necessary to carefully pry the transmission from the engine. Be careful!
The torque converter will come off with the transmission, but can easily
fall.
Lower the jack once the unit is clear.
Check the converter drive plate runout. Runout should be less than 0.3mm
(0.0118 in.). If not, replace the drive plate.
If the converter was removed and installed, check the distance between
the flat face of the converter and the mating surface of the housing. Distance
should be 20mm (0.787 in.). If not, remove and install the converter in
a different position. To install:
Raise the transmission to its normal position and slide it forward.
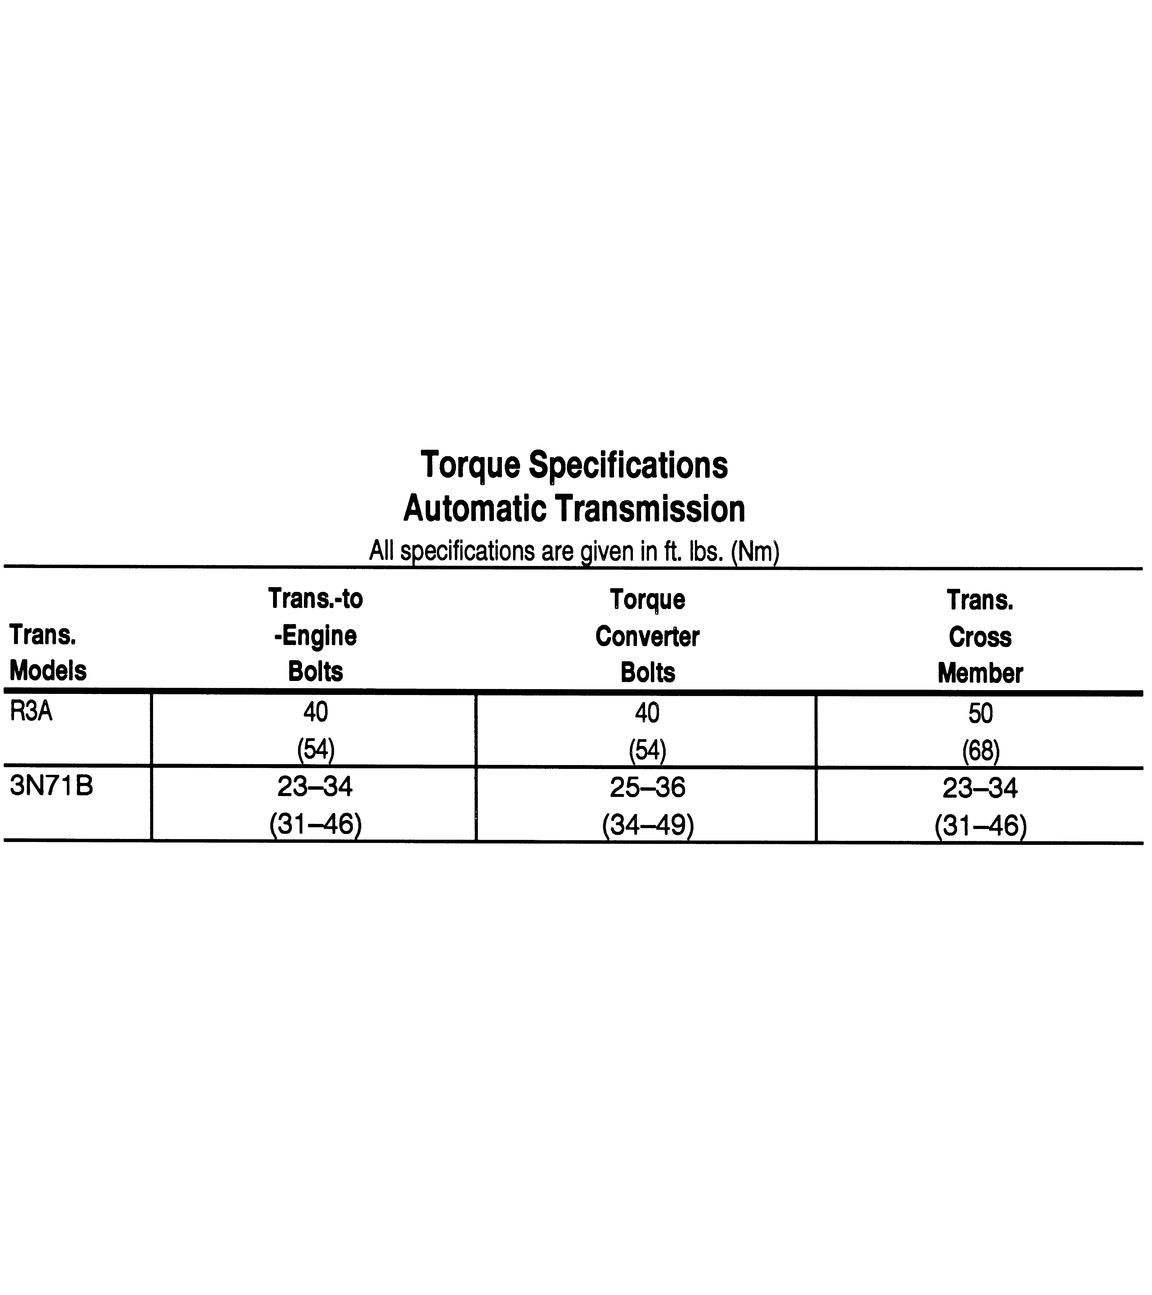
Install the transmission-to-engine bolts. Torque the bolts to 40 ft. lbs.
Connect the cooling lines.
Connect all wiring.
Install the vacuum line clips.
Install the vacuum fitting bolt in the intake manifold.
Install the transmission crossmember. Torque the bolts to 50 ft. lbs.
Bolt the transmission to the jack. Torque the bolts to 40 ft. lbs.
Remove the jack.
Install the converter housing cover.
Install the starter.
Connect the shift linkage at the transmission.
Connect the speedometer cable.
Install the driveshaft.
Install the underbody heat shield.
Connect the exhaust pipe at the manifold and the muffler.
Install the heat insulator.
Install the four converter-to-drive plate bolts by turning the drive plate
until the bolt hole appears, and holding the drive pulley lockbolt with
a wrench. Torque the bolts to 40 ft. lbs.
Install the bellhousing access cover.
Adjust the shift linkage.
Lower the truck.
Connect the power brake vacuum line at the converter housing.
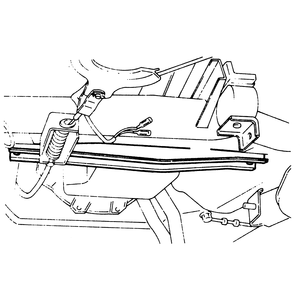
Fig. 1: The transmission crossmember should be positioned
as shown
Disconnect the negative cable from the battery.
Raise and support the truck.
Drain the transmission fluid but do not remove the pan. After the fluid
has drained, install a few bolts to hold the pan in place, temporarily.
Remove the exhaust pipe bracket bolt from the right side of the converter
housing.
Remove the exhaust pipe flange bolts from the rear of the resonator or
catalytic converter, and disconnect the pipe.
Disconnect the driveshaft from the rear axle flange.
Remove the driveshaft center bearing support nuts, washers, and lockwashers.
Lower the driveshaft and remove it from the transmission.
Disconnect the speedometer cable.
Disconnect the shift rod from the manual lever.
Remove the vacuum hose from the diaphragm. Disconnect the electrical connectors
from the downshift solenoid and inhibitor switch, and remove their wires
from the clip.
Disconnect and plug the cooler lines from the radiator at the transmission.
Use a flare nut wrench if one is available.
Remove the access cover from the lower front of the converter housing.
Matchmark the drive plate (flywheel) and torque converter for reassembly.
Remove the four bolts holding the torque converter to the drive plate.
Remove the bolts connecting the crossmember to the transmission.
Support the transmission with a jack. Remove the crossmember-to-frame
bolts, and remove the crossmember.
Make sure that the transmission is securely supported. Secure it to the
jack with a safety chain, if necessary.
Lower the transmission to provide working clearance, and remove the starter.
Remove the converter housing-to-engine bolts.
Remove the fluid filler tube.
With a prybar, exert light pressure between the converter and the drive
plate to prevent the converter from disengaging from the transmission as
it is removed.
Lower the transmission and converter as an assembly. Be careful not to
let the converter fall out. To install:
Place the transmission on the jack. Be sure that the converter is properly
installed.
Raise the transmission into place. Install the converter housing-to-engine
bolts, and torque in two stages to 23–34 ft. lbs.
Lower the transmission on the jack and install the starter.
Install the fluid filler tube with a new O-ring.
Raise the transmission slightly, and install the crossmember to the frame.
Tighten the bolts to 23–34 ft. lbs.
Lower the transmission and install the transmission-to-crossmember bolts.
Tighten to 23–34 ft. lbs.
Align the matchmarks made earlier on the torque converter and drive plate.
Install the four attaching bolts and torque to 25–36 ft. lbs. in three
stages.
Install the access cover. Remove the jack.
Connect the cooler lines.
Install the electrical connectors to the switch and solenoid, and replace
the wires in the clip. Install the diaphragm vacuum hose.
Connect the shift rod to the lever.
Reconnect the speedometer cable.
Insert the driveshaft into the transmission. Install the center bearing
support. Bolt the driveshaft to the rear of the axle flange.
Connect the exhaust pipe to the resonator or catalytic converter, using
a new gasket. Reinstall the exhaust pipe clamp onto the converter housing,
and torque the bolt to 10–15 ft. lbs.
Install a new pan gasket and the fluid pan, if this has not already been
done.
Lower the truck. Connect the battery cable. Fill the transmission through
the dipstick tube with the specified fluid, being careful not to overfill,
and check for leaks.