Previous Next

Brake Hoses

INSPECTION & REPLACEMENT

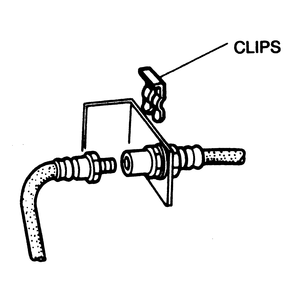
Fig. 1: Brake hose clip removal/installation

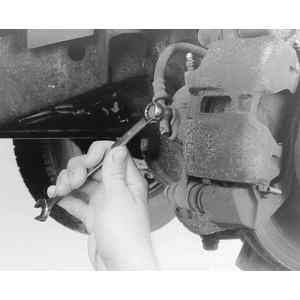
Fig. 2: To remove the flexible rubber brake hoses, loosen . . .

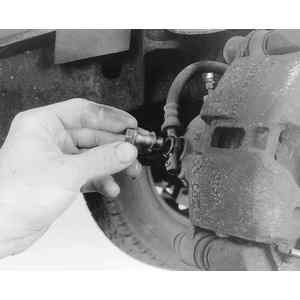
Fig. 3: . . . and remove the attaching bolt from the hose fitting

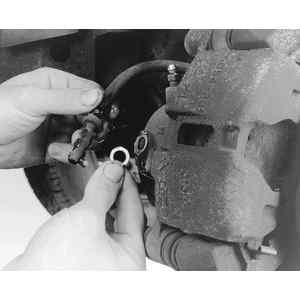
Fig. 4: Pay attention to these copper gaskets which seal the bolt to the hose and the hose to the brake connection — be sure the sealing surfaces are free of any grit or dirt

  1. Clean the brake hose thoroughly before inspecting it.
  2. Check all flexible hoses for any signs of swelling, cracking or brittleness. Replace any hose that shows any of these symptoms.
  3. Check the hoses for any sign that they are rubbing against any other component. If shiny marks or scuffing is found, determine what the hose is rubbing against and correct the problem. If scuffing has removed [cf2]anymaterial from the hose, replace it.
  4. Check brake pipes for corrosion or dents. Replace any damaged pipe.
  5. Check all connections for signs of leakage. Check threads for damage.
  6. When disconnecting hoses and pipes, remove the retaining clip AFTER loosening the flare nut at the joint. When tightening fittings, install the clip, THEN, tighten the flare nut.
  7. When installing a hose, make sure it is not twisted. Make absolutely certain, especially in the case of the hoses connected to the front calipers or wheel cylinders, that they will not come into contact with any other component with the front wheels in any position. Observe the following torques when installing lines:

    WARNING
    Clean, high quality brake fluid is essential to the safe and proper operation of the brake system. You should always buy the highest quality brake fluid that is available. If the brake fluid becomes contaminated, drain and flush the system, then refill the master cylinder with new fluid. Never reuse any brake fluid. Any brake fluid that is removed from the system should be discarded.

  8. When any brake line is opened, the system must be bled when the job is done.

Previous Next