Previous Next

INTERIOR

Door Panels

REMOVAL & INSTALLATION

1972–84 VEHICLES

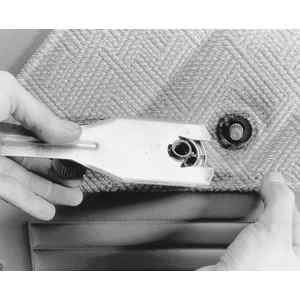
Fig. 1: An inexpensive tool designed for window crank removal eases the process — slip the tool between the door panel and the window crank . . .

Fig. 2: . . . catch the clip as it is pushed out and remove the crank handle

Fig. 3: Exploded view of the door for 1972–76 trucks

Fig. 4: Exploded view of the door for 1977–84 trucks

  1. Invert the door and window handles for easy access to the retaining pins.
  2. Push in slightly on the door panel to expose the retaining pin, and drive out the pin from the window regulator handle, from the bottom side, using a small punch.
  3. Drive the tapered pin from the door handle in the same manner.
  4. Remove the plastic molding from the arm rest, revealing the arm rest attaching screws.
  5. Remove the arm rest.
  6. Carefully slip a thin prying instrument behind the door panel and slide it along until you hit one of the eight retaining clips. Pry as close as possible to the clip to snap the clip from the door. Be very careful to avoid tearing the clip from the panel.
  7. Once all eight clips have been pried loose, lift the door panel from the bottom channel.
  8. Installation is the reverse of removal. When snapping the clips into place, make sure that they are squarely over the holes to avoid bending them.
1986 Vehicles

Fig. 5: Exploded view of the door for 1986 trucks

  1. Remove the attaching screw and door handle.
  2. Remove the armrest.
  3. Push in on the door panel, slightly, at the window handle and pry off the snapring retaining the handle to the regulator stem. Remove the handle.
  4. Carefully slip a thin prying instrument behind the door panel and slide it along until you hit one of the retaining clips. Pry as close as possible to the clip to snap the clip from the door. Be very careful to avoid tearing the clip from the panel.
  5. Pry out each clip, in turn, and lift off the door panel.
  6. Installation is the reverse of removal. When snapping the clips into place, make sure that they are squarely over the holes to avoid bending them.

Previous Next