Previous Next

CHECKING & ADJUSTMENT

Except 2.2L and 2.3L Engines
  1. Apply the parking brake. If equipped with a manual transaxle, place the shifter in the neutral position. If equipped with an automatic transaxle, place the shift lever in P.
  2. Locate the timing marks on the crankshaft pulley and timing belt lower cover. The engine may have to be cranked slightly to see the mark on the crankshaft pulley.
  3. Start the engine and allow it to come to normal operating temperature. Make sure all accessories are OFF.

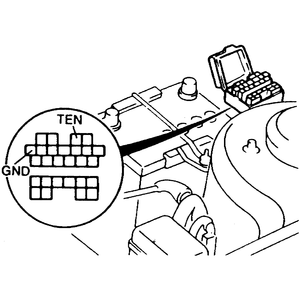
    Fig. 1: On all models except 1994–98 626/MX-6/Probe with ATX, jumper the connections shown on the data link

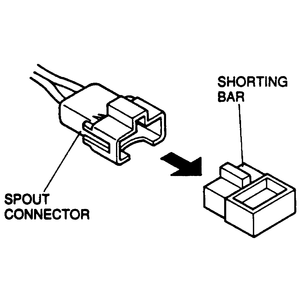
    Fig. 2: On 1994–98 626/MX-6/Probe with ATX, remove the shorting bar from the spout connector

  4. Check the idle speed and adjust, if necessary.
  5. Turn the engine off.
  6. On all engines except 1994–98 2.0L (FS) engines with an automatic transaxle, connect a jumper wire between the TEN terminal and the GND terminal at the underhood diagnosis connector.
  7. On 1994–98 2.0L (FS) engines with an automatic transaxle, remove the shorting bar from the double wire SPOUT connector.
  8. Connect an inductive timing light according to the manufacturers instructions.

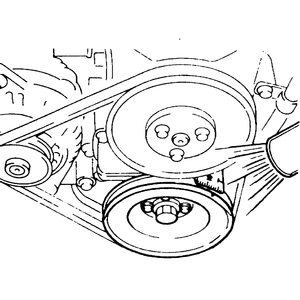
    Fig. 3: Connect an inductive timing light and aim it at the crankshaft pulley. Read the pulley mark against the scale

  9. Start the engine and allow the idle to stabilize. Aim the timing light at the timing marks.
  10. The mark on the crankshaft pulley should align with the specified BTDC degree mark on the timing cover scale, plus or minus 1 degree. If the marks are within alignment proceed with step 12. If the marks are not aligned, proceed to Step 11.

    Fig. 4: If adjustment is necessary, loosen the distributor lockbolts and rotate it until the mark is aligned

  11. Loosen the distributor lock bolts just enough to turn the distributor. While aiming the timing light at the timing marks, turn the distributor until the marks are aligned. Tighten the distributor lock bolts to 14–19 ft. lbs. (19–25 Nm) and recheck the timing.
  12. The ignition timing is now set. Disconnect the jumper wire from the underhood diagnosis connector or install the shorting bar from the double wire SPOUT connector.
  13. Remove all test equipment.
2.2L Engines
  1. Apply the parking brake. If equipped with manual transaxle, place the shift lever in neutral. If equipped with automatic transaxle, place the shift lever in P.
  2. Locate the timing marks on the crankshaft pulley and timing belt cover. You may have to crank the engine slightly to see the mark on the crankshaft pulley. If the marks are hard to see, clean them off with some degreasing cleaner and a wire brush.
  3. Start the engine and allow it to come to normal operating temperature. Make sure all accessories are OFF.
  4. Check the idle speed and adjust, if necessary.
  5. Shut off the engine.
  6. On non-turbocharged engines, disconnect and plug the vacuum hoses at the distributor vacuum diaphragm.

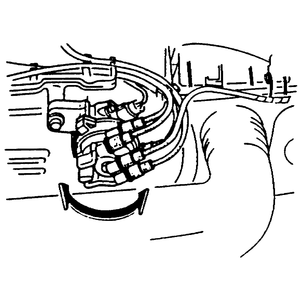
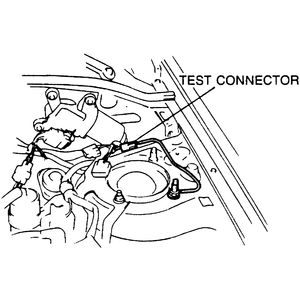
    Fig. 5: On turbocharged engines, ground the single wire test connector to set the ignition timing

  7. On turbocharged engines, connect a jumper wire between the single wire test connector, located near the left strut tower, and ground.
  8. Connect an inductive timing light according to the manufacturers instructions.
  9. Start the engine and allow the idle to stabilize.
  10. The mark on the crankshaft pulley should align with the specified BTDC degree mark on the timing cover scale, plus or minus 1 degree. If the marks are within alignment proceed with step 12. If the marks are not aligned, proceed to Step 11.
  11. Loosen the distributor lock bolt just enough to turn the distributor housing. While aiming the timing light at the timing marks, turn the distributor until the marks are aligned. Tighten the distributor lock bolt to 14–19 ft. lbs. (19–25 Nm) and recheck the timing.
  12. Initial timing is now set. Disconnect the timing light from the engine.
  13. On non-turbocharged engines, remove the plugs from the vacuum hoses and reconnect them to the distributor vacuum diaphragm.
  14. On turbocharged engines, disconnect the jumper wire at the test connector.
2.3L Engines

The 2.3L engine (VIN KJ) utilizes individual ignition coils for each cylinder and the timing is controlled by the computer. Ignition timing adjustment is not possible or necessary.

Previous Next