A normal set of spark plugs usually requires replacement after about 20,000–30,000
miles (32,000–48,000 km), depending on your style of driving. In normal
operation plug gap increases about 0.001 in. (0.025mm) for every 2500 miles
(4000 km). As the gap increases, the plug's voltage requirement also increases.
It requires a greater voltage to jump the wider gap and about two to three times
as much voltage to fire the plug at high speeds than at idle. The improved air/fuel
ratio control of modern fuel injection combined with the higher voltage output
of modern ignition systems will often allow an engine to run significantly longer
on a set of standard spark plugs, but keep in mind that efficiency will drop
as the gap widens (along with fuel economy and power).
NOTE: Platinum tipped spark plugs usually require replacement
after about 50,000–60,000 miles (80,000–96,000 km). However, some
manufacturers have recommended replacement at 100,000 miles (160,000 km).
When you're removing spark plugs, work on one at a time. Don't start by removing
the plug wires all at once, because, unless you number them, they may become
mixed up. Take a minute before you begin and number the wires with tape.
| Fig. 1: To remove a spark plug, first remove the plug
wire attached to the plug. Only detach one wire at a time
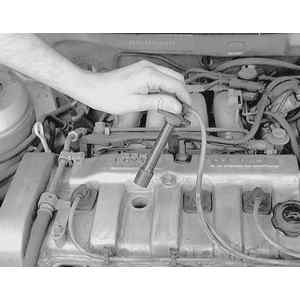
|
- Disconnect the negative battery cable, and if the vehicle has been run recently,
allow the engine to thoroughly cool.
- On all engines except the 2.3L V6, carefully twist the spark plug wire boot
to loosen it, then pull upward and remove the boot from the plug. Be sure
to pull on the boot and not on the wire, otherwise the connector located inside
the boot may become separated.
- On 2.3L V6 engines, remove the ignition coil as follows:
- For the front bank of spark plugs, remove the charge air cooler.
- For the rear bank of spark plugs, remove the solenoid bracket assembly.
- Detach the ignition coil 4-pin connector.
- Remove the ignition coil attaching screws and remove the coil by pulling
it straight up.
- Using compressed air, blow any water or debris from the spark plug well
to assure that no harmful contaminants are allowed to enter the combustion
chamber when the spark plug is removed. If compressed air is not available,
use a rag or a brush to clean the area.
NOTE: Remove the spark plugs when the engine is cold, if
possible, to prevent damage to the threads. If removal of the plugs is difficult,
apply a few drops of penetrating oil or silicone spray to the area around
the base of the plug, and allow it a few minutes to work.
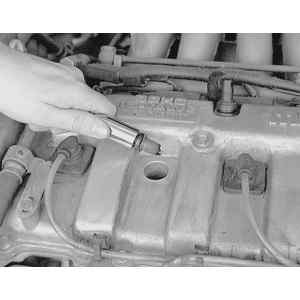
| Fig. 2: Then, using a spark plug socket with a rubber
insert, loosen the plug by turning it counterclockwise

|
- Using a spark plug socket that is equipped with a rubber insert to properly
hold the plug, turn the spark plug counterclockwise to loosen and remove the
spark plug from the bore.
WARNING
Be sure not to use a flexible extension on the socket. Use of a flexible
extension may allow a shear force to be applied to the plug. A shear force
could break the plug off in the cylinder head, leading to costly and frustrating
repairs.
| Fig. 3: Finally, remove the socket, with plug retained
by the insert, and inspect the spark plug
|
To install:
- On all engines except the 2.3L V6, inspect the spark plug boot for tears
or damage. If a damaged boot is found, the spark plug wire must be replaced.
- On 2.3L V6 engines, inspect the coil-to-spark plug connection area for cracks
or damage. If damage to the coil is found, replace the assembly.
- Using a wire feeler gauge, check and adjust the spark plug gap. When using
a gauge, the proper size should pass between the electrodes with a slight
drag. The next larger size should not be able to pass while the next smaller
size should pass freely.
- Carefully thread the plug into the bore by hand. If resistance is felt before
the plug is almost completely threaded, back the plug out and begin threading
again. In small, hard to reach areas, an old spark plug wire and boot could
be used as a threading tool. The boot will hold the plug while you twist the
end of the wire and the wire is supple enough to twist before it would allow
the plug to crossthread.
WARNING
Do not use the spark plug socket to thread the plugs. Always carefully thread
the plug by hand or using an old plug wire to prevent the possibility of
crossthreading and damaging the cylinder head bore.
- Carefully tighten the spark plug. If the plug you are installing is equipped
with a crush washer, seat the plug, then tighten about 1⁄4 turn
to crush the washer. If you are installing a tapered seat plug, tighten the
plug to specifications provided by the vehicle or plug manufacturer.
- On all engines except the 2.3L V6, apply a small amount of silicone dielectric
compound to the end of the spark plug lead or inside the spark plug boot to
prevent sticking, then install the boot to the spark plug and push until it
clicks into place. The click may be felt or heard, then gently pull back on
the boot to assure proper contact.
- On 2.3L V6 engines, install the ignition coil as follows:
- Position the ignition coil over the spark plug and press it down firmly
to ensure full engagement.
- Align the mounting holes and install the coil attaching screws. Tighten
the screws to 40–57 inch lbs. (4.5–6.4 Nm).
- Attach the ignition coil 4-pin connector.
- For the front bank of spark plugs, lubricate the sealing washers and
install the charge air cooler. Tighten the attaching nuts to 12–16
ft. lbs. (16–22 Nm).
- For the rear bank of spark plugs, install the solenoid bracket assembly.

