Previous Next

Alternator

REMOVAL & INSTALLATION

Fig. 1: Exploded view of a typical alternator mounting on 4-cylinder engines

Fig. 2: Exploded view of a typical alternator mounting on 6-cylinder engines

Except MX-3 (with V6 Engine), 626/MX-6/Probe and Millenia Models
  1. Disconnect the negative battery cable.
  2. On 323/Protege, disconnect the vacuum hose and remove the solenoid bracket, if equipped.
  3. On 1995–98 1.8L engines, remove the pressure pipe bracket and the EGR solenoid valve bracket.
  4. Label and disconnect the electrical connectors from the alternator.
  5. Remove the alternator drive belt.
  6. On the 1995–98 1.8L engines, remove the alternator bracket.
  7. Remove the alternator pivot and adjusting bar bolts and remove the alternator.

    To install:

  8. Install the alternator with the through–bolt.
  9. On the 1995–98 1.8L engines, install the alternator bracket.
  10. Connect the alternator electrical connectors.
  11. Install the drive belt and upper mounting bolt. Adjust the belt tension. Tighten the lower through–bolt to 27–38 ft. lbs. (37–52 Nm) and the upper mounting bolt to 12–19 ft. lbs. (16–26 Nm).
  12. On the 1995–98 1.8L engines, install the pressure pipe bracket and the EGR solenoid valve bracket.
  13. Connect the negative battery cable.
4-Cylinder 626 and MX6 Models
  1. Disconnect the negative battery cable.
  2. Remove the alternator upper mounting bolt.
  3. Loosen the alternator adjusting bolt and remove the drive belt from the alternator pulley.

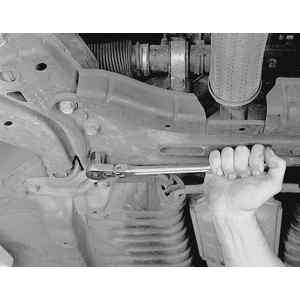
    Fig. 3: To remove the alternator, first, remove the drive belt and upper mounting bolt. Next, remove the crossmember attaching bolts . . .

    Fig. 4: . . . then remove the crossmember. Do not remove the transmission support member

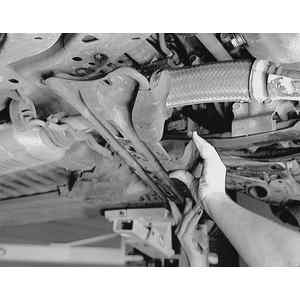
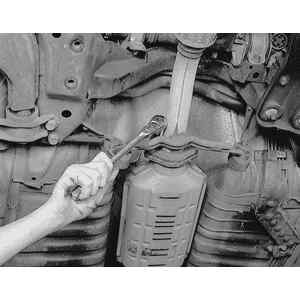
    Fig. 5: Unbolt the exhaust pipe from the engine manifold and also at the converter

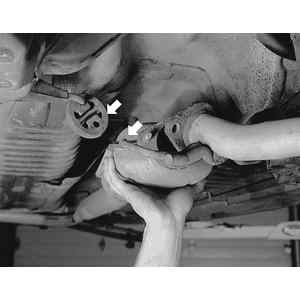
    Fig. 6: Disconnect the exhaust hangers (arrow) and separate the pipe from the converter.

  4. Raise and safely support the vehicle.
  5. Remove the 6 bolts and remove the transverse member.
  6. Disconnect the electrical connectors from the alternator.

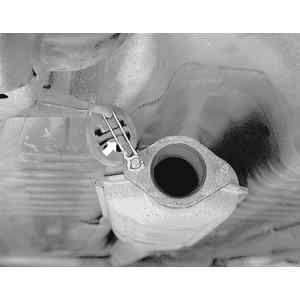
    Fig. 7: Support the catalytic converter either on a jackstand, or suspending it by length of mechanic's wire (arrow)

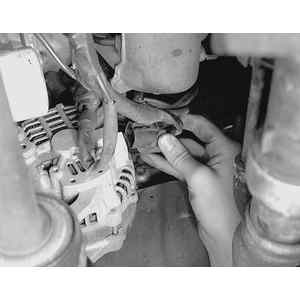
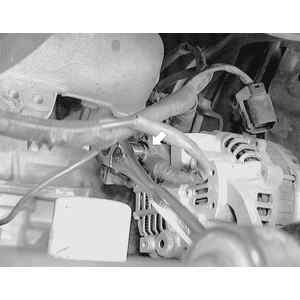
    Fig. 8: Label and detach the wire harness plug (or plugs) from the alternator . . .

    Fig. 9: . . . then, using the proper size socket, remove the battery positive terminal retaining nut (arrow)

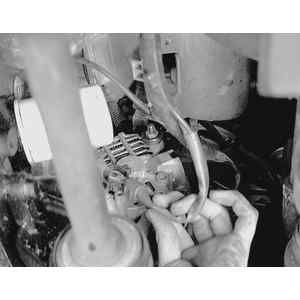
    Fig. 10: Remove the battery positive terminal wire from its attaching post on the alternator

  7. Remove the front exhaust pipe as follows:
    1. Support the exhaust system at the catalytic converter with a jack or by suspending it on a piece of wire.
    2. Disconnect the oxygen sensor electrical connector and remove the sensor using a sensor wrench.
    3. Remove the 3 exhaust manifold flange nuts and remove the clamp from the hold-down bracket.

      Fig. 11: Remove the alternator lower through-bolt . . .

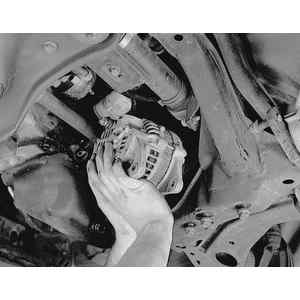
      Fig. 12: . . . then remove the alternator by lowering through the access opening afforded by removing the crossmember and exhaust pipe

    4. Remove the exhaust pipe-to-converter nuts and pry the rubber hangers from the mounting hooks. Remove the pipe.
  8. Remove the alternator lower through-bolt and remove the alternator.

    To install:

  9. Install the alternator with the through-bolt.
  10. Install the exhaust pipe, using new gaskets. Tighten the pipe-to-converter nuts to 28–38 ft. lbs. (38–51 Nm) and the exhaust manifold flange nuts to 28–38 ft. lbs. (38–51 Nm). Tighten the exhaust clamp nuts to 14–18 ft. lbs. (19–25 Nm).
  11. Install the oxygen sensor, using a sensor wrench, and tighten to 36 ft. lbs. (49 Nm). Connect the oxygen sensor electrical connector.
  12. Connect the alternator electrical connectors.
  13. Install the transverse member and tighten the bolts to 68–96 ft. lbs. (94–131 Nm). Lower the vehicle.
  14. Install the drive belt and upper mounting bolt. Adjust the belt tension. Tighten the lower through-bolt to 24–33 ft. lbs. (32–46 Nm) and the upper mounting bolt to 12–16 ft. lbs. (16–22 Nm).
  15. Connect the negative battery cable.
6-Cylinder MX3, 626 and MX6 Models
  1. Disconnect the negative battery cable.
  2. Remove the fresh air duct and radiator upper bracket.
  3. If equipped, remove the condenser fan.
  4. Disconnect the electrical connectors from the alternator.
  5. Loosen the belt tensioner locknut and tension adjusting bolt. Remove the alternator upper mounting bolt.
  6. Raise and safely support the vehicle.
  7. Remove the right splash shield.
  8. Remove the drive belt from the alternator pulley.
  9. If necessary, remove the A/C compressor mounting bolts and support the compressor aside, leaving the refrigerant lines connected.
  10. Remove the alternator through-bolt and the alternator.

    To install:

  11. Position the alternator and install the through-bolt. Tighten the alternator through-bolt to 24–33 ft. lbs. (32–46 Nm) on the 1.8L, and to 38 ft. lbs. (51 Nm) on the 2.5L engine.
  12. If removed, install the mounting bolts and tighten the A/C compressor mounting bolts to 26 ft. lbs. (35 Nm).
  13. Install the right splash shield, and lower the vehicle.
  14. Install the drive belt and adjust the tension.
  15. Install the alternator upper mounting bolt and tighten to 18 ft. lbs. (25 Nm).
  16. Tighten the belt tensioner locknut and tension adjusting bolt.
  17. Connect the electrical connectors from the alternator.
  18. If removed, install the condenser fan.
  19. Install the radiator upper bracket and fresh air duct.
  20. Connect the negative battery cable.
Millenia
  1. Disconnect the negative battery cable.
  2. On models equipped with the 2.3L engine, remove the front charge air cooler, radiator upper seal board and the condenser fan assembly.
  3. Disconnect the electrical connectors from the alternator.
  4. Raise and safely support the vehicle.
  5. Remove the right splash shield.
  6. Remove the drive belt from the alternator pulley.
  7. Remove the A/C compressor mounting bolts and support the compressor aside, leaving the refrigerant lines connected.
  8. Remove the upper and lower alternator mounting bolts and the alternator.

    To install:

  9. Position the alternator and install the through-bolt. Tighten the alternator lower bolt to 24–33 ft. lbs. (32–46 Nm). Install the alternator upper mounting bolt and tighten to 12–16 ft. lbs. (16–22 Nm).
  10. Install the mounting bolts and tighten the A/C compressor mounting bolts to 12–16 ft. lbs. (16–22 Nm).
  11. Install the right splash shield, and lower the vehicle.
  12. Install the drive belt.
  13. Connect the electrical connectors to the alternator.
  14. If removed, install the condenser fan assembly, radiator upper seal board and the front charge air cooler using new O-rings. Tighten the mounting bolts to 12–16 ft. lbs. (16–22 Nm).
  15. Connect the negative battery cable.

Previous Next