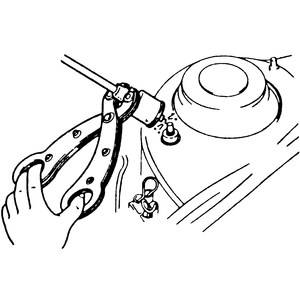
Remove one of the ignition coils, but leave the 4-wire connector plugged
in.
Hold the coil with insulated pliers approximately 0.20–0.39 in. (5–10mm)
from a ground.
While holding the coil in position, crank the engine.
A strong blue spark should be seen.
Repeat the test for each of the coils mounted on the engine.
If a spark is seen from some of the coils, and no trouble codes or check
engine light is present, proceed as follows:
Replace the faulty ignition coil with a known good unit and test again.
If there is a spark visible, replace the defective coil.
If there is still no spark, check the following ECM terminals for proper
voltage (0 volts with ignition switch on, or 0.05 volts with engine idling):
Cylinder No. 1: terminal 4S
Cylinder No. 2: terminal 4W
Cylinder No. 3: terminal 4AA
Cylinder No. 4: terminal 4AE
Cylinder No. 5: terminal 4AI
Cylinder No. 6: terminal 4AM
If the voltages are not normal, inspect and repair the ignition coil
related wiring harnesses, connectors, power supply and grounds.
If the voltages are normal, Mazda recommends replacing the ECM. However,
due to the cost of an ECM, WE recommends having the vehicle professionally
tested with a scan tool designed specifically for the vehicle, before
purchasing the ECM for replacement.
If no spark is seen from any of the coils or a trouble code or check engine
light is present, proceed as follows:
Check to see if the following diagnostic trouble codes are present (refer
to Section 4 for trouble code retrieval instructions):
P0335 - CranKshaft Position sensor (CKP) circuit malfunction
P1345 - SGC signal
If either of the two codes were found, carry out an inspection of the
circuits related to the trouble code. Refer to Section 4.
If no codes are present, repair or replace the wiring harness connector
between the ignition coil and ignition switch.
If a spark is seen from all coils, the system is normal.