Previous Next

Crankshaft Damper

REMOVAL & INSTALLATION

  1. Remove the accessory drive belts.
  2. Raise and safely support the vehicle.
  3. Remove the right front wheel and tire assembly.
  4. Remove the right inner fender panel.
  5. Examine the damper attaching bolts.

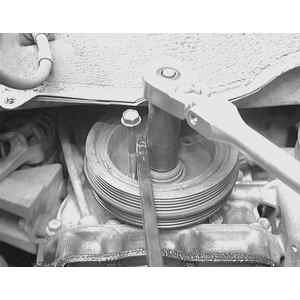
    Fig. 1: To remove the crankshaft, first loosen the center bolt while keeping the crankshaft from turning

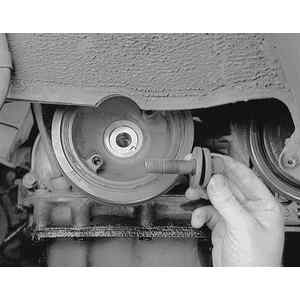
    Fig. 2: Remove the center crankshaft bolt or, if equipped, the perimeter bolts . . .

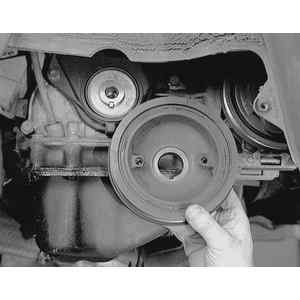
    Fig. 3: . . . then pull the damper from the end of the crankshaft snout. Some models may require a puller to remove it

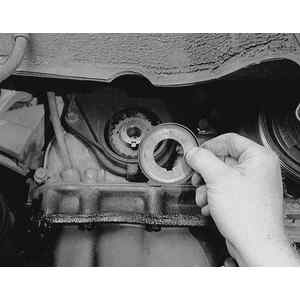
    Fig. 4: Finally, remove the timing belt baffle plate to complete the removal procedure

  6. If the damper has one bolt in the center, with no perimeter bolts, proceed as follows:
    1. The damper will have two or more open, threaded bolt holes. Install the proper size metric bolt into these holes and thread them in by hand. Ensure that you have at least 38 inch (9.5 mm) of engagement on the bolt.
    2. Position a breaker bar and socket assembly onto the center bolt head and place a prybar between the installed bolts to keep the damper from rotating while loosening the center bolt.
    3. Loosen the center bolt while holding the prybar, however, watch the installed bolts carefully. Any excessive flexing or bending is unacceptable, and the bolts may break off in the damper.
    4. Once the center bolt is loose, remove the installed bolts, then the center bolt.
  7. If the damper has one bolt in the center, with additional perimeter bolts, proceed as follows:
    1. Remove all of the perimeter bolts.
    2. Remove the crankshaft pulley from the engine.
    3. If the center bolt must also be removed, install the proper size metric bolt into the perimeter bolt holes and thread them in by hand. Ensure that you have at least 38 inch (9.5 mm) of engagement on the bolt.
    4. Position a breaker bar and socket assembly onto the center bolt head and place a prybar between the installed bolts to keep the damper from rotating while loosening the center bolt.
    5. Loosen the center bolt while holding the prybar, however, watch the installed bolts carefully. Any excessive flexing or bending is unacceptable, and the bolts may break off in the damper.
    6. Once the center bolt is loose, remove the installed bolts, then the center bolt.
  8. Remove the damper and, if necessary, the baffle plate.
  9. Inspect the damper for damage and replace, as necessary.

    To install:

  10. Installation is the reverse of the removal procedure. When installing the baffle, ensure that the curved lip faces outward. Tighten all bolts to specification.

Previous Next