Previous Next

Exhaust Manifold

REMOVAL & INSTALLATION

1995–98 1.5L and 1.8L (except K8) Engines
  1. Disconnect the negative battery cable.
  2. Remove the air cleaner, and disconnect the air hose.
  3. Remove the water bypass pipe bolt.
  4. Remove the exhaust manifold heat shield bolts and the heat shield.
  5. Disconnect the oxygen sensor electrical connector.
  6. Raise and safely support the vehicle.
  7. Remove and discard the exhaust pipe-to-exhaust manifold nuts. Suspend the exhaust system with wire.
  8. Disconnect the EGR pipe from the exhaust manifold and lower the vehicle.
  9. Remove the nuts and bolts and remove the exhaust manifold. Discard the nuts.

    To install:

  10. Clean all gasket mating surfaces.
  11. Position a new exhaust manifold gasket over the studs and install the exhaust manifold. Tighten the mounting nuts and bolts to 14–16 ft. lbs. (19–22 Nm) on the 1.5L, and for the 1.8L to 29–34 ft. lbs. (39–47 Nm).
  12. Raise and safely support the vehicle.
  13. Connect the exhaust pipe to the manifold. Install new nuts and tighten to 38 ft. lbs. (52 Nm). Connect the oxygen sensor connector.
  14. Connect the EGR pipe to the back of the exhaust manifold and tighten to 34 ft. lbs. (47 Nm). Lower the vehicle.
  15. Install the heat shield and tighten the bolts to 88 inch lbs. (10 Nm).
  16. Install the water bypass pipe bolt, and tighten to 48–65 ft. lbs. (64–89 Nm).
  17. Connect the air hose, and install the air cleaner.
  18. Connect the negative battery cable.
1.8L (K8) and 2.5L Engines
  1. Disconnect the negative battery cable. Raise and safely support the vehicle.
  2. Disconnect the oxygen sensor connectors.

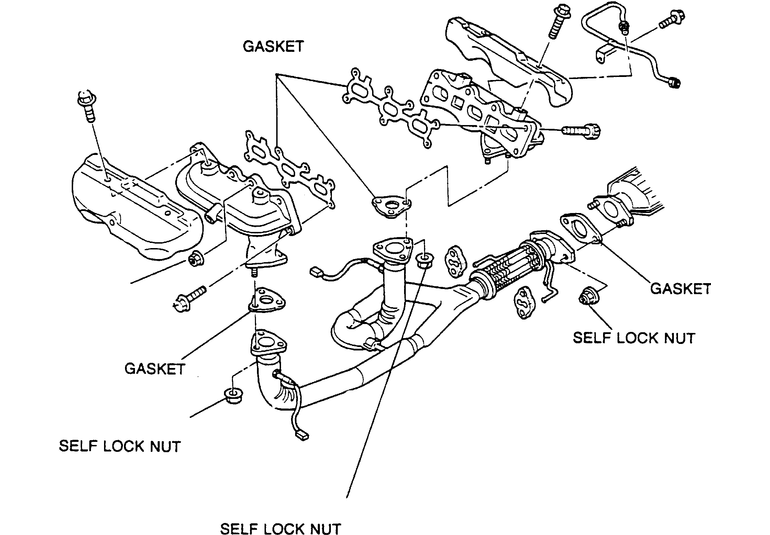
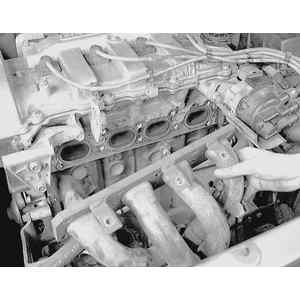
    Fig. 1: Exploded view of the exhaust manifolds for the 1.8L (K8) and 2.5L engines — 2.3L engine is similar

  3. Remove the nuts from the front and rear exhaust pipes and lower the exhaust system. Both pipes must be disconnected, even if only one manifold is to be removed.
  4. If removing the rear (right side) manifold, disconnect the EGR pipe.
  5. Remove the 3 heat shield bolts and remove the heat shield.
  6. Remove the 2 nuts and 5 bolts and remove the exhaust manifold.

    To install:

  7. Clean all gasket mating surfaces.
  8. Install the exhaust manifold, using a new gasket, and tighten the nuts to 15–20 ft. lbs. (20–28 Nm), and the bolts to 12–16 ft. lbs. (16–22 Nm).
  9. Install the heat shield and tighten the bolts to 88 inch lbs. (10 Nm).
  10. If installing the rear (right side) manifold, connect the EGR pipe.
  11. Connect the exhaust pipes to the manifolds, using new gaskets and nuts, and tighten the nuts to 38 ft. lbs. (51 Nm).
  12. Connect the oxygen sensor connectors and lower the vehicle.
  13. Connect the negative battery cable.
2.3L Engine
  1. Disconnect the negative battery cable.
  2. Raise and safely support the vehicle.
  3. Remove the nuts from the front and rear exhaust pipes and lower the exhaust system. Both pipes must be disconnected, even if only one manifold is to be removed.
  4. If removing the rear (right side) manifold, disconnect the EGR pipe.
  5. If removing the front (left side) manifold, remove the charge air cooler and the coolant/condenser fans.
  6. Disconnect the front and rear oxygen sensor connectors.
  7. Remove the three heat shield bolts and remove the heat shield.
  8. Remove the 2 nuts and 5 bolts and remove the exhaust manifold.

    To install:

  9. Clean all gasket mating surfaces.
  10. Install the exhaust manifold, using a new gasket, and tighten the nuts and bolts to 12–16 ft. lbs. (16–22 Nm).
  11. Install the heat shield and tighten the bolts to 70–95 inch lbs. (8–11 Nm).
  12. Connect the oxygen sensor connectors.
  13. If installing the front (left side) manifold, install the coolant/condenser fans and the charge air cooler. Tighten the charge air cooler mounting bolts to 14–18 ft. lbs. (19–25 Nm)
  14. If installing the rear (right side) manifold, connect the EGR pipe.
  15. Connect the exhaust pipes to the manifolds, using new gaskets and nuts, and tighten the nuts to 28–38 ft. lbs. (38–51 Nm).
  16. Lower the vehicle.
  17. Connect the negative battery cable.
Except 1.5L, 1.8L (K8), 2.3L, 2.5L and 1995–98 1.8L (except K8) Engines
  1. Disconnect the negative battery cable.
  2. Remove the retaining bolts and remove the exhaust manifold insulator.

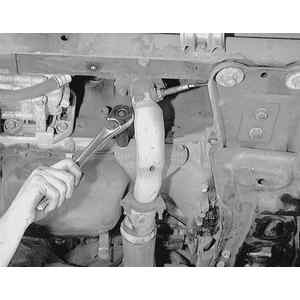
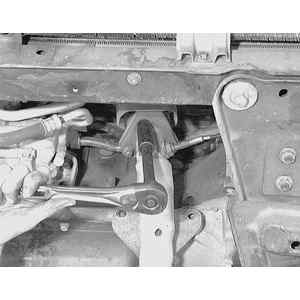
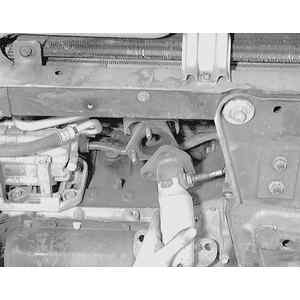
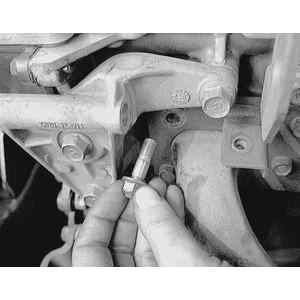
    Fig. 2: To remove the exhaust manifold, first raise the vehicle and loosen the exhaust pipe-to-engine block support bracket bolts . . .

    Fig. 3: . . . then remove them. Detach the oxygen sensor (arrow) wire harness connection

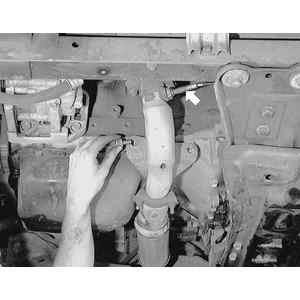
    Fig. 4: Remove the exhaust pipe-to-manifold attaching nuts . . .

    Fig. 5: . . . then pull the pipe down to detach it from the manifold

  3. Disconnect the oxygen sensor electrical connector. Remove the oxygen sensor, if necessary, if it is installed in the manifold.
  4. Disconnect the EGR pipe, if equipped.
  5. Raise and safely support the vehicle. Remove the nuts from the exhaust pipe flange and disconnect the exhaust pipe from the manifold or turbocharger, if equipped.

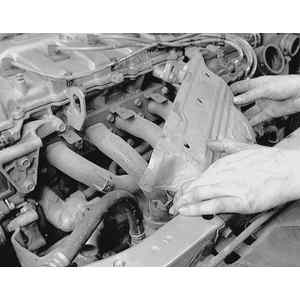
    Fig. 6: Lower the vehicle and remove the exhaust manifold heat shield retaining bolts . . .

    Fig. 7: . . . and remove the shield from the manifold. Some models may need the power steering pump to be removed for better access

    Fig. 8: If equipped, loosen and remove the EGR pipe retaining bolt

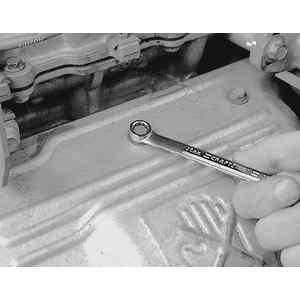
    Fig. 9: Loosen the exhaust manifold-to-head attaching nuts/bolts . . .

    Fig. 10: . . .and remove them

    Fig. 11: Don't be alarmed if some of the studs have come out of the head. The stud should thread back in as if it were a bolt

  6. Lower the vehicle.
  7. If equipped with turbocharger, proceed as follows:
    1. Drain the cooling system.
    2. Disconnect the air hose and coolant hoses from the turbocharger.
    3. Disconnect the oil feed and return lines.

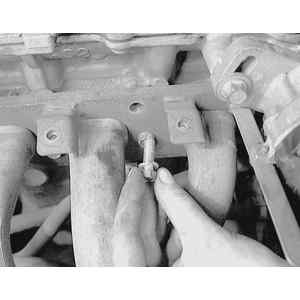
      Fig. 12: Pull the manifold backwards off of the mounting studs and remove it from the vehicle

      Fig. 13: Remove and discard the old gaskets and clean the mating surfaces thoroughly

  8. Remove the mounting nuts/bolts and remove the exhaust manifold. On turbocharged vehicles, the manifold and turbocharger are removed as an assembly.
  9. Installation is the reverse of the removal procedure. Make sure all gasket mating surfaces are clean prior to assembly.
  10. Use new gaskets and tighten the exhaust manifold-to-cylinder head nuts/bolts to 17 ft. lbs. (23 Nm) on 1.6L and 1.8L SOHC engines, 34 ft. lbs. (46 Nm) on 1.6L and 1.8L DOHC 4-cylinder engines and 2.2L engine. On 2.0L engine, tighten the nuts to 20 ft. lbs. (26 Nm) and the bolts to 16 ft. lbs. (22 Nm).
  11. Use a new gasket and tighten the exhaust pipe flange-to-exhaust manifold nuts to 34 ft. lbs. (46 Nm).

Previous Next