NOTE: Due to space constraints, the 2.3L engine must be removed
from the vehicle in order to service the oil pump assembly. Refer to the Engine
Removal & Installation procedure earlier in this section.
- Disconnect the negative battery cable. Raise and safely support the vehicle.
- Remove the timing belt. Remove the crankshaft damper retaining bolt, the
damper and the timing belt sprocket. Drain the engine oil and remove the oil
pan.
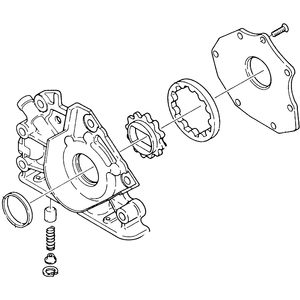
| Fig. 1: Exploded view of a typical oil pump assembly
|
- Remove the oil pump pickup tube-to-oil pump bolts, the tube and gasket.
NOTE: When removing the pump housing from the front of
the block, some engines have an additional engine block support structure
which the bottom surface of the pump seals against. This may make it difficult
to remove the pump. Try not to pry between gasket mating surfaces and always
pull the pump outward from the engine, not up.
- Remove the oil pump housing-to-cylinder block bolts, the pump and, if equipped,
the gasket.
- If necessary, pry the oil seal from the pump and clean the seal bore.
- Thoroughly clean all of the gasket mounting surfaces. Inspect the pump and
gears for wear.
To install:
- Apply a continuous bead of silicone sealer to the oil pump gasket surface.
NOTE: Do not allow the sealer to squeeze into the pump's
outlet hole in the pump or cylinder block.
- Install a new O-ring into the pump body.
- Install the oil pump to the cylinder block; be careful not to cut the oil
seal lip. Tighten the oil pump-to-cylinder block bolts to specifications.
- Install the oil pump pickup tube using a new gasket.
- Install the oil pan and the crankshaft sprocket. Tighten the crankshaft
sprocket bolt to specifications.
- Connect the negative battery cable and refill the crankcase. Start the engine
and check for leaks.

