CAUTION
When draining the coolant, keep in mind that cats and dogs are attracted by
the ethylene glycol antifreeze, and are quite likely to drink any that is left
in an uncovered container or in puddles on the ground. This will prove fatal
in sufficient quantity. Always drain the coolant into a sealable container.
Coolant should be reused unless it is contaminated or several years old.
- Disconnect the negative battery cable. Drain the radiator to below the level
of the thermostat.
- If necessary, remove the air cleaner assembly.
- If necessary, disconnect the coolant temperature switch at the thermostat
housing.
| Fig. 1: Exploded view of the thermostat assembly
for the 1.5L, 1.6L and 1.8L (except K8) engines
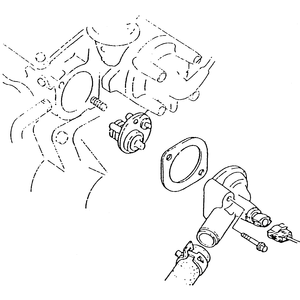
|
| Fig. 2: Exploded view of the thermostat assembly
for the 2.2L engine
|
- Remove the upper radiator hose.
- Remove the mounting nuts, thermostat housing, thermostat and gasket.
NOTE: Do not pry the housing off.
To install:
- Clean the thermostat housing and the cylinder head mating surfaces.
- Insert the thermostat into the rear cylinder head housing with the jiggle
pin at the top. The spring side of the thermostat should face the housing.
- Position a new gasket onto the studs with the seal print side facing the
rear cylinder housing.
- Install the thermostat housing and 2 nuts. Tighten the nuts to 14–22
ft. lbs. (19–30 Nm).
- Install the upper radiator hose.
- If detached, connect the coolant temperature switch.
- If removed, install the air cleaner housing.
- Fill the cooling system. Connect the negative battery cable, start the engine
and check for leaks. Check the coolant level and add coolant, as necessary.
- Disconnect the negative battery cable.
- Drain the engine coolant from the radiator to below the level of the thermostat.
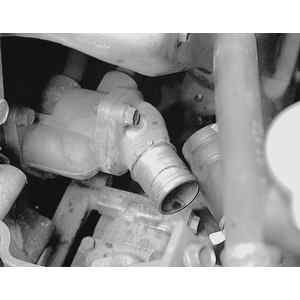
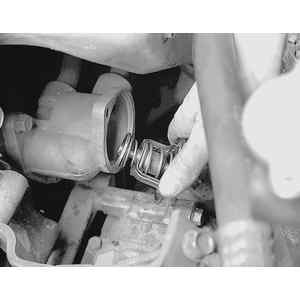
| Fig. 3: To remove the thermostat, first drain the
cooling system, then remove the radiator hose-to-thermostat housing
cover clamp . . .
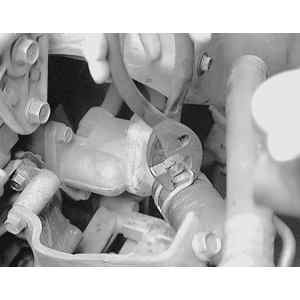
|
| Fig. 4: . . . by sliding back on the hose. Note the
alignment marks on the hose and housing cover (arrows)
|
| Fig. 5: Disconnect the hose from the thermostat housing
cover
|
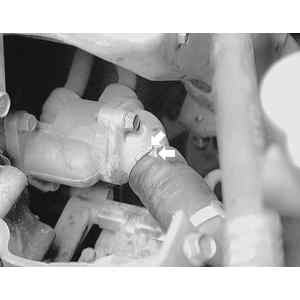
| Fig. 6: Loosen the thermostat housing cover attaching
bolts . . .
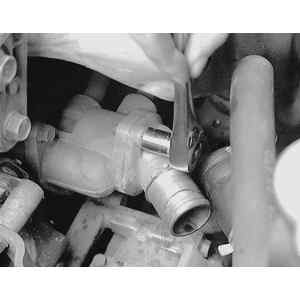
|
| Fig. 7: . . . then remove them . . .
|
| Fig. 8: . . . along with the housing cover/water
outlet
|
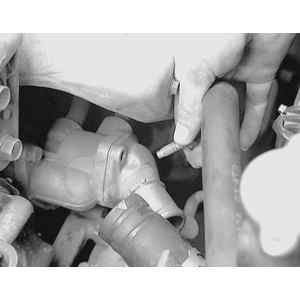
| Fig. 9: Remove the thermostat from the housing by
simply pulling it outward
|
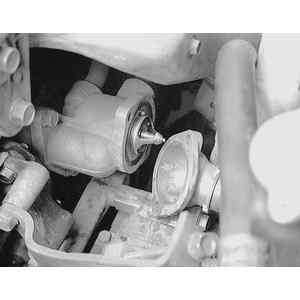
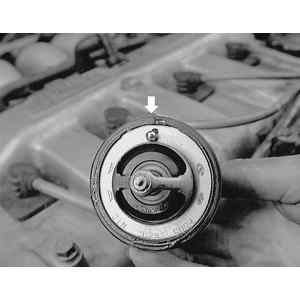
| Fig. 10: When installing the new thermostat, note
the tab (arrow) which seats into a notch in the housing. Jiggle pin
must face straight up
|
- Disconnect the lower radiator hose from the engine.
- Remove the housing bolts, thermostat housing, thermostat and gasket.
NOTE: Do not pry the housing off.
To install:
- Clean the thermostat housing and the cylinder head mating surfaces.
- Make sure that the thermostat jiggle pin is aligned with the gasket projection.
- Install the thermostat to the housing. Align the gasket projection with
the opening in the housing. The spring side of the thermostat should face
into the housing.
- Install the thermostat housing cover and tighten both bolts to 14–19
ft. lbs. (19–25 Nm).
- Fill the cooling system. Connect the negative battery cable, start the engine
and check for leaks. Check the coolant level and add coolant, as necessary.
- Disconnect the negative battery cable.
- Drain the engine coolant from the radiator to below the level of the thermostat.
- Remove the water outlet pipe mounting bolt and detach the pipe from the
outlet housing. Remove and discard the O-ring.
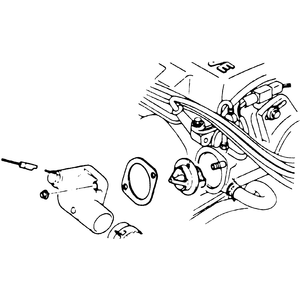
| Fig. 11: Exploded view of the thermostat assembly
for the 1.8L (K8) and 2.5L engines

|
- Remove the engine harness bracket bolt and position the harness aside.
- Remove the housing bolt, thermostat housing, thermostat and gasket.
NOTE: Do not pry the housing off.
To install:
- Clean the thermostat housing and the cylinder head mating surfaces.
- Insert the thermostat into the housing with the jiggle pin at the top. The
spring side of the thermostat should face the housing.
- Position a new gasket with the projection facing the same direction as the
thermostat jiggle pin.
- Install the thermostat housing cover and loosely install the lower bolt.
Install the engine harness bracket and loosely install the bolt. Tighten both
bolts to 14–19 ft. lbs. (19–25 Nm).
- Position a new O-ring onto the water pipe and wet the O-ring with fresh
engine coolant.
- Install the pipe to the outlet housing, using care to not rip or otherwise
damage the O-ring, and install the mounting bolt. Tighten the mounting bolt
to 14–19 ft. lbs. (19–25 Nm).
- Fill the cooling system. Connect the negative battery cable, start the engine
and check for leaks. Check the coolant level and add coolant, as necessary.
- Disconnect the negative battery cable.
- Drain the engine coolant from the radiator to below the level of the thermostat.
- Remove the charge air cooler air duct.
| Fig. 12: Exploded view of the thermostat assembly
for the 2.3L engine. Also shown are the removed components for thermostat
access

|
- Remove the air cleaner housing.
- Remove the resonator.
- Remove the two thermostat housing bolts, the housing and the thermostat.
To install:
- Thoroughly clean the thermostat housing and cylinder head mating surfaces.
- Position the thermostat on the housing and align the projection on the thermostat
to the notch in the housing.
- Position the housing/thermostat assembly to the cylinder head and install
the two retaining bolts. Tighten the bolts to 14–18 ft. lbs. (19–25
Nm).
- Install the resonator, air cleaner housing and air duct assemblies. Tighten
all attaching bolts to 70–95 inch lbs. (8–11 Nm).
- Fill the cooling system. Connect the negative battery cable, start the engine
and check for leaks. Check the coolant level and add coolant, as necessary.

