Previous Next

Timing Belt Cover

REMOVAL & INSTALLATION

1990–94 1.6L and 1.8L (except K8) Engines
  1. Disconnect the negative battery cable.
  2. Remove the engine under splash shield.

    Fig. 1: Exploded view of the 1990–94 1.6L and 1.8L SOHC timing belt cover assembly

    Fig. 2: Exploded view of the 1.8L DOHC timing belt cover assembly

  3. Remove the accessory drive belts. Refer to Section 1.
  4. Remove the crankshaft pulley.
  5. Remove the inner and outer timing belt guide plates.
  6. Remove the 2 bolts and remove the upper timing belt cover assembly.
  7. Remove the 1 bolt and remove the lower timing belt cover assembly and gasket.

    To install:

  8. Install the lower cover gasket and the lower cover. Tighten the bolt to 69–95 inch lbs. (8–11 Nm).
  9. Install the upper cover gasket and the upper cover. Tighten the bolts to 69–95 inch lbs. (8–11 Nm).
  10. Install the timing belt inner and outer guide plates. Make sure that the inner guide plate is installed in the proper direction.
  11. Install the crankshaft pulley. Tighten the bolts to 109–152 inch lbs. (12–17 Nm).
  12. Install the accessory drive belts. Refer to Section 1.
  13. Install the under engine splash shield.
  14. Connect the negative battery cable.
1.5L and 1995 1.6L DOHC Engines
  1. Disconnect the negative battery cable.
  2. Remove the engine under splash shield.
  3. Drain the cooling system.
  4. Remove the air intake pipe.

    Fig. 3: Exploded view of the timing cover assembly for the 1.5L and 1995 1.6L engines — 1995–98 1.8L engine is similar

  5. Disconnect the upper radiator hose and the 2 lower coolant hoses from the thermostat housing.
  6. Remove the power steering, air conditioning and alternator drive belts. Refer to Section 1.
  7. Remove the retaining bolts and remove the water pump pulley.
  8. Remove the crankshaft pulley bolts and remove the crankshaft pulley.
  9. Remove the inner and outer timing belt guide plates.
  10. Disconnect the coil electrical connectors and remove coil assembly. Remove the spark plug wires. Be certain to record positioning of plug wires for assembly purposes.
  11. Remove the spark plugs.
  12. Remove the cylinder head cover bolts and remove the cover.
  13. Remove the bolts from the timing belt covers and remove the top, the center and the lower timing belt covers.

    To install:

  14. Install the timing belt covers with gaskets and tighten the bolts to 69–95 inch lbs. (8–11 Nm).
  15. Apply silicone sealant to the corners of the cylinder head cover and install the cover. Tighten the bolts to 43–78 inch lbs. (5–9 Nm).
  16. Install the spark plugs and tighten them to 11–17 ft. lbs. (15–23 Nm).
  17. Install the coil assembly and connect the electrical connectors and the spark plug wires.
  18. Install the inner and outer timing belt guide plates.
  19. Install the crankshaft pulley and tighten the bolts to 109–152 inch lbs.(12–17 Nm).
  20. Install the water pump pulley and tighten the bolts to 69–95 inch lbs. (8–11 Nm).
  21. Install the power steering, air conditioning and alternator drive belts. Refer to Section 1.
  22. Install the coolant and radiator hoses and refill the coolant to the proper level.
  23. Install the air intake pipe and connect the negative battery cable.
1995–98 1.8L (except K8) DOHC Engines
  1. Disconnect the negative battery cable.
  2. Remove the engine under splash shield.
  3. Remove the power steering, air conditioning and alternator drive belts. Refer to Section 1.
  4. Remove the retaining bolts and remove the water pump pulley.
  5. Remove the crankshaft pulley bolts and remove the crankshaft pulley.
  6. Remove the inner and outer timing belt guide plates.
  7. Remove the bolt and remove the upper timing belt cover assembly.
  8. Remove the bolts from the middle and lower timing belt cover assembly and remove the covers and the gaskets.

    To install:

  9. Install the upper, the center and the lower timing belt covers. Tighten the bolts to 69–95 inch lbs. (8–11 Nm).
  10. Install the timing belt inner and outer guide plates. Make sure that the inner guide plate is installed in the proper direction.
  11. Install the crankshaft pulley. Tighten the bolts to 109–152 inch lbs. (12–17 Nm).
  12. Install the water pump pulley and tighten the bolts to 69–95 inch lbs. (8–11 Nm).
  13. Install the P/S, A/C and alternator drive belts. Refer to Section 1.
  14. Install the under engine splash shield.
  15. Connect the negative battery cable.
2.0L Engine
  1. Disconnect the negative battery cable.
  2. Raise and safely support the vehicle. Remove the right front wheel.

    Fig. 4: Exploded view of the timing belt cover for the 2.0L engine

  3. Remove the engine under splash shield.
  4. Remove the accessory drive belts. Refer to Section 1.

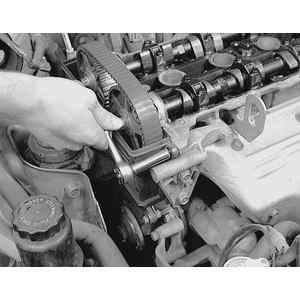
    Fig. 5: To remove the timing belt cover, first remove the valve cover, then remove the upper belt cover attaching screws . . .

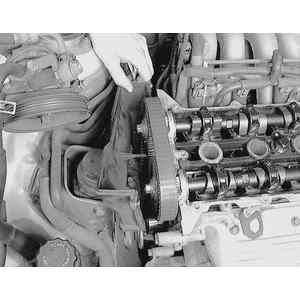
    Fig. 6: . . . then pull the cover from the engine. Some careful maneuvering of the cover is required

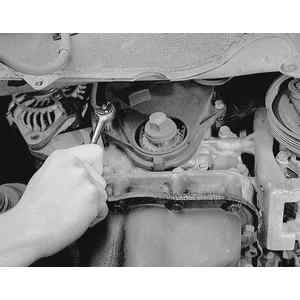
    Fig. 7: Next, raise the vehicle, remove the crankshaft damper as well as the lower belt cover attaching screws . . .

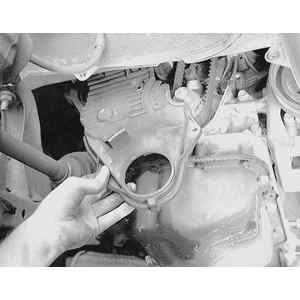
    Fig. 8: . . . then pull the cover outward and down to remove it from the vehicle

  5. Remove the power steering pump pulley shield.
  6. Remove the power steering pump, leaving the hoses attached and position the pump out of the way.
  7. Remove the retaining bolts and remove the water pump pulley.
  8. Remove the crankshaft pulley bolt and remove the pulley using a steering wheel puller.
  9. Remove the spark plug wires, noting the original location of the wires for installation purposes. Disconnect the power steering hose from the cylinder head cover.
  10. Remove the spark plugs and remove the cylinder head cover bolts. Remove the cylinder head cover with the gasket in place.
  11. Remove the oil level dipstick bolt and remove the oil dipstick and plug the hole.
  12. Remove the timing belt cover bolts and remove the upper and lower covers and the gaskets. To install:
  13. Install the timing covers with the gaskets in place. Install the timing cover bolts and tighten to 69–95 inch lbs. (8–11 Nm).
  14. Install the bolt that secures the oil level dipstick and tighten the bolt to 69–95 inch lbs. (8–11 Nm).
  15. Apply silicone sealant to the corners of the cylinder head cover and install the cylinder head cover to the engine and tighten the cylinder head bolts to 69–95 inch lbs. (8–11 Nm).
  16. Install the spark plugs to the engine and connect the spark plug wires.
  17. Install the crankshaft pulley, with the guide plate in place behind the pulley. Hold the pulley in place with special tool 49 E011 1A1 or equivalent and tighten the bolt to 116–123 ft. lbs. (157–167 Nm).
  18. Install the water pump pulley and tighten the bolts to 69–95 inch lbs. (8–11 Nm).
  19. Install the power steering pump. Tighten the upper bolt to 32–44 ft. lbs. (44–66 Nm) and the lower bolt to 24–33 ft. lbs. (32–46 Nm).
  20. Install the power steering pump pulley shield and tighten the bolt to 60–87 inch lbs. (7–10 Nm).
  21. Install the accessory belts and adjust as necessary. Refer to section One.
  22. Install the under engine splash shield and install the right front wheel.
  23. Lower the vehicle and connect the negative battery cable.
2.2L Engine
  1. Disconnect the negative battery cable.
  2. Remove the bolts and remove the engine side cover.

    Fig. 9: Exploded view of the 2.2L engines timing belt cover assembly

  3. Remove the accessory drive belts, refer to section 1.
  4. Remove the crankshaft pulley bolts and remove the crankshaft pulley.
  5. Remove the timing cover bolts and remove the upper and lower covers.

    To install:

  6. Install the upper and lower timing belt covers with the gaskets. Tighten the bolts to 61–87 inch lbs. (7–10 Nm).
  7. Install the crankshaft pulley and tighten the bolts to 109–153 inch lbs. (12–17 Nm).
  8. Install the accessory drive belts, refer to section 1.
  9. Install the engine side cover and connect the negative battery cable.
1.8L (K8) and 2.5L Engines
  1. Disconnect the negative battery cable.
  2. Remove the engine under splash shield.

    Fig. 10: Exploded view of the 1.8L (K8) and 2.5L engines timing belt cover assembly — 2.3L engine is similar

  3. Remove the accessory drive belts. Refer to Section 1.
  4. Remove the retaining bolts and remove the water pump pulley.
  5. Remove the idler pulley bracket bolt and remove the idler pulley bracket.
  6. Remove the power steering pump bolts and the pump as shown in section 8.
  7. Remove the crankshaft pulley bolts and remove the pulley using a steering wheel puller.
  8. Disconnect the crank angle sensor electrical connector and remove the clip from the oil dipstick tube. Remove the oil dipstick and plug the hole.
  9. Remove the bolt from the knock sensor harness bracket.
  10. Remove the 2 bolts that secure the engine harness to the timing cover.
  11. Remove the remaining timing belt cover bolts and remove the covers and the gaskets.

    To install:

  12. Install the timing covers with the gaskets in place. Install the timing cover bolts and tighten to 69–95 inch lbs. (8–11 Nm).
  13. Install the 2 bolts that secure the engine harness to the timing cover and tighten the bolts to 69–95 inch lbs. (8–11 Nm).
  14. Install the knock sensor harness bracket to the timing cover and tighten the bolt to 69–95 inch lbs. (8–11 Nm).
  15. Install the oil dipstick tube complete with a new O-ring. Install the crank angle sensor harness clip to the dipstick tube and connect the electrical connector.
  16. Install the crankshaft pulley and loosely tighten the bolt. Hold the pulley in place with special tool 49 E011 1A1 or equivalent and tighten the bolt to 116–123 ft. lbs. (157–167 Nm).
  17. Install the power steering fluid pump assembly and tighten the upper bolts to 23–34 ft. lbs. (31–46 Nm) and the lower bolt to 14–19 ft. lbs. (19–25 Nm).
  18. Install the power steering pump pulley nut and tighten to 46–69 ft. lbs. (63–93 Nm). Connect the power steering fluid line bracket to the engine and tighten the bolts to 69–95 inch lbs. (7.8–11 Nm).
  19. Connect the power steering pressure switch electrical connector and install the power steering oil reservoir and the engine ground.
  20. Install the water pump pulley and the power steering idler pulley. Install the belts and tighten the pulley bolts to 69–95 inch lbs. (8–11 Nm).
  21. Install the A/C belt and adjust as necessary. Refer to section One.
  22. Install the under engine splash shield and connect the negative battery cable.
2.3L Engine
  1. Disconnect the negative battery cable.

    CAUTION
    Never open, service or drain the radiator or cooling system when hot; serious burns can occur from the steam and hot coolant. Also, when draining engine coolant, keep in mind that cats and dogs are attracted to ethylene glycol antifreeze and could drink any that is left in an uncovered container or in puddles on the ground. This will prove fatal in sufficient quantities. Always drain coolant into a sealable container. Coolant should be reused unless it is contaminated or is several years old.

  2. Drain the cooling system.
  3. Loosen the lug nuts on the right front wheel.
  4. Apply the parking brake, block the rear wheels, then raise and safely support the front of the vehicle securely on jackstands.
  5. Remove the right front wheel.
  6. Remove the engine under splash shield.
  7. Remove the right-hand dust cover.
  8. Loosen the water pump and power steering pump pulley attaching bolts.
  9. Remove the accessory drive belts.
  10. Remove the crankshaft pulley.
  11. Unbolt and remove the power steering pump pulley.
  12. Remove the water pump pulley attaching bolts and the pulley.
  13. Remove the alternator belt auto tensioner pulley assembly.
  14. Remove the camshaft position sensor.
  15. Unbolt the engine oil dipstick tube and remove it from the engine. Plug the hole to keep debris from falling into the engine.
  16. Unbolt and remove the vacuum pipe.
  17. Remove the upper radiator hose.
  18. Support the engine from underneath and remove the No. 3 (front) engine mount.
  19. Remove the timing belt cover attaching bolts and remove the covers.

    To install:

  20. Inspect the dust seals on the belt covers and replace them as necessary.
  21. Position the timing belt covers and install the attaching bolts. Tighten the bolts to 70–95 inch lbs. (8–11 Nm).
  22. The remainder of the installation is the reverse of the removal procedure. Tighten all fasteners to specification.

Previous Next