Before starting the following procedure, clean the area around the turbocharger
assembly with a non-caustic solution. After the turbocharger is removed, cover
the openings to prevent the entry of foreign material while it is off the engine.
During removal, be careful not to bend, nick, or in any way damage the compressor
wheel blades. Damage may result in rotating assembly imbalance, and bearing
and oil seal failure. Any time a turbocharger assembly has been removed, gently
spin the turbine wheel before reassembly to ensure the rotating assembly does
not bind.
Any time an engine bearing (main bearing, connecting rod bearing, camshaft
bearing) has been damaged in a turbocharged engine, the oil and filter should
be changed and the turbocharger flushed with clean engine oil to reduce the
possibility of contamination.
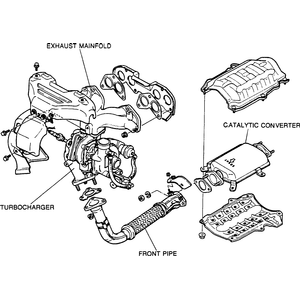
| Fig. 1: Exploded view of the turbocharger assembly on
the 2.2L engine

|
- Disconnect the negative battery cable.
- Raise and safely support the vehicle. Remove the engine undercover and drain
the cooling system.
- Remove the inlet and outlet hoses from the turbocharger. Cover the turbocharger
openings with clean rags to prevent the entry of dirt or foreign material.
- Remove the retaining bolts and remove the insulator covers from the exhaust
manifold and turbocharger.
- Disconnect the coolant hoses.
- Disconnect the oil feed and return lines. Cover the openings in the turbocharger
to prevent the entry of dirt or foreign material.
- Disconnect the oxygen sensor connector. Disconnect the EGR pipe from the
exhaust manifold.
- Remove the nuts and disconnect the exhaust pipe from the turbocharger. Remove
the bolt from the turbocharger support bracket.
- Remove the exhaust manifold-to-cylinder head nuts while supporting the manifold/turbocharger
assembly.
- Remove the exhaust manifold and turbocharger as an assembly.
- Remove the nuts and separate the manifold from the turbocharger.
NOTE: Do not carry the turbocharger by the actuator rod.
Be careful not to bend the actuator mounting or rod.
- Clean all gasket mating surfaces of sealant and old gasket material.
To install:
- Assemble the exhaust manifold to the turbocharger, using a new gasket. Tighten
the nuts to 34 ft. lbs. (46 Nm).
- Pour approximately 0.85 oz. (25 ml) of clean engine oil into the turbocharger
oil inlet.
- Install the turbocharger/exhaust manifold assembly to the cylinder head,
using a new gasket. Tighten the nuts to 34 ft. lbs. (46 Nm).
- Connect the support bracket to the turbocharger. Tighten the bolt to 30
ft. lbs. (41 Nm).
- Connect the exhaust pipe to the turbocharger, using a new gasket. Tighten
the nuts to 34 ft. lbs. (46 Nm).
- Connect the EGR pipe to the exhaust manifold. Connect the oxygen sensor
connector.
- Connect the oil feed and return lines. Connect the coolant hoses.
- Install the insulators on the exhaust manifold and turbocharger and secure
with the bolts.
- Install the turbocharger inlet and outlet hoses.
- Check the engine oil level and add, as necessary. Change the oil and filter
if the oil is dirty.
- Install the engine undercover and lower the vehicle.
- On 323, disconnect the connector from the ignition coil negative terminal.
Disconnect the connector from the igniter.
- Connect the negative battery cable and crank the engine for at least 20
seconds.
- Reconnect the electrical connector. Fill and bleed the cooling system.
- Start the engine and run at idle for 30 seconds.
- Stop the engine and disconnect the negative battery cable. Depress the brake
pedal for at least 5 seconds to cancel the malfunction code.


