Previous Next

TESTING

EGR System
  1. Start the engine.
  2. Accelerate the engine and verify that the EGR control valve diaphragm does not move upon acceleration with the engine cold.
  3. Continue to run the engine until it reaches the normal operating temperature.
  4. Accelerate the engine and verify that the EGR control valve diaphragm moves upward upon acceleration with the engine warm.
EGR Valve
  1. Manually operate the valve by pushing on the diaphragm with a finger.

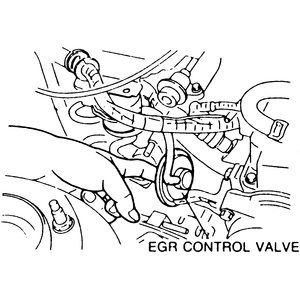
    Fig. 1: Press on the underside of the EGR valve diaphragm to check for proper movement and resistance

  2. There should be spring resistance felt and the diaphragm should not stick or bind.
  3. Start the engine and allow it to reach normal operating temperature.
  4. Attach a vacuum pump to the valve and apply vacuum.
  5. The engine should begin to run rough or stall as the vacuum increases.

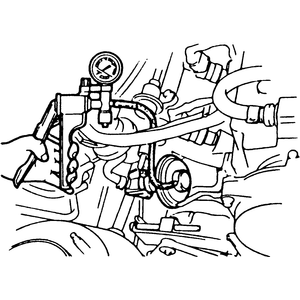
    Fig. 2: With the engine running, apply vacuum to the EGR valve with a vacuum pump and verify a change in engine rpm

  6. If there is no change in the engine speed, turn the engine OFF.
  7. Apply at least 5.91 in.Hg (150mmHg) of vacuum to the valve to check for a bad diaphragm. The vacuum should stay at the same reading. If it does not, or you are not able to achieve a vacuum, replace the EGR valve.
  8. If the vacuum did not bleed off, remove the valve and check the passages for blockage. Clean as necessary.
EGR Modulator Valve
  1. Remove the EGR modulator valve assembly.
  2. Plug the number 1 port and attach a vacuum gauge to the number 3 port as shown.

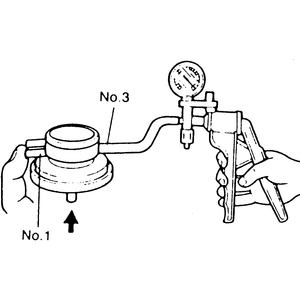
    Fig. 3: Test the EGR modulator using a hand vacuum pump

  3. Blow air into the exhaust port and operate the vacuum pump. Make sure that vacuum is held.
  4. Release the plug from the exhaust port and make sure that the vacuum pressure is released.
  5. If vacuum pressure is not held or released as required, replace the EGR modulator valve assembly.
EGR Solenoid Valve
DUAL PORT VALVE
  1. Label and disconnect the vacuum hoses from the solenoid valve.
  2. Detach the solenoid valve electrical connector.
  3. As shown, blow air through the solenoid valve from vacuum port A and make sure that air flows out of port B.
  4. Apply 12 volts and a ground to the valve at the electrical connector point.
  5. Blow through the vent hose and make sure that the air flows.
  6. Replace the solenoid valve if the valve is not as specified.
THREE PORT VALVE

Vent Side

  1. Label and disconnect the vacuum hoses.
  2. Blow through the vent hose and make sure the air flows.
  3. Detach the solenoid valve electrical connector.
  4. Apply 12 volts and a ground to the valve at the electrical connector point.
  5. Blow through the vent hose and make sure that the air does not flow.
  6. Replace the solenoid valve if the valve is not as specified.

    Vacuum Side

  7. Disconnect the vacuum hoses.
  8. Blow through the vent hose and make sure the air does not flow.
  9. Detach the solenoid valve electrical connector.
  10. Apply 12 volts and a ground to the valve at the electrical connector point.
  11. Blow through the vent hose and make sure that the air flows.
  12. Replace the solenoid valve if the valve is not as specified.

Previous Next