Previous Next

FUEL TANK

Tank

REMOVAL & INSTALLATION

323 and Protege — Except 4WD
  1. Properly relieve the fuel system pressure.
  2. Disconnect the negative battery cable.
  3. Depress the clips on each end of the rear seat cushion and remove the cushion.
  4. Detach the sending unit electrical connector, remove the 4 attaching screws and the sending unit access cover.

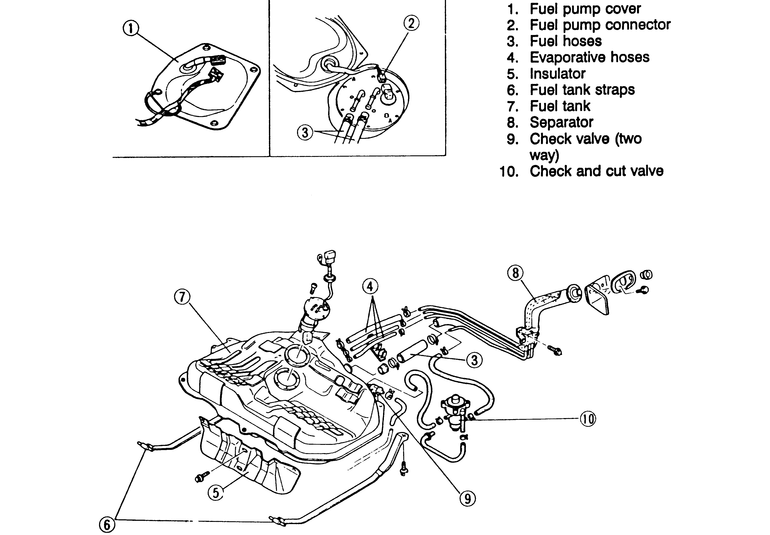
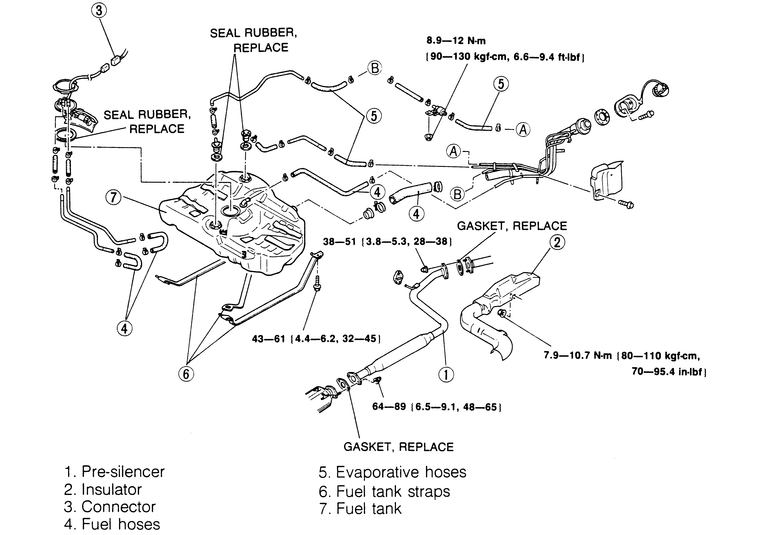
    Fig. 1: Exploded view of the 323 and Protege (Except 4WD) fuel tank assembly

  5. Raise and safely support the vehicle.
  6. Disconnect the fuel hoses and the evaporative hoses from the sending unit and from the fuel tank itself.
  7. Position a suitable container under the fuel tank and drain the fuel tank.
  8. Remove the attaching screws and the fuel tank insulator from the front of the fuel tank.
  9. Support the fuel tank and remove the 2 fuel tank straps.
  10. Remove the fuel tank.
  11. Position the fuel tank in place and install the 2 tank straps. Tighten the bolts to 27–38 ft. lbs. (37–52 Nm).
  12. Install the fuel tank insulator and tighten the bolts to 69–95 inch lbs. (8–11 Nm).
  13. Connect the evaporative and fuel hoses. Push the hoses on at least 1.4 inches (35mm).
  14. Attach the sending unit electrical connector and install the cover.
  15. Install the rear seat and connect the negative battery cable.
4WD 323 and Protege
  1. Properly relieve the fuel system pressure.
  2. Disconnect the negative battery cable.
  3. Depress the clips on each end of the rear seat cushion and remove the cushion.
  4. Remove both fuel pump covers and detach the sending unit electrical connectors.

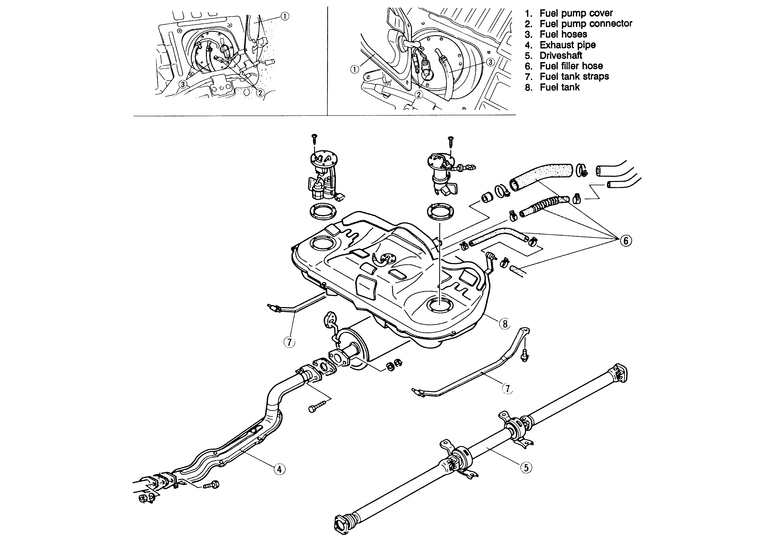
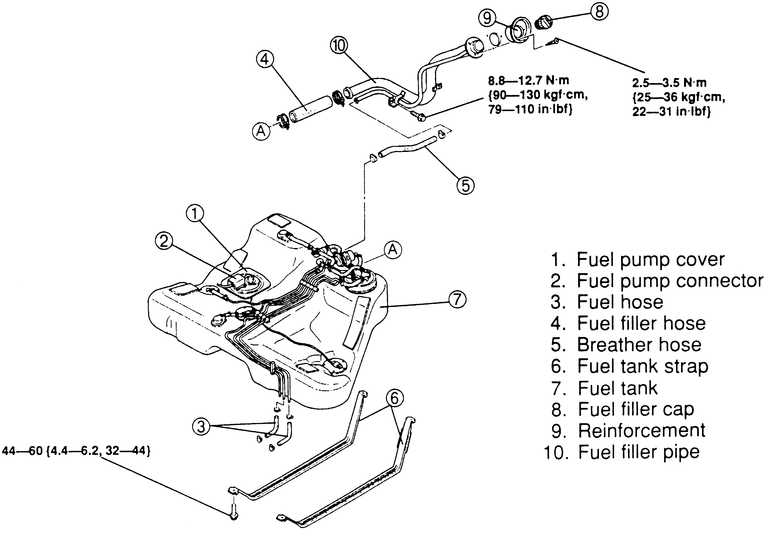
    Fig. 2: Exploded view of the 323 and Protege (4WD) fuel tank assembly

  5. Disconnect the fuel hoses and the evaporative hoses from the sending unit/fuel pumps.
  6. Raise and safely support the vehicle.
  7. Position a suitable container under the fuel tank and drain the fuel tank.
  8. Remove the exhaust system intermediate pipe and muffler from below the fuel tank.
  9. Remove the driveshaft.
  10. Disconnect the fuel hoses from the fuel tank.
  11. Support the fuel tank and remove the 2 fuel tank straps.
  12. Remove the fuel tank.
  13. Position the fuel tank in place and install the 2 tank straps. Tighten the bolts to 32–45 ft. lbs. (43–61 Nm).
  14. Connect the hoses to the fuel tank.
  15. Install the driveshaft. Tighten the shaft end nuts to 20–22 ft. lbs. (27–30 Nm) and the center shaft support nuts to 27–38 ft. lbs. (37–51 Nm).
  16. Install the exhaust intermediate pipe/muffler with new gaskets and tighten the nuts to 30–41 ft. lbs. (40–55 Nm).
  17. Attach the hoses and electrical connectors to the fuel sending unit/pump assemblies. Push the hoses on at least 1.4 inches (35mm).
  18. Install the fuel pump cover assemblies and install the rear seat.
  19. Connect the negative battery cable.
MX-3
  1. Properly relieve the fuel system pressure.
  2. Disconnect the negative battery cable.
  3. Depress the clips on each end of the rear seat cushion and remove the cushion.
  4. Detach the sending unit electrical connector, remove the 4 attaching screws and the sending unit access cover.
  5. Raise and safely support the vehicle.
  6. Disconnect the fuel hoses and the evaporative hoses from the sending unit and from the fuel tank itself.

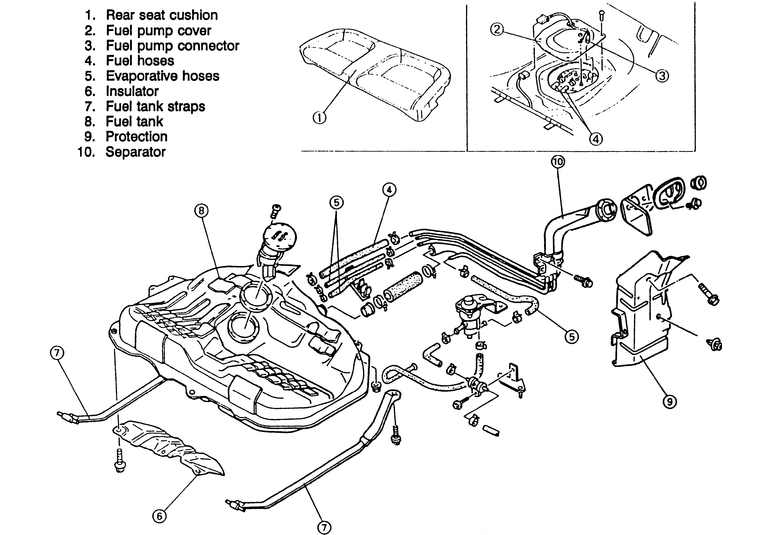
    Fig. 3: Exploded view of the MX-3 fuel tank assembly

  7. Position a suitable container under the fuel tank and drain the fuel tank.
  8. Remove the attaching screws and the fuel tank insulator from the front of the fuel tank.
  9. Support the fuel tank and remove the 2 fuel tank straps.
  10. Remove the fuel tank.
  11. Position the fuel tank in place and install the 2 tank straps. Tighten the bolts to 32–45 ft. lbs. (43–62 Nm).
  12. Install the fuel tank insulator and tighten the bolts to 69–95 inch lbs. (8–11 Nm).
  13. Connect the evaporative and fuel hoses. Push the hoses on at least 1.4 inches (35mm).
  14. Attach the sending unit electrical connector and install the cover.
  15. Install the rear seat and connect the negative battery cable.
1990–92 626 and MX-6
  1. Properly relieve the fuel system pressure.
  2. Disconnect the negative battery cable.
  3. Depress the clips on each end of the rear seat cushion and remove the cushion.
  4. Detach the sending unit electrical connector, remove the 4 attaching screws and the sending unit access cover. Disconnect the fuel hoses from the sending unit.

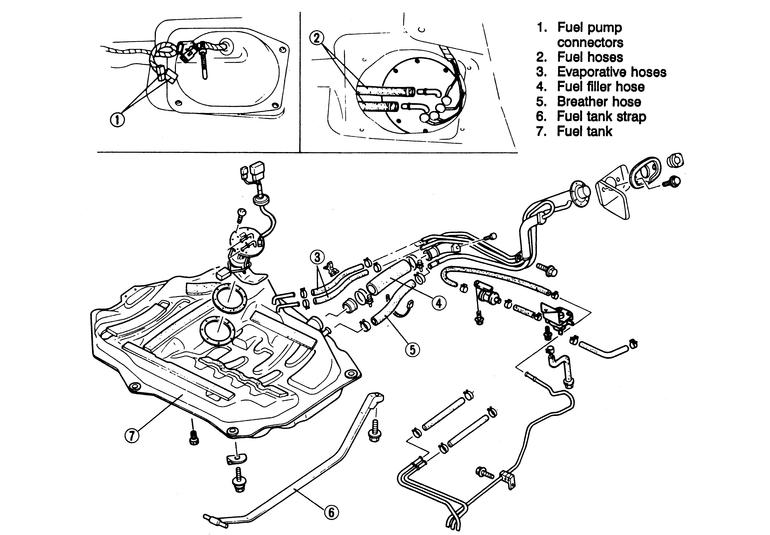
    Fig. 4: Exploded view of the 1990–92 626 and MX-6 fuel tank assembly

  5. Raise and safely support the vehicle.
  6. Disconnect the fuel hoses and the evaporative hoses from the fuel tank itself.
  7. Position a suitable container under the fuel tank and remove the drain plug to drain the fuel tank.
  8. Support the fuel tank.
  9. Remove the 2 fuel tank straps and the corner mounting bolts.
  10. Remove the fuel tank.
  11. Position the fuel tank in place and install the 2 tank straps. Tighten the bolts to 32–45 ft. lbs. (43–61 Nm).
  12. Install the corner mounting bolts and tighten them to 16–22 ft. lbs. (22–30 Nm).
  13. Connect the evaporative and fuel hoses. Push the hoses on at least 1.4 inches (35mm).
  14. Lower the vehicle and attach the sending unit electrical connector and hoses. Install the cover.
  15. Install the rear seat and connect the negative battery cable.
1993–98 626/MX-6/Probe
  1. Properly relieve the fuel system pressure.
  2. Drain the fuel tank and disconnect the negative battery cable.

    Fig. 5: Exploded view of the 626/MX-6/Probe fuel tank assembly

  3. Raise and safely support the vehicle.
  4. Remove the pre-silencer exhaust pipe.
  5. Remove the exhaust pipe insulator assembly.
  6. Detach the electrical connectors from the top of the fuel tank.
  7. Disconnect the fuel and evaporative hoses from the fuel tank.
  8. While having an assistant support the fuel tank, remove the fuel tank support straps and lower the fuel tank from the vehicle.

    To install:

  9. Lift the fuel tank into place and install the fuel tank straps. Tighten the bolts to 32–45 ft. lbs. (43–61 Nm).
  10. Connect the fuel and evaporative hoses to the fuel tank, making sure to push the hose on at least 1.4 inches (35mm).
  11. Attach the electrical connector to the top of the fuel tank.
  12. Install the exhaust pipe insulator assembly and tighten the nut to 70–95 inch lbs. (7.9–10.7 Nm).
  13. Install the pre-silencer exhaust pipe with new gaskets and tighten the rear nuts to 28–38 ft. lbs. (38–51 Nm). Tighten the front nuts to 48–65 ft. lbs. (64–89 Nm).
  14. Lower the vehicle and connect the negative battery cable.
Millenia
  1. Properly relieve the fuel system pressure.
  2. Disconnect the negative battery cable.
  3. Remove the rear seat cushion.

    Fig. 6: Exploded view of the fuel tank assembly for Millenia

  4. Detach the fuel pump connector, located beneath the rear seat cushion.
  5. Drain the fuel tank.
  6. Raise and safely support the vehicle.
  7. Disconnect the fuel lines at the tank.
  8. Disconnect the fuel filler hose from the tank.
  9. Disconnect the fuel tank vapor and breather hoses.
  10. Properly support the fuel tank and remove the tank retaining straps.
  11. Lower the fuel tank and remove it from the vehicle.

    To install:

  12. Raise the fuel into position and install the tank retaining straps. Tighten the bolts to 32–44 ft. lbs. (44–60 Nm).
  13. Connect the fuel vapor, breather and filler hoses to the tank.
  14. Connect the fuel lines to the tank.
  15. From inside the vehicle, attach the fuel pump electrical connector.
  16. Fill the tank with fuel.
  17. Connect the negative battery cable.
  18. Cycle the ignition switch ON and OFF several times to pressurize the fuel system.
  19. Check all hose connections for leaks. Repair any leaks which are found (loose hose clamps, worn or damaged hoses, etc.).
  20. Lower the vehicle and install the rear seat cushion.

Previous Next