Previous Next

HEATING AND AIR CONDITIONING

Blower Motor

REMOVAL & INSTALLATION

MX-3, 1990–94 323 and Protege
  1. Disconnect the negative battery cable.
  2. Open the glove box and remove the glove box retaining screws. Remove the glove box assembly.
  3. Remove the inner glove box assembly screws and remove the inner glove box.

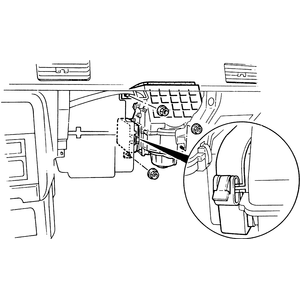
    Fig. 1: View of the heater blower unit mounting for the MX-3, 1990–94 323 and Protege

  4. Unclip and remove the heater blower seal plate.
  5. Remove the 3 heater blower mounting nuts and remove the blower unit case.

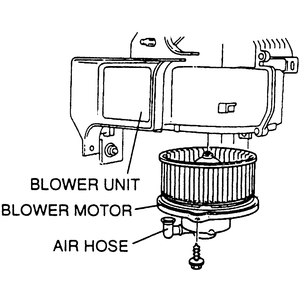
    Fig. 2: Exploded view of the MX-3, 1990–94 323 and Protege heater blower unit. The 1990–92 626 and MX-6 use a similar mounting

  6. Remove the screws and separate the two halves of the blower unit case.
  7. Remove the blower fan from the blower motor. Remove the mounting screws and separate the blower motor from the case.

    To install:

  8. Install the blower motor to the case and install the screws.
  9. Install the blower fan to the blower motor.
  10. Connect the 2 halves of the blower unit case and install the screws.
  11. Install the heater blower unit case to the vehicle and tighten the mounting nuts.
  12. Install the heater blower seal plate.
  13. Install the inner glove box assembly.
  14. Install the glove box door.
  15. Connect the negative battery cable.
1990–92 626 and MX-6
  1. Disconnect the negative battery cable.
  2. Remove the glove box and the underdash cover.
  3. Detach the electrical connectors from the blower unit.
  4. Remove the blower unit-to-fire wall attaching bolts and remove the blower unit assembly.
  5. Remove the blower motor fan-to-motor fastener.
  6. Remove the blower motor-to-unit attaching bolts, then remove the motor.
  7. Installation is the reverse of the removal procedure.
1993–98 626/MX-6/Probe, 1995–98 Protege and Millenia

NOTE: The blower motor is located on the right side of the vehicle underneath the dashboard.

  1. Disconnect the negative battery cable.
  2. If necessary, remove the sound deadening panel from the passenger side.

    Fig. 3: Exploded view of the blower motor assembly for 1993–98 626/MX-6/Probe, 1995–98 Protege and Millenia

  3. Remove the glove box assembly and, if equipped, the brace.
  4. Remove the cooling air hose from the blower motor assembly.
  5. Detach the electrical connector from the blower motor.
  6. Remove the 3 blower motor-to-blower motor housing screws and blower motor.
  7. If necessary, remove the blower wheel-to-blower motor clip and the wheel.
  8. To install, reverse the removal procedure and check the blower motor operation.

Previous Next