Previous Next

Rear Stabilizer Bar

REMOVAL & INSTALLATION

323/Protege
  1. Raise and safely support the rear of the vehicle.
  2. Remove the rear wheels from the vehicle.

    Fig. 1: Exploded view of the 323/Protege rear stabilizer bar assembly and related components. MX-3 is similar

  3. Remove the upper stabilizer nut, bushing, retainer and spacer.
  4. Remove the stabilizer bolt and the remaining bushings, retainers and spacers.
  5. Remove the stabilizer bracket bolts and remove the stabilizer bar.
  6. Installation is the reverse of the removal procedure. Align the stabilizer bushing with the marks painted on the bar.
MX-3
  1. Raise and safely support the rear of the vehicle.
  2. Remove the rear wheels from the vehicle.
  3. Remove the stabilizer bar to link mounting nut and protectors.
  4. Remove the stabilizer bracket and remove the stabilizer bar. Remove the stabilizer bushings and inspect the bushing for deterioration or wear. Replace if necessary.
  5. Installation is the reverse of the removal procedure.
1990–92 626/MX-6
  1. Raise and safely support the rear of the vehicle.
  2. Remove the rear wheels from the vehicle.
  3. Remove the upper stabilizer nut, bushing, retainer and spacer.
  4. Remove the stabilizer bolt and the remaining bushings, retainers and spacers.
  5. Remove the stabilizer bracket bolts and remove the stabilizer bar.
  6. Installation is the reverse of the removal procedure. Align the stabilizer bushing with the marks painted on the bar.
  7. Tighten the stabilizer bracket bolts to 27–40 ft. lbs. (36–54 Nm). Tighten the top stabilizer nut so that there is approximately 0.41 inch (10.4mm) of thread exposed at the end of the bolt.
Millenia and 1993–98 626/MX-6
  1. Raise and safely support the rear of the vehicle.

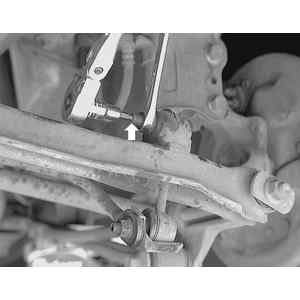
    Fig. 2: When removing the rear stabilizer end links, you may need to hold the shaft with an Allen wrench (arrow). Loosen the nut . . .

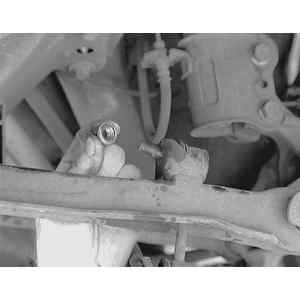
    Fig. 3: . . . then remove it and detach the stabilizer end link from the lateral link

  2. Remove the rear wheels from the vehicle.
  3. Remove the stabilizer bar to link mounting nut and protectors.
  4. Remove the stabilizer bracket and remove the stabilizer bar. Remove the stabilizer bushings and inspect the bushing for deterioration or wear. Replace if necessary.
  5. Installation is the reverse of the removal procedure.

Previous Next