Previous Next

Brake Caliper

REMOVAL & INSTALLATION

Fig. 1: Exploded view of the front brake caliper mounting

Fig. 2: Common rear disc brake caliper mounting

1990–94 323, 626, MX3, MX6 and Protege
FRONT
  1. Raise the vehicle and support safely.
  2. Remove the appropriate tire and wheel assembly.

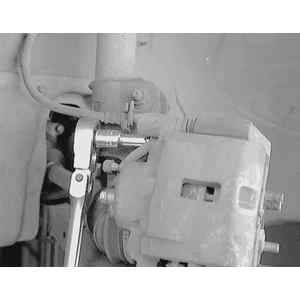
    Fig. 3: Use a short extension to help reach the caliper mounting bolts

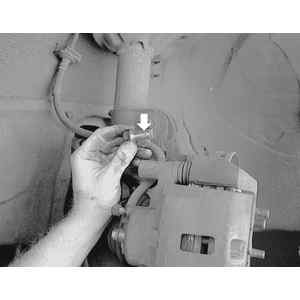
    Fig. 4: Remove the mounting bolts and inspect for damaged threads. Replace if necessary

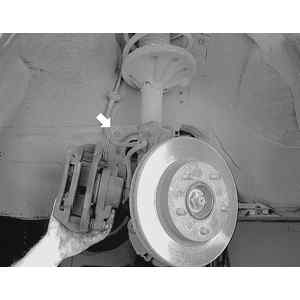
    Fig. 5: Lift the caliper from the knuckle and support it with wire

  3. If necessary, disconnect the flexible brake hose from the caliper.
  4. If equipped with one caliper mounting bolt, remove the lower caliper bolt and pivot the caliper upward. Slide the top of the caliper off of the top pin and remove it from the vehicle (or support it with wire). If equipped with two caliper mounting bolts, remove both bolts and remove the caliper (or support it out of the way with wire).

    To install:

  5. If equipped with one mounting bolt, lubricate the caliper pin and slide the caliper onto the guide pin. Pivot the caliper over the brake pads. Install the mounting bolt. If equipped with two bolts, position the caliper and install the bolts.
  6. Connect the brake hose to the caliper.
  7. Bleed the brake system and inspect the brake system for proper operation.
  8. Install the wheel and lower the vehicle. Connect the negative battery cable.
REAR
  1. Raise the vehicle and support safely.
  2. Remove the appropriate tire and wheel assemblies. Loosen the parking brake cable adjustment from inside the vehicle.
  3. Disconnect the parking brake cable from the cable bracket and the operating lever.
  4. Disconnect the flexible brake line from the caliper assembly.
  5. Remove the caliper upper mounting bolt and pivot the caliper downward. Slide the caliper off of the guide pin. Remove the caliper from the vehicle.

    To install:

  6. Lubricate the caliper pin and slide the caliper onto the guide pin. Pivot the caliper over the brake pads.
  7. Connect the brake hose to the caliper and tighten the hose nut to 16–20 ft. lbs. (22–26 Nm).
  8. Install the upper caliper mounting bolt and tighten the bolt to 33–49 ft. lbs. (45–67 Nm).
  9. Bleed the brake system and inspect the brake system for proper operation.
  10. Install the wheel and lower the vehicle. Connect the negative battery cable.
1995–98 Protege
FRONT
  1. Raise the vehicle and support safely.
  2. Remove the appropriate tire and wheel assembly.
  3. Disconnect the flexible brake hose from the caliper.
  4. Remove the disc pad retaining pins. Remove the brake pads.
  5. Remove the upper and lower caliper bolts. Remove the caliper from the vehicle.

    To install:

  6. Position the caliper on the brake disc. Install the caliper mounting bolts and tighten the bolts to 29–36 ft. lbs. (40–49 Nm).
  7. Install the disc pad and retaining pins.
  8. Replace the washers for the brake line. Connect the brake hose to the caliper and tighten the hose nut to 16–21 ft. lbs. (22–29 Nm).
  9. Bleed the brake system and inspect the brake system for proper operation.
  10. Install the wheel and lower the vehicle.
REAR
  1. Raise the vehicle and support safely. Remove the wheels.
  2. Disconnect the parking brake cable from the cable bracket and the operating lever.
  3. Disconnect the flexible brake line from the caliper assembly.
  4. Turn the manual adjustment gear counterclockwise with an Allen wrench to pull the caliper piston inward (turn until it stops).
  5. Remove the caliper mounting bolts. Remove the caliper from the vehicle.
  6. Installation is reverse of removal. Torque the caliper mount bolts to 34–44 ft. lbs. (46–60 Nm). Torque the brake hose line bolt to 16–22 ft. lbs. (22–30 Nm). Properly bleed the brake system.
1995 MX3
FRONT
  1. Raise the vehicle and support safely.
  2. Remove the appropriate tire and wheel assembly.
  3. Disconnect the flexible brake hose from the caliper.
  4. Remove the disc pad retaining pins. Remove the brake pads.
  5. Remove the upper and lower caliper bolts. Remove the caliper from the vehicle.

    To install:

  6. Position the caliper on the brake disc. Install the caliper mounting bolts and tighten the bolts to 29–36 ft. lbs. (40–49 Nm).
  7. Install the disc pad and retaining pins.
  8. Replace the washers for the brake line. Connect the brake hose to the caliper and tighten the hose nut to 16–21 ft. lbs. (22–29 Nm).
  9. Bleed the brake system and inspect the brake system for proper operation.
  10. Install the wheel and lower the vehicle. Connect the negative battery cable.
REAR
  1. Raise the vehicle and support safely.
  2. Remove the wheels. Loosen the parking brake cable adjustment from inside the vehicle.
  3. Disconnect the parking brake cable from the cable bracket and the operating lever.
  4. Disconnect the flexible brake line from the caliper assembly.
  5. Remove the caliper upper mounting bolt and pivot the caliper downward. Slide the caliper off of the guide pin. Remove the caliper from the vehicle.

    To install:

  6. Lubricate the caliper pin and slide the caliper onto the guide pin. Pivot the caliper over the brake pads.
  7. Connect the brake hose to the caliper and tighten the hose nut to 16–21 ft. lbs. (22–29 Nm).
  8. Install the upper caliper mounting bolt and tighten the bolt to 12–17 ft. lbs. (16–24 Nm).
  9. Connect the parking brake cable to the cable bracket and the operating lever.
  10. Bleed the brake system and inspect the brake system, including the parking brake, for proper operation.
  11. Install the wheel and lower the vehicle. Connect the negative battery cable.
1995–98 626 and MX6
FRONT
  1. Raise the vehicle and support safely.
  2. Remove the appropriate tire and wheel assembly.
  3. Disconnect the flexible brake hose from the caliper.
  4. Remove the lower caliper bolt and pivot the caliper upward. Slide the top of the caliper off of the top pin and remove it from the vehicle.

    To install:

  5. Lubricate the caliper pin and slide the caliper onto the guide pin. Pivot the caliper over the brake pads.
  6. Connect the brake hose to the caliper and tighten the hose nut to 16–21 ft. lbs. (22–29 Nm).
  7. Install the caliper mounting bolt and tighten the bolt to 22–29 ft. lbs. (30–40 Nm).
  8. Bleed the brake system and inspect the brake system for proper operation.
  9. Install the wheel and lower the vehicle. Connect the negative battery cable.
REAR
  1. Disconnect the battery negative cable.
  2. Raise the vehicle and support safely.
  3. Remove the appropriate tire and wheel assemblies. Loosen the parking brake cable adjustment from inside the vehicle.
  4. Disconnect the parking brake cable from the cable bracket and the operating lever.
  5. Disconnect the flexible brake line from the caliper assembly.
  6. Remove the caliper upper mounting bolt and pivot the caliper downward. Slide the caliper off of the guide pin. Remove the caliper from the vehicle.

    To install:

  7. Lubricate the caliper pin and slide the caliper onto the guide pin. Pivot the caliper over the brake pads.
  8. Connect the brake hose to the caliper and tighten the hose nut to 16–21 ft. lbs. (22–29 Nm).
  9. Install the upper caliper mounting bolt and tighten the bolt to 26–28 ft. lbs. (35–39 Nm).
  10. Connect the parking brake cable to the cable bracket and the operating lever.
  11. Bleed the brake system and inspect the brake system, including the parking brake, for proper operation.
  12. Install the wheel and lower the vehicle. Connect the negative battery cable.
1995–98 Millenia
FRONT
  1. Raise and safely support the vehicle.
  2. Remove the wheels.
  3. Disconnect the brake hose and brake pipe. Cap the ends to prevent contamination.
  4. Remove the caliper mounting bolts and remove the caliper. Remove the brake rotor.
  5. Installation is the reverse of removal. Torque the caliper mounting bolts to 47–62 ft. lbs. (63–84 Nm). Add fluid and properly bleed the brake system.
REAR
  1. Raise and safely support the vehicle.
  2. Remove the wheels.
  3. Disconnect the brake hose and cap the end to prevent contamination.
  4. Remove the caliper bracket mounting bolts and remove the caliper. Remove the rotor.
  5. Installation is the reverse of removal. Torque the caliper mounting bolts to 12–17 ft. lbs. (16–23 Nm).

Previous Next