Previous Next

Hatchback Assembly

REMOVAL & INSTALLATION

323
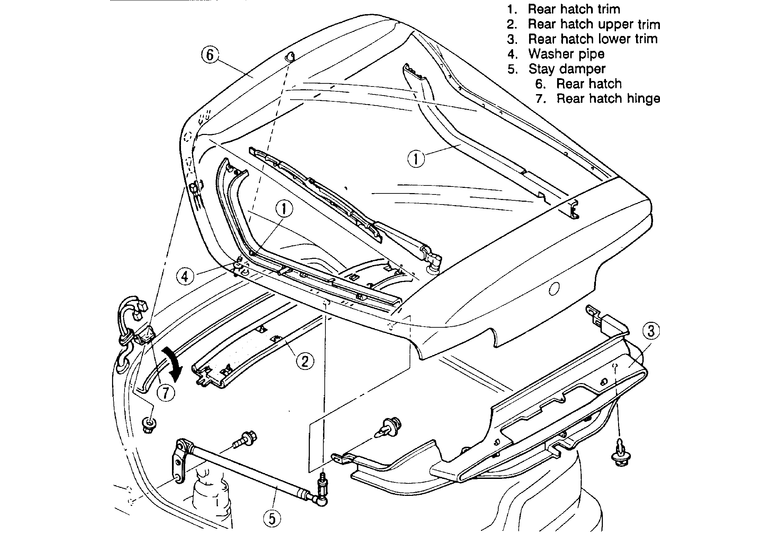
  1. Disconnect the negative battery cable and open the hatch fully.
  2. Disconnect the electrical harness that is located on the right side of the hatch. Feed the harness out of the channel.
  3. Disconnect the rear window washer hose from the rear hatch.
  4. Matchmark the position of the hinges to the hatch.
  5. Have an assistant support the rear hatch and remove the strut/damper supports from both sides.
  6. From under the hatch lip, remove the hatch hinge mounting bolts and lift the hatch away from the vehicle.
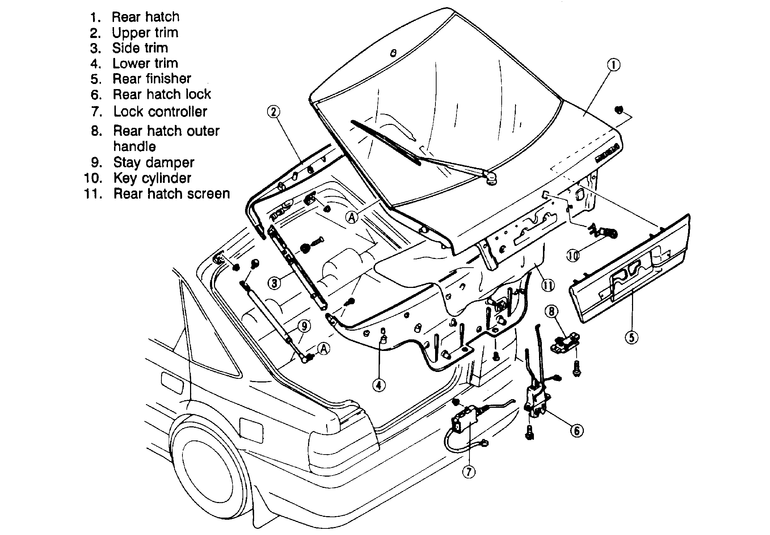
    To install:

  7. Lower the hatch into place, aligning with the matchmarks made earlier. Install the hatch hinge mounting bolts and tighten to 78–113 inch lbs. (9–13 Nm).
  8. Install the strut/damper assemblies. Tighten the bolts to 69–104 inch lbs. (8–12 Nm).
  9. Connect the rear window washer hose.
  10. Feed the electrical harness through the hatch channel and engage the electrical connector.
  11. Connect the negative battery cable.

    Fig. 1: Hatchback mounting found on 323 models

MX-3
  1. Open the hatch fully and disconnect the negative battery cable.
  2. Remove the inside hatch trim panel clips and remove the trim panels.
  3. Unplug the rear window washer hose and the electrical connector from the rear hatch.
  4. Matchmark the position of the hinges to the hatch.
  5. Support the hatch. Remove the strut/stay damper assembly bolts and remove the assemblies from the hatch.
  6. Remove the hatch mounting nuts and remove the hatch assembly from the vehicle.

    To install:

  7. Install the hatch to the vehicle and tighten the mounting nuts to 69–104 inch lbs. (8–12 Nm). Be sure the matchmarks are aligned.
  8. Install the strut/stay damper assemblies. Tighten the mounting bolts to 13–16 ft. lbs. (18–22 Nm).
  9. Connect the rear window washer hose and the electrical harness to the hatch.
  10. Install the inside trim panels and the trim clips.
  11. Connect the negative battery cable.

    Fig. 2: MX-3 hatchback mounting

626/MX-6/Probe
  1. Disconnect the negative battery cable and remove the trim that surrounds the rear hatch.
  2. Unplug the connector from the luggage compartment light and remove the light from its socket.
  3. Remove the rear hatch screen. Be careful not to rip or tear the screen when removing it.
  4. Locate the rear defroster and wiper motor electrical connectors and unplug them. Pull the wiring through the rear hatch.
  5. Matchmark the position of the hinges to the hatch.
  6. Remove the stay damper mounting bolts and disconnect the rear washer hose.
  7. Remove the wiring harness and route it off to the side.
  8. Have an assistant grasp and support the rear hatch and remove the rear hatch-to-hinge mounting bolts. Remove the hatch.

    To install:

  9. Install the rear hatch assembly and install the hatch-to-hinge bolts. Be sure to align it with the marks made earlier.
  10. Route the wiring harness to the side of the hatch.
  11. Connect the rear washer hose and install the stay damper mounting bolts.
  12. Engage the rear defroster and rear windshield wiper electrical connector.
  13. Install the rear hatch screen.
  14. Install the luggage compartment light and install the rear trim panels.
  15. Connect the negative battery cable.

    Fig. 3: Hatchback mounting — 1990–92 626/MX-6 shown

Previous Next