To Remove:
- Before servicing the vehicle, refer to the precautions in the beginning of this section.
- Relieve the fuel system pressure.
- Drain the cooling system.
- Properly discharge the A/C system.
- Disconnect the negative battery cable.
- Loosen the water pump pulley bolts.
- Remove the drive belt.
- Remove the water pump pulley, the fan, and the clutch assembly.
- Remove the intake manifolds.
- Remove the ignition wires from the spark plugs then remove the spark plugs.
- Remove the dipstick tube and bolt.
- Remove the exhaust gas recirculation (EGR) valve-to-exhaust manifold tube.
- Remove the valve cover and drive belt.
- Recover the A/C refrigerant.
- Disconnect the wiring from the A/C compressor.
- Remove the A/C compressor.
- Remove the A/C compressor mounting bracket with the power steering pump still attached and move it to the side.
- Disconnect the connector for the engine control sensor wiring from the generator.
- Disconnect the lower radiator hose and the water pump inlet tube then remove the upper radiator hose and the water pump inlet tube.
- Remove the generator and bolts.
- Remove the generator mounting bracket and bolts.
- Remove the ignition wire and bracket.
- Remove the outer timing belt cover and the timing chain/belt.
- Remove the exhaust manifold and the cylinder head.
To Install:
CAUTION
Do not use metal scrapers, wire brushes, power abrasive discs or other abrasive means to clean the sealing surfaces. These items will cause scratches and gouges, which create leak paths.
- Clean all gasket mating surfaces and install new gaskets where necessary. Make sure to use new cylinder head bolts for installation.
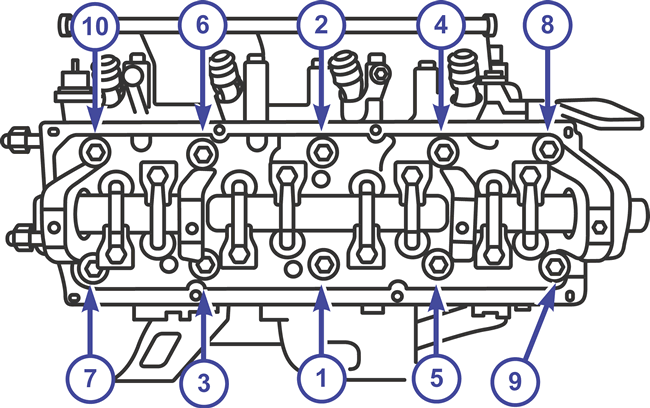
- Install the cylinder head and tighten the bolts in the sequence shown.
- Step 1: Torque all bolts to 51 ft-lb (70 Nm).
- Step 2: Again torque all bolts to 51 ft-lb (70 Nm).
- Step 3: Tighten all bolts an extra 90 degrees.
| Cylinder head torque sequence (2.5L)

|
- Install the exhaust manifold and the timing chain/belt.
- Install the outer timing belt cover.
- Install the ignition wire and bracket.
- Install the generator mounting bracket in four steps. First hand-tighten the bolt at the widest end of the generator bracket. Second, install and tighten the bolt at the opposite end of the bracket. Third, install and tighten the bolt in the middle of the other two bolts. Fourth, fully tighten the bolt you started with. Torque bolts to 30-40 ft-lb (40-55 Nm).
- Install the generator. Torque bolts to 31-39 ft-lb (41-54 Nm).
- Install the water pump inlet tube. Torque bolts to 80-106 in-lbs (9-12 Nm).
- Install the upper radiator hose.
- Connect the lower radiator hose and water pump inlet tube.
- Connect the connector for the engine control sensor wiring to the generator.
- Install the A/C compressor mounting bracket. Install the bolts and the stud. Torque the M10 bolts and stud to 35 ft-lb (48 Nm). Torque the M8 bolt to 18 ft-lb (25 Nm).
- Install the A/C compressor. Torque to 16-20 ft-lb (21-28 Nm).
- Connect the wiring to the A/C compressor.
- Evacuate and charge the A/C system.
- Install the drive belt.
- Install the valve cover. Torque to 80-115 in-lb (9-13 Nm).
- Install the EGR valve-to-exhaust manifold tube. Torque to 25-35 ft-lb (34-47 Nm).
- Install the dipstick tube and bolt then install the spark plugs.
- Install the ignition wires to the spark plugs.
- Install the intake manifolds, clutch assembly, fan, and water pump pulley.
- Install the drive belt.
- Tighten the water pump pulley bolts.
- Fill the cooling system.
- Pressurize the fuel system and check for leaks.
- Connect the negative battery cable.