CAUTION
Do not use solvent of any type when cleaning the gasket surfaces on the intake manifold and the throttle body assembly, as damage to the gasket surfaces and throttle body assembly may result. Use care in cleaning the gasket surfaces on the intake manifold and the throttle body assembly, as sharp tools may damage the gasket surfaces.
To Remove:
- Before servicing the vehicle, refer to the precautions in the beginning of this section.
- Disconnect the negative battery cable and the intake air temperature (IAT) sensor.
- Remove the air cleaner outlet tube and the accelerator control splash shield.
- Disconnect the engine control sensor wiring from the throttle position (TP) sensor and the idle air control (IAC) valve.
- Disconnect the accelerator cable and speed control, if present.
- Remove the accelerator cable bracket.
- Disconnect the crankcase vent hose from the valve cover then disconnect the vacuum hoses from the intake manifold vacuum tee.
- Disconnect the heater water hose from the intake manifold and from the heater line.
- Disconnect the EGR tube at the EGR valve and loosen the fitting on the exhaust manifold.
- Remove the EGR valve. Throw away the EGR valve gasket.
- Remove the upper intake manifold.
To Install:
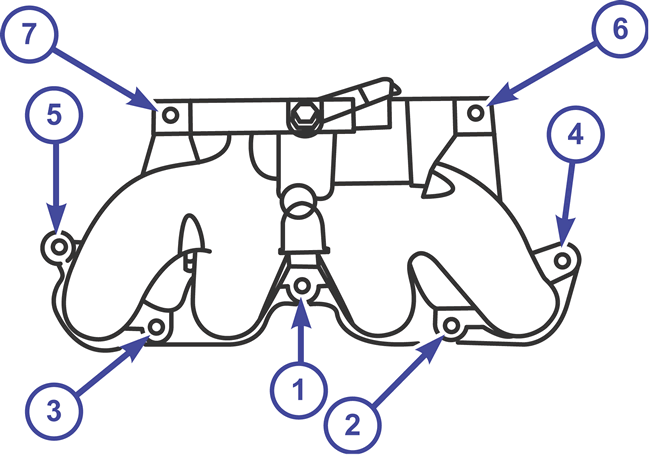
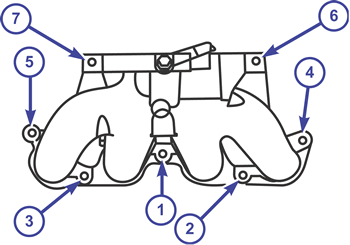
- Correctly place the lower intake manifold gasket and the upper intake manifold. Tighten the bolts in two steps according to the sequence shown.
- Step 1: Torque to 62-88 in-lb (7-10 Nm).
- Step 2: Torque to 20-28 ft-lb (26-38 Nm).
| Upper intake manifold torque sequence (2.5L)
|
- Install the EGR valve with a new valve gasket.
- Connect the EGR tube at the EGR valve and tighten the fitting on the exhaust manifold. Torque to 25-35 ft-lb (34-47 Nm).
- Connect the heater water hose to the intake manifold and to the heater line.
- Connect the vacuum hoses to the intake manifold vacuum tee.
- Connect the crankcase vent hose to the valve cover.
- Install the accelerator cable bracket. Torque to 16-20 ft-lb (21-28 Nm).
- Connect the accelerator cable and speed control, if present.
- Connect the engine control sensor wiring to the throttle position (TP) sensor and the idle air control (IAC) valve.
- Install the accelerator control splash shield. Torque to 62-79 in-lb (7-9 Nm).
- Install the air cleaner outlet tube.
- Connect the intake air temperature (IAT) sensor.
- Connect the negative battery cable.
To Remove:
WARNING
Even after the engine is turned off, fuel pressure is still in the fuel system. Correctly relieve fuel pressure or personal injury may result.
- Disconnect the negative battery cable.
- Remove the accessory drive belt, the dipstick tube, and the upper intake manifold.
- Remove the A/C compressor and bracket.
- Remove the dash panel ground cable from the intake manifold stud.
- Disconnect the 42-pin wiring connector from the retainer on the lower intake manifold.
- Disconnect the spring lock coupling.
- Disconnect the engine control wiring connectors from the fuel injectors.
- Remove the engine lifting eye.
- Remove the lower intake manifold and throw away the gasket.
To Install:
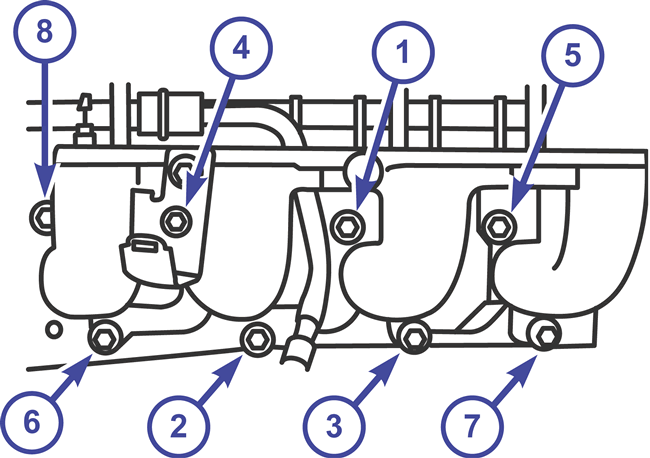
- Install the lower intake manifold with a new gasket. Tighten the lower intake manifold bolts in 2 steps according to the sequence shown below.
- Step 1: Torque to 62-88 in-lb (7-10 Nm).
- Step 2: Torque to 20-28 ft-lb (26-38 Nm).
| Lower intake manifold bolt torque sequence (2.5L)

|
- Install the engine lifting eye.
- Connect the engine control wiring connectors to the fuel injectors.
- Connect the spring lock coupling.
- Connect the 42-pin wiring connector to the retainer on the lower intake manifold.
- Install the dash panel ground cable to the intake manifold stud. Torque to 80-106 in-lb (9-12 Nm).
- Install the A/C compressor and bracket, the upper intake manifold, and the dipstick tube.
- Install the accessory drive belt.
- Connect the negative battery cable.