To Remove:
- Before servicing the vehicle, refer to the precautions in the beginning of this section.
- Remove the flywheel or flexplate.
- Drain the engine oil.
- On vehicles with coil springs ONLY: Remove the air cleaner outlet tube and the nuts from the engine mounts. Using the lifting eyes (303-D030) and the 3-bar engine support (303-D063), raise the engine 1.72 in (43 mm). Install blocks between the engine mounts and the support brackets.
- Remove the bolts, the oil pan, and the gasket. Throw away the gasket.
To Install:
CAUTION
Do not allow old sealant or gasket material to fall into the engine. Thoroughly clean the oil pan and all sealing surfaces. Clean and inspect the oil inlet tube.
CAUTION
Thickness of the applied sealant must be between 0.16 - 0.23 inch (4 - 6 mm).
NOTE: The oil pan should be installed and all fasteners torqued to specification within four minutes of the applying the gasket compound.
- Apply a 0.16 - 0.23 inch (4 - 6 mm) bead of silicone gasket and sealant to the parting line of the main bearing cap and the cylinder block and to where the front cover assembly and cylinder block meet.
- Position the oil pan gasket to the oil pan by aligning the fastener holes and retaining the gasket with clips. Make sure the fasteners are clean and dry before installing.
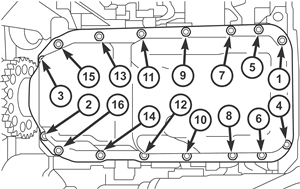
- Next, torque the oil pan bolts EVENLY to 9 ft-lb (12 Nm) in the sequence shown.
| Oil pan bolt torque sequence

|
- For vehicles equipped with coil springs ONLY: Remove the blocks from between the engine mounts and the support brackets then lower the engine and remove the 3-bar engine support and lifting eyes. Next, install the nuts. Torque to 65-95 ft-lb (88-130 Nm).
- Install the air cleaner outlet tube.
- Install the flywheel or flexplate.
- Fill the engine with the correct type and amount of motor oil.
- Start the engine and check for leaks. Repair leaks as necessary.
To Remove:
- Before servicing the vehicle, refer to the precautions in the beginning of this section.
- Disconnect the negative battery cable.
- Remove the flywheel or flexplate.
CAUTION
Retain the U-joint bearing caps with tape to the universal joint.
NOTE: Mark the alignment between the front axle pinion flange and the front drive shaft.
- Remove the front driveshaft from the front axle pinion flange, then throw away the bolts and straps.
- Drain the engine oil.
- Secure the front axle housing to a suitable jack.
- Remove the 3 axle-housing mounting bolts and lower the axle housing about 2 in.
- Remove the oil pan bolts and the oil pan.
- Remove and throw away the oil pan gasket.
To Install:
CAUTION
Do not allow old sealer or gasket material to fall into the engine. Thoroughly wash the oil pan and all gasket-sealing surfaces. Clean and inspect the oil inlet tube.
CAUTION
The sealant bead must be between 4 - 6 mm (0.16 - 0.23 in.) to prevent oil leaks.
NOTE: Install the oil pan and tighten all fasteners to the specified torque within four minutes of the sealant application.
- Apply a 0.16 - 0.23 in. (4 - 6 mm) bead of silicone to the parting line of the rear main bearing cap and the cylinder block, and to the parting line of the front cover assembly and cylinder block.
- Position the oil pan gasket on the oil pan and retain the gasket with clips. Make sure the fasteners are clean and dry before installing them.
- Tighten all oil pan bolts evenly in the sequence shown below. Torque to 9 ft-lb (12 Nm).
| Oil pan bolt torque sequence

|
- Raise the front axle into place and install the 3 front-axle mounting bolts. Torque to 49 ft-lb (66 Nm).
- Remove the jack.
CAUTION
Remove the tape applied during removal.
- Align the front drive shaft in the position marked during removal and install new front driveshaft straps and bolts. Torque to 14 ft-lb (19 Nm).
- Install the flywheel or flexplate.
- Fill the engine with clean engine oil.
- Start the engine and check for leaks. Repair leaks as necessary.

