CAUTION
Do not use solvent of any type when cleaning the gasket surfaces on the intake manifold and the throttle body assembly, as damage to the gasket surfaces and throttle body assembly may result. Use care in cleaning the gasket surfaces on the intake manifold and the throttle body assembly, as sharp tools may damage the gasket surfaces.
To Remove:
- Before servicing the vehicle, refer to the precautions in the beginning of this section.
- Disconnect the battery ground cable.
- Remove the air cleaner outlet pipe.
- Disconnect the accelerator cable, speed control cable, and the return spring.
- Disconnect the throttle position (TP) sensor and idle air control (IAC) valve electrical connectors.
- Disconnect the exhaust gas recirculation (EGR) tube from the EGR valve.
- Disconnect the vacuum hoses.
- Disconnect the EGR solenoid vacuum tube from the upper intake manifold port.
- Remove the bolt from the 42-pin connector bracket.
- Remove the throttle body and the throttle body gasket, if needed.
- Remove the bolt and nuts for the ignition coil and place it to the side.
- Remove the EGR transducer.
- Disconnect the evaporative emission hose.
- Remove the bolt from the intake support bracket.
- Remove the bolts from the upper intake manifold.
- Disconnect the crankcase ventilation hose.
- Remove the upper intake manifold and gasket.
To Install:
- Clean all mating surfaces.
- Install new upper intake manifold gaskets (when required).
- Place the upper intake manifold and align the EGR tube, then start it off by hand-tightening the EGR-tube-to-EGR nut.
- Connect the crankcase ventilation hose.
- Connect the evaporative emission hose.
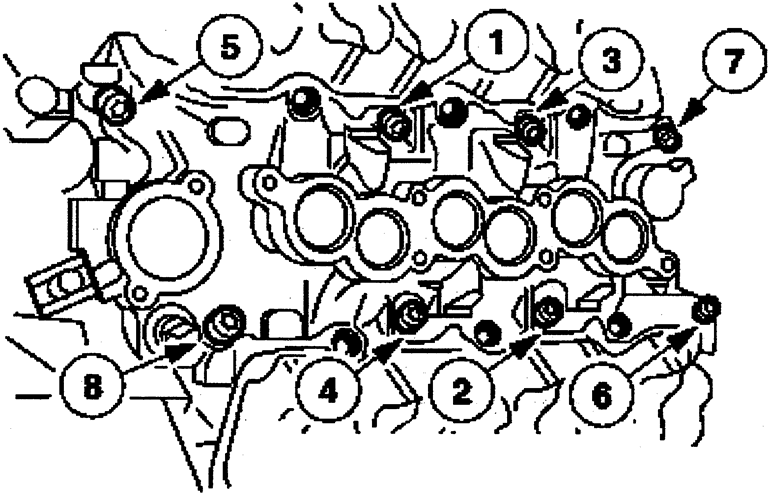
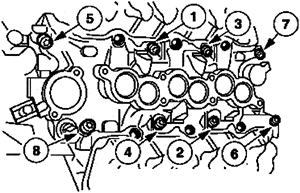
- Install the bolts on the upper intake manifold in 2 steps according to the sequence shown.
- Step 1: Torque to 14 ft-lb (20 Nm).
- Step 2: Torque to 18 ft-lb (25 Nm).
| Upper intake manifold bolt torque sequence
|
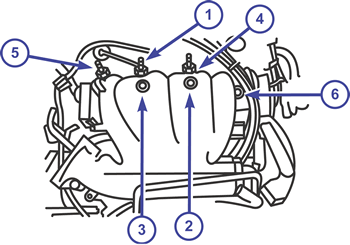
- Install the intake support bolt. Torque to 18 ft-lb (25 Nm).
- Install the EGR transducer. Torque to 71-106 in-lb (8-12 Nm).
- Install the ignition coil. Torque to 12-14 ft-lb (16-20 Nm).
- Install the throttle body and gasket. Torque to 15-22 ft-lb (20-30 Nm).
- Install the 42-pin connector bracket. Torque to 71-88 in-lb (8-10 Nm).
- Connect the EGR solenoid vacuum tube.
- Torque the EGR-tube-to-EGR-compression nut to 30 ft-lb (40 Nm).
- Connect the vacuum tube.
- Connect the engine control sensor wiring to the TP sensor, the IAC valve, and the EGR transducer.
- Connect the accelerator cable and the speed control actuator cable.
- Install the air cleaner outlet tube.
- Connect the negative battery cable.
- Start the vehicle and check for leaks, repair if necessary.
To Remove:
- Before servicing the vehicle, refer to the precautions in the beginning of this section.
- Disconnect the negative battery cable.
- Drain the engine cooling system.
- Remove both valve covers.
- Disconnect the upper radiator hose, heater hose, and coolant bypass hose.
- Disconnect the engine coolant temperature (ECT) sensor, the coolant temperature sender electrical connectors, and the camshaft position (CMP) sensor.
- Disconnect the crankshaft position (CKP) sensor and detach the wiring from the stud bolt.
- Disconnect the fuel injector electrical connectors and position the engine control wiring aside.
- Release the fuel pressure and disconnect the fuel tube.
- As an assembly, remove the fuel injection supply manifold and the fuel injector.
- Disconnect the hoses, including the upper radiator hose and the bypass hose.
- Loosen the bolt for the rocker arm positioned at the number three cylinder intake valve.
- Remove the push rods for the number three cylinder intake valve then remove the bolts from the lower intake manifold.
NOTE: Carefully loosen the intake manifold to separate the silicone sealant from the cylinder block.
- Remove the lower intake manifold then remove and throw away the gaskets and end seals.
To Install:
- Clean and inspect all the sealing surfaces.
NOTE: If the lower intake manifold is not installed within four minutes, remove the sealant and reapply.
- Install new intake manifold gaskets and seals.
- Apply a bead of silicone gasket and sealant at the four cylinder block-to-cylinder head seams.
- Position the intake manifold gaskets.
- Position the intake manifold front and rear seals.
- Position the lower intake manifold.
- Install the bolts and tighten in the sequence shown. Torque to 21 ft-lb (29 Nm).
| Tighten the lower manifold bolts in the sequence shown
|
- Install the pushrod for the number three cylinder intake valve.
- Tighten the rocker arm. Torque to 24 ft-lb (32 Nm).
- Connect the hoses.
- As an assembly, install the fuel injection supply manifold and fuel injectors. Torque to 71-106 in-lb (8-12 Nm).
- Connect the fuel line then the fuel injector electrical connectors.
- Connect the CKP sensor and attach the wiring from the stud bolt then connect the CMP sensor.
- Connect the ECT sensor and coolant temperature sender electrical connectors.
- Install both valve covers.
- Fill and bleed the engine cooling system.
- Drain the engine oil and refill with the correct type and amount of clean engine oil.
- Connect the negative battery cable.
- Start the engine. Check for any leaks and repair them as necessary.