To Remove:
CAUTION
The engine must only be turned clockwise because otherwise engine damage can result. The crankshaft, the crankshaft sprocket, and the pulley fit together by friction between the flange faces on each part. Because of this, the crankshaft sprocket can also be moved when the crankshaft pulley is rotated counterclockwise.
- Disconnect the negative battery cable.
- As an assembly, remove the upper gearshift lever and the outer gearshift lever boot and console assembly.
- Safely raise and support the vehicle.
- If transmission disassembly is necessary, remove the drain plug, and drain the transmission fluid then install the drain plug after draining out all of the fluid. Tighten to 36-ft-lb (48 Nm).
- Disconnect the reversing lamp switch electrical connector.
- Disconnect the electrical connector for the vehicle speed sensor (VSS) and the heated oxygen sensor (HO2S) electrical connector from the bracket.
- Disconnect the wiring harness from the bracket.
- Disconnect the heated oxygen sensor (HO2S) electrical connectors.
- Remove the starter motor.
CAUTION
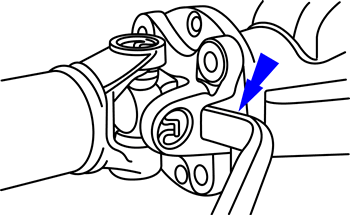
The driveshaft centering socket yoke fits tightly on the rear axle pinion flange pilot. Never hammer on the driveshaft or any of its components to disconnect the yoke from the flange. Pry only in the area shown, with a suitable tool, to disconnect the yoke from the flange.
CAUTION
If equipped, always disconnect the front driveshaft from the transfer case first. Otherwise, the weight of the driveshaft can cause the boot to tear.
- Remove the rear driveshaft, and the front driveshaft, if so equipped.
| Driveshaft removal

|
- Remove the bolts retaining the exhaust inlet crossover pipe to the exhaust manifold.
- Remove the bolts retaining the catalytic converter to the muffler. Discard the exhaust converter outlet gasket.
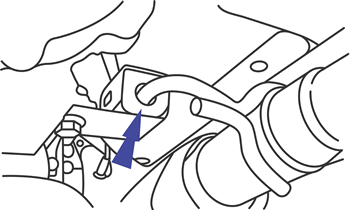
- While supporting the exhaust inlet crossover pipe and the catalytic converter assembly, remove the exhaust hanger from the insulator. Position the exhaust assembly to the side.
| Remove the exhaust hanger from the insulator

|
- On 4-wheel drive vehicles, remove the transfer case.
- Using a hydraulic line connector remover (special tool #308-182), disconnect the clutch hydraulic line from the clutch slave cylinder.
WARNING
Secure the transmission to the jack with a suitable safety strap. Failure to follow these instructions may result in personal injury.
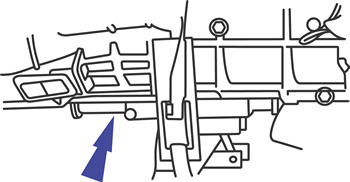
- Safely support the transmission using an appropriate transmission jack. Secure the transmission to the jack using an appropriate safety strap.
| Support the transmission

|
- Loosen, but do not remove the nuts retaining the transmission insulator to the crossmember.
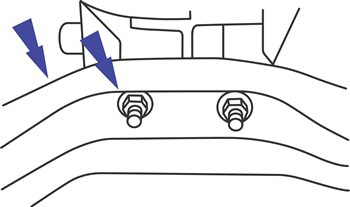
- Remove the 6 bolts that fasten the crossmember to the frame.
- Remove the nuts and the crossmember.
| Remove the nuts and the crossmember

|
NOTE: Lower the transmission enough to get access to the upper bolts fastening the transmission to the engine.
- Remove the 9 bolts that fasten the transmission onto the engine.
- Remove the transmission from the vehicle.
To Install:
CAUTION
The engine must only be turned clockwise because otherwise engine damage can result. The crankshaft, the crankshaft sprocket, and the pulley fit together by friction between the flange faces on each part. Because of this, the crankshaft sprocket can also be moved when the crankshaft pulley is rotated counterclockwise.
- Use a transmission jack to raise and position the transmission to the engine and clutch.
- Install the 9 bolts that fasten the transmission onto the engine. Tighten to 44 ft-lb (60 Nm).
- Install the 6 bolts that fasten the crossmember to the frame. Tighten to 46 ft-lb (63 Nm).
- Install the transmission insulator-to-crossmember nuts. Tighten to 72 ft-lb (98 Nm).
- Remove the high-lift transmission jack.
| Support the transmission

|
- Connect the clutch hydraulic to the clutch slave cylinder.
- On 4-wheel drive vehicles ONLY: Install the transfer case.
- Install the exhaust hanger into the insulator.
| Remove the exhaust hanger from the insulator

|
- Install a new exhaust converter outlet gasket, then install the catalytic converter to the muffler bolts. Tighten to 30 ft-lb (40 Nm).
- Install the exhaust inlet crossover pipe bolts. Tighten to 30 ft-lb (40 Nm).
- Install the rear driveshaft.
- Install the front driveshaft, if so equipped.
- Install the starter motor.
- Connect the electrical connectors to the heated oxygen sensors (HO2S).
- Connect the electrical connector to the reverse lamp switch.
- Connect the electrical connector to the VSS.
- Connect the electrical connector for the HO2S to the bracket.
- Connect the wiring harness to the bracket.
- Refill the transmission with the specified amount of fluid. Use MERCONŽ Multi-Purpose Automatic Transmission Fluid XT-2-QDX or equivalent meeting Ford specification MERCONŽ.
- Lower the vehicle.
- Connect the negative battery cable.
- Install the upper gearshift lever and the outer gearshift lever boot and console assembly as an assembly.


