To Remove:
NOTE: Any time the lines are disconnected from the steering gear, new O-ring seals must be installed.
CAUTION
Be careful to prevent contaminants from entering the power steering system during the repair procedure or the result could be premature failure of the power steering components.
- Position the wheel to face straight ahead. Turn OFF the ignition switch.
- Remove the front tire and wheel assemblies.
- Remove the fluid cooler.
- Remove the cotter pins and nuts and throw them away.
CAUTION
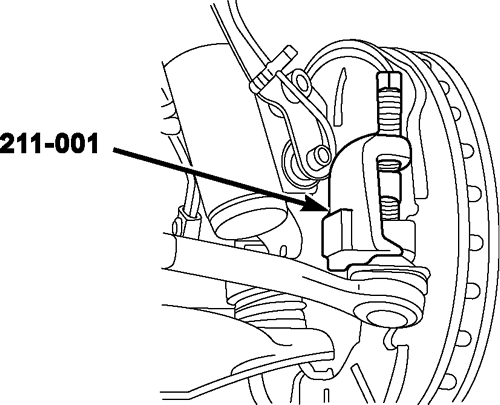
Be careful not to damage the tie-rod boot when installing the tie-rod end remover tool (211-001).
NOTE: Remove the adapter from the ball end of the tie-rod end remover tool then apply a little bit of grease to the tie-rod end stud and the ball of the tie-rod end remover tool.
- Use the tie-rod end remover tool to separate the tie-rod ends from the wheel knuckles.
| Use the special tool to separate the tie rod end from the knuckle
|
CAUTION
Do not let the intermediate shaft rotate while it is disconnected from the steering gear because damage to the clockspring can occur. If there are signs that the intermediate shaft has rotated, the clockspring must be removed and recentered.
- Remove the pinch bolt and detach the intermediate shaft from the gear. Throw away the bolt.
- Remove the nut and disconnect the lines. Throw away the O-ring seals.
- Cap or plug the power steering pressure hose, the power steering return hose, and the steering gear ports to keep dirt out.
CAUTION
To avoid damaging the steering gear fluid transfer tubes, hold the tops of the steering gear to crossmember stud bolts.
- Remove the nuts.
- Remove the mounting stud, washer, nut, and stop assemblies.
- Remove the steering gear. Make sure all mounting surfaces are clean.
To Install:
- Install the steering gear. Make sure all mounting surfaces are clean.
- Install the mounting stud, washer, nut, and stop assemblies.
- Install the nuts. Torque to 111 ft-lb (150 Nm).
CAUTION
To avoid damaging the steering gear fluid transfer tubes, hold the tops of the steering gear to crossmember stud bolts.
- Remove the caps of plugs from the power steering pressure hose, the power steering return hose, and the steering gear ports.
- Connect the lines and install the nut. Use new O-ring seals. Torque to 18 ft-lb (25 Nm).
- Attach the intermediate shaft to the gear and install a new pinch bolt. Torque to 35 ft-lb (48 Nm).
CAUTION
Do not let the intermediate shaft rotate while it is disconnected from the steering gear because damage to the clockspring can occur. If there are signs that the intermediate shaft has rotated, the clockspring must be removed and recentered.
- Connect the tie-rod ends to the wheel knuckles.
- Install new cotter pins and nuts.
- Install the fluid cooler.
- Install the front wheel and tire assemblies.
- Fill and check the system for leaks.
- Check the wheel alignment and make any necessary adjustments.
To Remove:
CAUTION
Be careful to prevent contaminants from entering the power steering system during the repair procedure or the result could be premature failure of the power steering components.
- Position the wheel to face straight ahead. Turn OFF the ignition switch.
- Remove the tire and wheel assemblies.
- Remove the power steering fluid cooler nuts.
- Loosen the clamp, disconnect the hose, and drain the fluid into an appropriate container.
- Loosen the clamp then disconnect and remove the cooler.
- Loosen the tie-rod end jam nuts then remove and throw away the cotter pins and nuts.
CAUTION
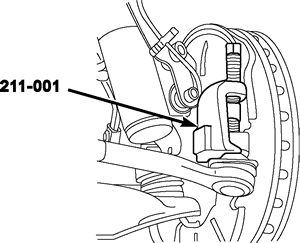
Do not damage the tie-rod boot when installing the tie-rod end remover (211-001).
NOTE: Remove the adapter from the ball end of the tie-rod end remover. Apply a little bit of grease to the tie-rod end stud and the ball of the tie-rod end remover.
- Use the tie-rod end remover to separate the tie-rod ends from the wheel knuckles.
- Remove the tie-rod ends and make note of how many turns are needed to remove a tie-rod end.
- Remove the front stabilizer bar link nuts from the front suspension lower arms.
- Remove the front stabilizer bar bolts and the front stabilizer bar links.
- Remove the front stabilizer bar and insulators.
CAUTION
Do not let the intermediate shaft rotate while it is disconnected from the steering gear because damage to the clockspring can occur. If there are signs that the intermediate shaft has rotated, the clockspring must be removed and recentered.
- Remove the pinch bolt and detach the intermediate shaft from the gear.
- Disconnect the lines.
CAUTION
To avoid damaging the steering gear fluid transfer tubes, hold the tops of the steering gear to crossmember stud bolts.
- Remove the nuts, stud bolts, and washers.
- Turn the steering gear control valve housing toward the front of the vehicle.
- Turn the steering gear input shaft to the right until it stops.
- Move the steering gear toward the right side of the vehicle as far as it will possibly go.
- Move the left front wheel spindle tie-rod forward to clear the frame crossmember.
- Remove the steering gear.
To Install:
NOTE: Be sure the steering gear input shaft is turned to the left until it stops.
NOTE: Be careful when handling the steering gear to avoid damaging the fluid transfer tubes and to avoid dimples in the tie-rod boots.
- Turn the steering gear input shaft to the right until it stops. Make note of the number of turns needed.
NOTE: Be sure the steering gear control valve housing is turned toward the front of the vehicle at this point in the procedure.
- Install the steering gear in the right-hand opening of the crossmember.
CAUTION
Be careful not to tear or scuff the inner tie-rod boots.
- Move the steering gear to the right side of the vehicle as far as it will possibly go.
- Move the left front wheel spindle tie-rod into the crossmember opening and move the steering gear into the correct position.
- Turn the steering gear input shaft to the left by half the number of turns noted earlier in the procedure. This will put the steering gear in a position facing straight ahead.
- Turn the steering gear control valve housing toward the rear.
- Install the steering gear crossmember washers and stud bolts with the dished side of the washers facing downward.
CAUTION
To avoid damage to the steering gear fluid transfer tubes, hold the tops of the steering gear to crossmember stud bolts.
- Install the nuts. Torque to 111 ft-lb (150 Nm).
- Install the lines. Torque the nut to 22 ft-lb (30 Nm).
CAUTION
Do not let the intermediate shaft rotate while it is disconnected from the steering gear because damage to the clockspring can occur. If there are signs that the intermediate shaft has rotated, the clockspring must be removed and recentered.
- Connect the intermediate shaft to the steering gear input shaft then install a new lower steering column pinch bolt. Torque to 36 ft-lb (49 Nm).
- Install the cooler, the hose, and the clamp.
- Connect and install the clamp.
- Install the power steering fluid cooler nuts. Torque to 30 ft-lb (40 Nm).
NOTE: If the self-tapping bolts cannot be installed in the frame, a kit with flag nuts is available.
- Install the front stabilizer bar. Torque bolts to 25-34 ft-lb (34-46 Nm).
- Install the front stabilizer bar links and bolts.
- Install the front stabilizer bar link nuts. Torque to 15-21 ft-lb (21-29 Nm).
- Install the tie-rod ends to the front wheel spindle tie-rods. Be sure to turn the tie-rod ends the same number or rotations that were noted during the removal procedure.
- Place the tie-rod ends on the steering knuckles. Install the castellated nuts and new cotter pins. Make sure the brake dust shields are not bent and do not touch the outer tie-rod boots. Torque to 52 ft-lb (70 Nm).
- Tighten the tie-rod end jam nuts. Torque to 59 ft-lb (80 Nm).
- Install the front tire and wheel assemblies.
- Fill and check the system for leaks.
- Check the wheel alignment and adjust if needed.