NOTE: The procedure for pulling the engine requires removing
the transaxle along with it. As a result, when the halfshafts are pulled from
the transaxle, a special plug/side gear holding tool is recommended.
- Before servicing the vehicle, refer to the precautions in the beginning
of this section.
- Properly relieve the fuel system pressure.
- Drain the engine oil.
- Drain the transaxle fluid.
- Drain the cooling system.
- Remove or disconnect the following:
- Battery cables and battery
- Battery tray
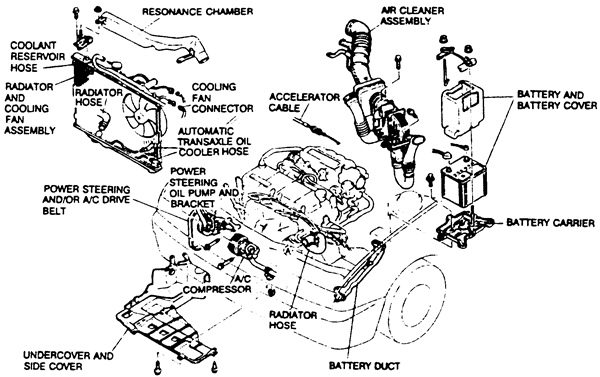
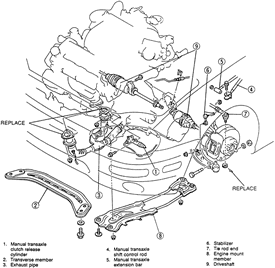
| Fig. 1: View of typically removed external components
for engine removal-front wheel drive models

|
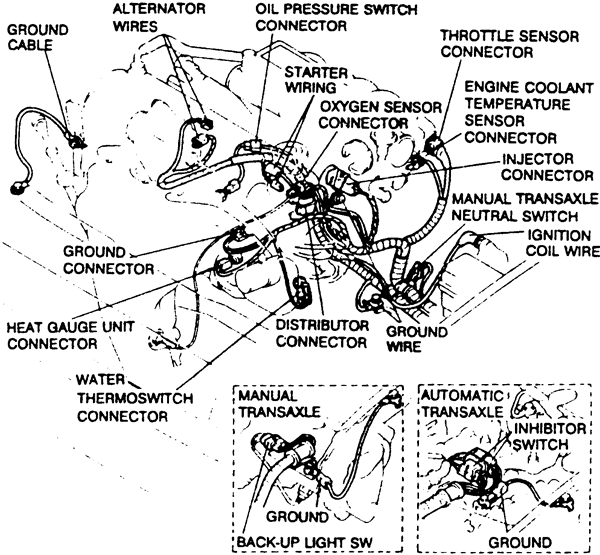
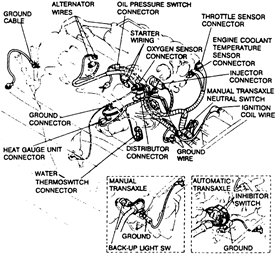
| Fig. 2: View of the common electrical harness
plug connector points-front wheel drive models
|
- Hood
- Front wheels
- Splash shield(s) from under the vehicle
- Air cleaner assembly and resonance chamber, including the air flow meter
and all of the ducting
- Oil dipstick
- On the Millenia with the 2.3L engine, remove the charge air cooler, front
grille, upper seal board (panels that the grille mounts to) and coolant overflow
tank.
- Remove or disconnect the following:
- Radiator hoses
- Transmission oil cooler lines from the radiator, if equipped with automatic
transaxle
- Cooling fan and radiator switch electrical connectors
- Radiator/cooling fan assembly
- Throttle and speedometer cables
| Fig. 3: Typical vacuum, fuel and water hose disconnect
points for engine removal-front wheel drive models
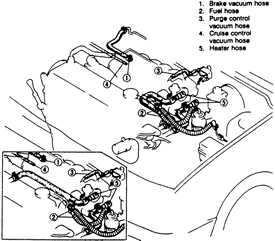
|
- All vacuum hoses and wiring harnesses
- Fuel supply and return hoses
- Heater hoses
- Exhaust pipe from the manifold
- Accessory drive belt(s)
- Power steering pump and move it aside without disconnecting the hydraulic
hoses
- A/C compressor and move it aside without disconnecting the lines
- Clutch cable and shift control rod, if equipped with manual transaxle
- Slave cylinder from the transaxle without disconnecting the hydraulic
line, if equipped with hydraulic clutch
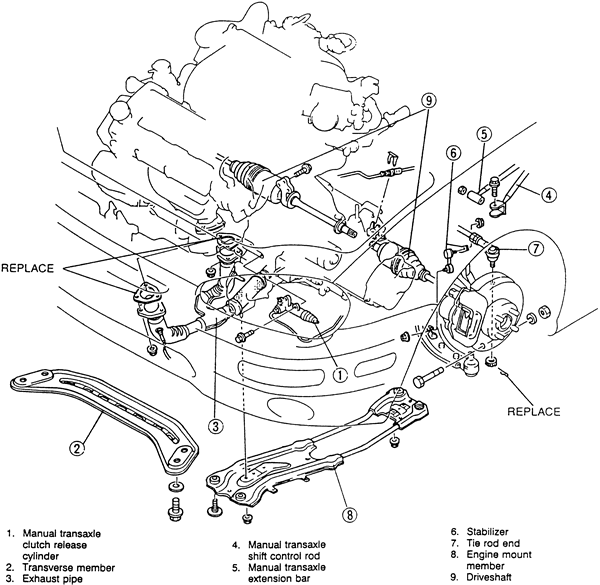
| Fig. 4: Typically removed 4-cylinder engine under-vehicle
components for engine removal-front wheel drive models
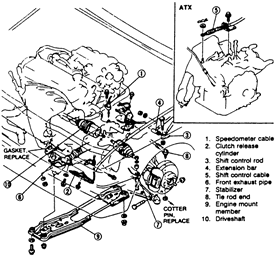
|
| Fig. 5: Typically removed 6-cylinder engine under-vehicle
components for engine removal-front wheel drive models
|
- Shift control cable, if equipped with automatic transaxle
- Tie rod ends from the steering knuckles
- Stabilizer bar from the lower control arms
- Attach an engine lifting chain to the engine lifting eyes. Attach the chain
to a suitable engine hoist and raise the hoist until there is tension on the
chain.
- Remove or disconnect the following:
- Engine mount member
- Lower ball joint from the steering knuckle
- Bolts from the right side intermediate shaft support, if equipped
- Intermediate shaft by prying it from the transaxle
- Suspend the halfshafts with wire.
- Remove or disconnect the following:
- Dynamic damper from the right side engine mount, if equipped.
- Engine/transaxle mount nuts/bolts and right engine (if equipped) and
left transaxle mounts
- Lift the engine/transaxle assembly from the vehicle.
- Remove or disconnect the following:
- Intake manifold bracket
- Starter
- Torque converter nuts
- Engine-to-transaxle stiffener, if equipped
- No. 2 engine mount
- Throttle valve cable
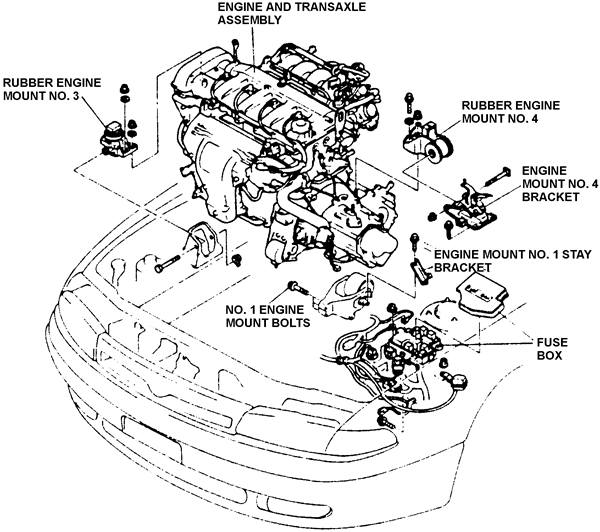
| Fig. 6: Once all components and mounts are unfastened,
the engine is removed with the transaxle attached-front wheel
drive

|
- Transaxle mounting bolts
- Transaxle from the engine
To install:
- Installation is the reverse of the removal procedure. Note the following
important steps.
- When possible, leave the engine mounting nuts/bolts loose (hand tight) until
all mounts are aligned and bolted. This may help in aligning the engine and
transmission assembly in the vehicle.
- Install new circlips on the inner CV-joint stub shafts, if equipped, and
the intermediate shaft. Grease the shaft splines before installing the halfshaft/intermediate
shaft into the transaxle.
- Always install new gaskets and/or O-rings. Use new self-locking nuts, especially
on the exhaust.
- Fill the engine and the transaxle with oil. Fill the cooling system.
- Connect the negative battery cable, start the engine and check for leaks.
- Check the ignition timing and the idle speed.
- Check all fluid levels.
- Before servicing the vehicle, refer to the precautions in the beginning
of this section.
- Properly relieve the fuel system pressure.
- Drain the engine oil.
- Drain the cooling system.
- Remove or disconnect the following:
- Negative battery cable
- Fresh air duct and the air cleaner/air flow meter assembly
- Transmission
- Accelerator cable from the throttle body
- Undercover
- Radiator hoses and the coolant reservoir hose
- Cooling fan electrical connector
- Transmission oil cooler hose, if equipped with automatic transmission
- Radiator/cooling fan assembly
- Accessory drive belts
- Power steering pump and move it aside without disconnecting the hydraulic
hoses
- Air conditioner compressor and move it aside without disconnecting the
refrigerant lines
- Disconnect the following electrical connectors:
- Steering pressure sensor electrical connector
- Throttle position sensor electrical connector
- Idle air control valve electrical connector
- Heated Oxygen (HO2S) sensor electrical connector
- Ignition coil electrical connectors
- Crankshaft position sensor electrical connector
- Ground electrical connectors
- Fuel injector electrical connectors
- Alternator electrical connectors
- Oil pressure sensor electrical connector
- Starter electrical connectors
- Disconnect the following hoses:
- Brake vacuum hose
- Fuel hose
- Purge control vacuum hose
- Cruise control vacuum hose
- Water inlet hose
- Heater hose
- Exhaust pipe from the exhaust manifold and install suitable lifting
equipment onto the engine.
- Engine from the vehicle
To install:
- Install or connect the following:
- Engine assembly by tilting the engine downward and aligning the engine
mounts with the crossmember holes. Torque the nuts to 42-57 ft. lbs. (57-78
Nm)
- Exhaust pipe to the manifold using a new gasket. Torque the nuts to
34 ft. lbs. (46 Nm)
- Connect the following hoses:
- Brake vacuum hose
- Fuel hose
- Purge control vacuum hose
- Cruise control vacuum hose
- Water inlet hose
- Heater hose
- Connect the following electrical connectors:
- Steering pressure sensor electrical connector
- Throttle position sensor electrical connector
- Idle air control valve electrical connector
- HO2S electrical connector
- Ignition coil electrical connectors
- Crankshaft position sensor electrical connector
- Ground electrical connectors
- Fuel injector electrical connectors
- Alternator electrical connectors
- Oil pressure sensor electrical connector
- Starter electrical connectors
- Install or connect the following:
- Air conditioner compressor and power steering pump
- Drive belt(s)
- Radiator and fans and all cooling system hoses
- Accelerator cable
- Air cleaner and air flow meter assembly
- Transmission
- Negative battery cable
- Fill and bleed the cooling system.
- Fill the engine and transmission.
- Start the engine and check for leaks.
- Check the ignition timing and idle speed.