Timing Chain, Sprockets, Front Cover and Seal
REMOVAL & INSTALLATION
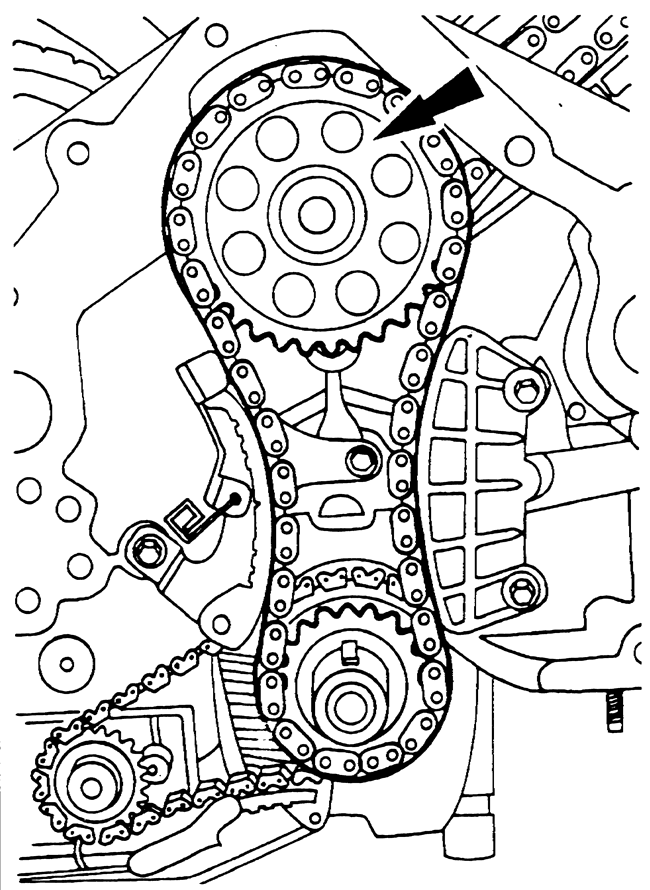
3.0L and 4.0L OHC Engines
Before servicing the vehicle, refer to the precautions in the beginning of this section.
Remove or disconnect the following:
Negative battery cable
Engine front cover
Rotate the crankshaft and align the timing marks
Timing chain tensioner, 4.0L OHC engine only
Sprocket bolt
Timing chain, camshaft sprocket and crankshaft sprocket as an assembly
To install:
Install or connect the following:
Timing chain, camshaft and crankshaft sprockets as an assembly
Align the timing marks.
Install or connect the following:
Timing chain tensioner
Sprocket bolt. Torque the bolt to 51 ft. lbs. (70 Nm).
Engine front cover
Negative battery cable
4.0L OHC Engine
Before servicing the vehicle, refer to the precautions in the beginning of this section.
Drain the engine oil.
Remove or disconnect the following:
Negative battery cable
Engine from the vehicle
Oil pan
Engine front cover
Cylinder heads
Lock the jackshaft tensioner by installing a pin.
Jackshaft sprocket and chain assembly
Left front cassette retaining bolt
Cassette chain and tensioner assembly
Rear jackshaft plug from the engine
Right rear cassette retaining bolt and spacer
Right rear cassette chain and tensioner
Timing chain (s)
Fig. 1: Remove the jackshaft sprocket–4.0L SOHC Engine
To install:
Install or connect the following:
Timing chain(s)
Right rear cassette chain, tensioner and sprocket
Jackshaft sprocket and chain on the engine and remove the tensioner pin
Torque the jackshaft sprocket bolt in 2 stages:
32–35 ft. lbs. (43–47 Nm).
Turn an additional 65 degrees.
Install or connect the following:
Cylinder heads
Front cover
Oil pan
Engine to the vehicle
Negative battery cable
Fill the engine with clean oil.
Start the vehicle, check for leaks and repair if necessary.
5.0L Engine
Before servicing the vehicle, refer to the precautions in the beginning of this section.
Drain the engine oil.
Remove or disconnect the following:
Negative battery cable
Engine front cover
Rotate the crankshaft and align the timing marks.
Remove or disconnect the following:
Camshaft sprocket bolt
Timing chain, camshaft sprocket and crankshaft sprocket as an assembly
To install:
Install or connect the following:
Timing chain, camshaft and crankshaft sprockets as an assembly
Align the timing marks.
Camshaft sprocket bolt. Torque the bolt to 45 ft. lbs. (61 Nm).
Engine front cover
Negative battery cable