Previous Next

HEATER CORE

Pick-Ups

REMOVAL & INSTALLATION

  1. Disconnect the negative battery cable.

    CAUTION
    After disconnecting the battery, wait for more than 1 minute for the air bag system to deplete its stored energy.

  2. Drain the cooling system into a clean container for reuse.
  3. Disconnect the heater hoses from the heater core.
  4. Discharge and recover the air conditioning system refrigerant.
  5. At the driver's side, remove the SAS module and the steering wheel by performing the following procedure:
    1. Place the wheel in the straight-ahead position and turn the ignition switch to LOCK.
    2. At both sides of the steering wheel, remove the cover clips.
    3. Remove the steering wheel-to-SAS module bolts.
    4. Carefully, lift the SAS module from the steering wheel and disconnect the electrical connector.

      CAUTION
      Place the SAS in a safe place with the module facing upward.

    5. Remove the steering wheel-to-column nut.
    6. Using a steering wheel puller, press the steering wheel from the steering column.
  6. At the passenger's side, remove the SAS module by performing the following procedure:
    1. Remove the glove compartment and the glove compartment cover.
    2. Remove the SAS module-to-dash bolts.
    3. Carefully, lift the SAS module and disconnect the electrical connector.

      CAUTION
      Place the SAS in a safe place with the module facing upward.

  7. Remove the steering column by performing the following procedure:
    1. Remove the parking brake release handle.
    2. Remove the hood release lever.
    3. Remove the instrument panel steering column cover and the cover reinforcement.
    4. Remove and disconnect the ignition switch electrical connector.
    5. Disconnect the electrical harness connectors.
    6. If equipped with an automatic transmission, remove the shift indicator cable bolt and the cable.
    7. Remove the air bag sliding contact.
    8. Remove the upper intermediate steering shaft-to-column shaft bolt; then, discard the bolt.
    9. Remove the lower steering column nuts.
    10. Remove the steering column nuts, column support and the column.
  8. Remove the instrument panel by performing the following procedures:
    1. Disconnect the Brake Pedal Position (BPP) switch connector.
    2. If equipped, disconnect the Clutch Pedal Position (CPP) switch connector.
    3. Remove the right and left hand scuff plates.
    4. Remove both A-pillar trim plates.
    5. Remove both front side trim panels.
    6. Remove the fuse panel opening door.
    7. In the engine compartment, disconnect the fuse box and position it aside.
    8. In the engine compartment, remove and disconnect the bulkhead wiring harness connector.
    9. Remove the valance panel.
    10. Disconnect the following items:
    11. Air bag diagnostic monitor locking tab and connector
    12. Blend door actuator connector
    13. Climate control vacuum harness connector
    14. Radio antenna cable in-line connector
    15. At the right cowl panel, disconnect the electrical connectors and the ground.
    16. Under the steering column, remove the instrument panel brace bolt.
    17. Remove the right and left instrument panel cowl sides.
    18. Pull the instrument panel away from the cowl.
    19. Disconnect the instrument panel-to-main electrical harness connector.
    20. Using an assistant, remove the instrument panel.
  9. Remove the evaporator core housing by performing the following procedure:
    1. Disconnect the refrigerant lines from the evaporator core. Discard the O-rings.
    2. Remove the engine air cleaner.
    3. Remove the windshield washer reservoir/coolant recovery reservoir and move them aside.
    4. Remove the vacuum reservoir tank and bracket; then, move it aside.
    5. Disconnect the cruise control servo electrical connector.
    6. Disconnect the manifold/tube assembly from the receiver drier.
    7. Disconnect the air conditioning cycling switch connector.
    8. Disconnect the blower motor connector and the resistor.
    9. If equipped with a 3.0L or 4.0L engine, remove the support bracket.
    10. Disconnect the windshield washer hose retainer and move it aside.
    11. Disconnect the vacuum hose.
    12. If equipped with a 4.0L engine, remove the air conditioning hose support retaining bolts from the back of the engine.
    13. In the passenger compartment, disconnect the vacuum harness connector and nut.
    14. Remove the evaporator core housing nuts and remove the housing.
  10. Remove the plenum chamber.
  11. Remove the heater housing-to-heater core cover screws and the heater core.

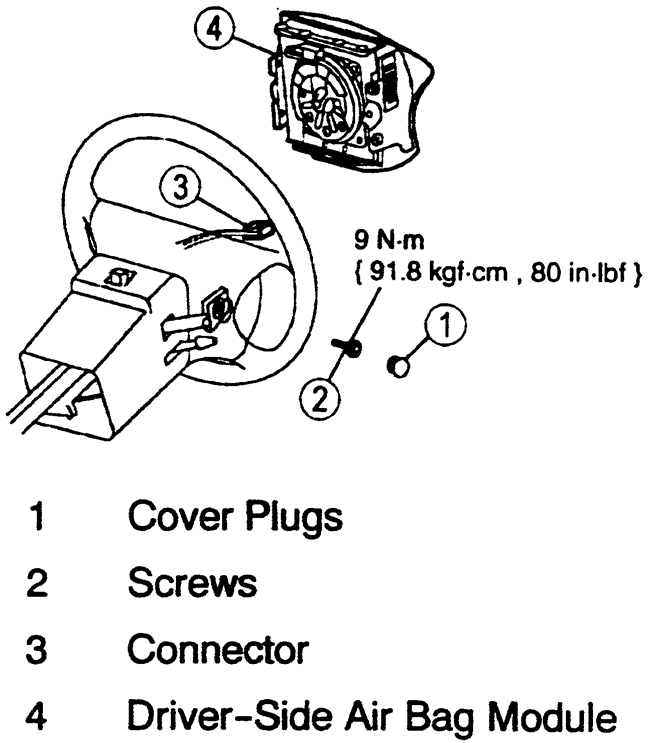
    Fig. 1: View of the SAS module and steering wheel — Mazda Pick-Ups

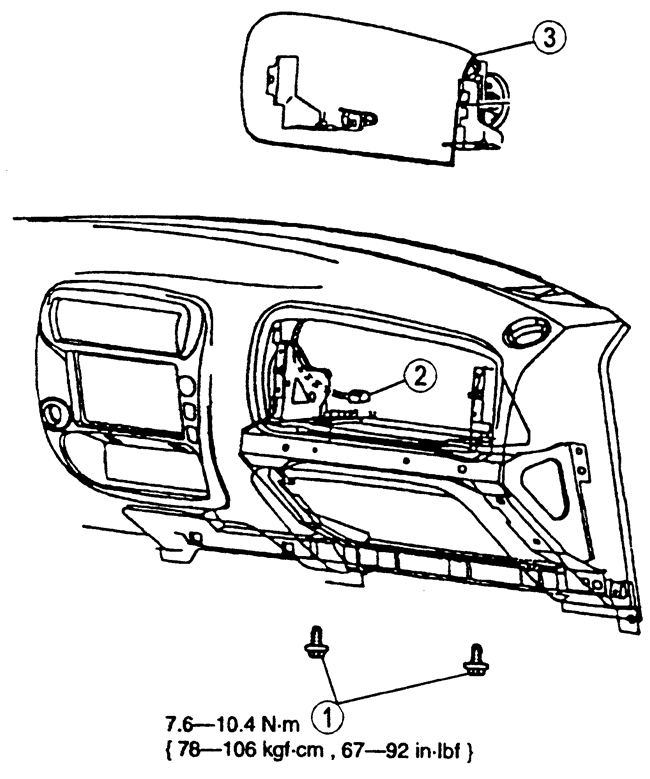
    Fig. 2: View of the passenger's side SAS module — Mazda Pick-Ups

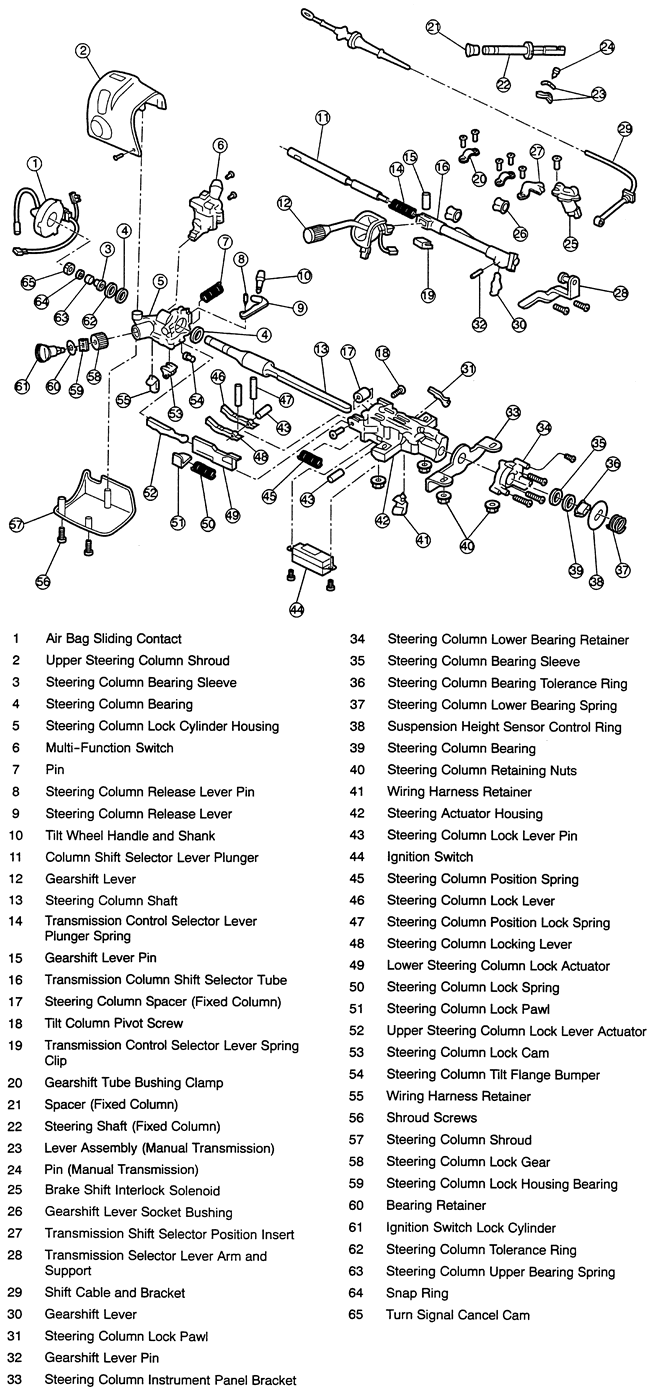
    Fig. 3: Exploded view of the steering column assembly — Mazda Pick-Ups

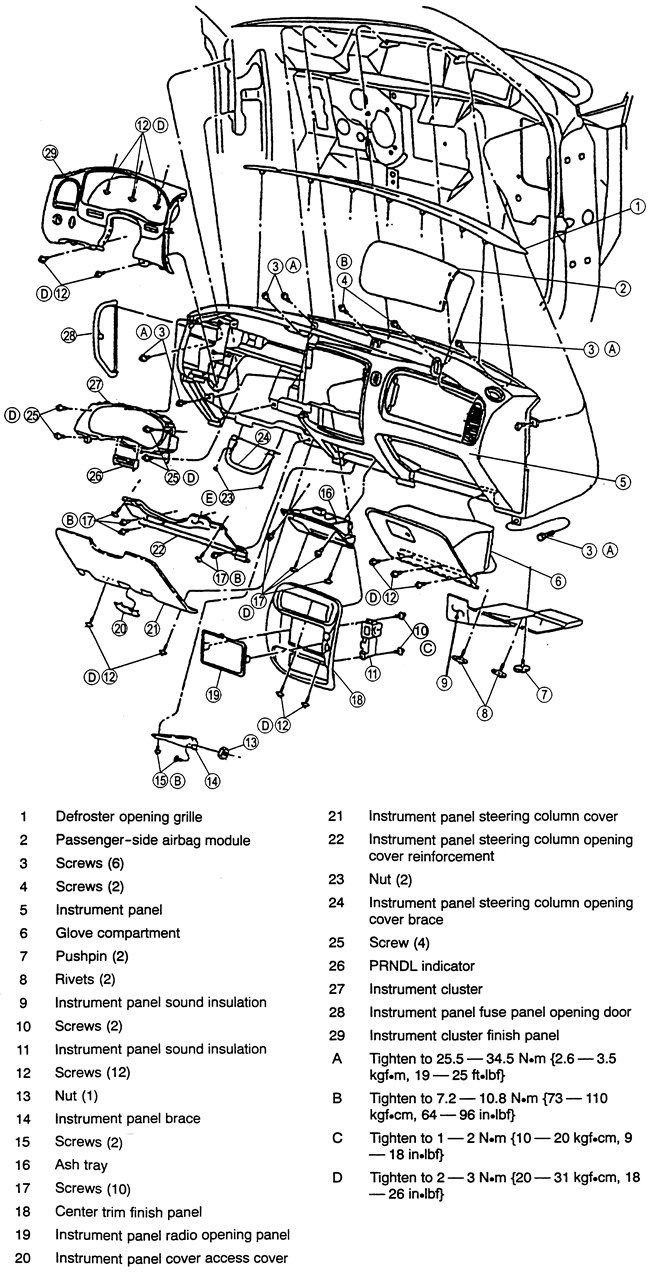
    Fig. 4: Exploded view of the instrument panel assembly — Mazda Pick-Ups

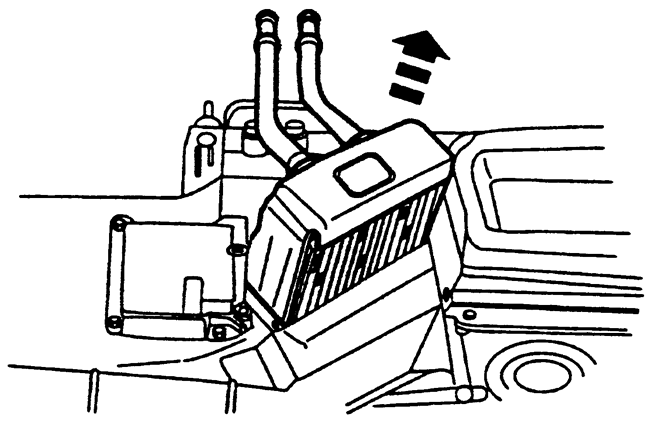
    Fig. 5: View of the heater housing and heater core — Mazda Pick-Ups

    To install:

  12. Install the heater core and the heater housing-to-heater core cover screws.
  13. Install the plenum chamber.
  14. Install the evaporator core housing by performing the following procedure:
    1. Install the evaporator core housing and the housing nuts.
    2. In the passenger compartment, connect the vacuum harness connector and nut.
    3. If equipped with a 4.0L engine, install the air conditioning hose support retaining bolts to the back of the engine.
    4. Connect the vacuum hose.
    5. Connect the windshield washer hose retainer.
    6. If equipped with a 3.0L or 4.0L engine, install the support bracket.
    7. Connect the blower motor connector and the resistor.
    8. Connect the air conditioning cycling switch connector.
    9. Connect the manifold/tube assembly to the receiver drier.
    10. Connect the cruise control servo electrical connector.
    11. Install the vacuum reservoir tank and bracket.
    12. Install the windshield washer reservoir/coolant recovery reservoir.
    13. Install the engine air cleaner.
    14. Using new O-rings, connect the refrigerant lines to the evaporator core.
  15. Install the instrument panel by performing the following procedures:
    1. Using an assistant, install the instrument panel.
    2. Connect the instrument panel-to-main electrical harness connector.
    3. Push the instrument panel toward from the cowl.
    4. Install the right and left instrument panel cowl sides.
    5. Under the steering column, install the instrument panel brace bolt.
    6. At the right cowl panel, connect the electrical connectors and the ground.
    7. Connect the following items:
    8. Air bag diagnostic monitor locking tab and connector
    9. Blend door actuator connector
    10. Climate control vacuum harness connector
    11. Radio antenna cable in-line connector
    12. Install the valance panel.
    13. In the engine compartment, install and connect the bulkhead wiring harness connector.
    14. In the engine compartment, connect the fuse box.
    15. Install the fuse panel opening door.
    16. Install both front side trim panels.
    17. Install both A-pillar trim plates.
    18. Install the right and left hand scuff plates.
    19. If equipped, connect the Clutch Pedal Position (CPP) switch connector.
    20. Connect the Brake Pedal Position (BPP) switch connector.
  16. Install the steering column by performing the following procedure:
    1. Install the steering column, column support and the column nuts.
    2. Install the lower steering column nuts.
    3. Using a new bolt, install the upper intermediate steering shaft-to-column shaft bolt.
    4. Install the air bag sliding contact.
    5. If equipped with an automatic transmission, install the shift indicator cable bolt and the cable.
    6. Connect the electrical harness connectors.
    7. Install and connect the ignition switch electrical connector.
    8. Install the instrument panel steering column cover reinforcement and the cover.
    9. Install the hood release lever.
    10. Install the parking brake release handle.
  17. At the passenger's side, install the SAS module by performing the following procedure:
    1. Carefully, install the SAS module and connect the electrical connector.
    2. Install the SAS module-to-dash bolts.
    3. Install the glove compartment and the glove compartment cover.
  18. At the driver's side, install the SAS module and the steering wheel by performing the following procedure:
    1. Install the steering wheel-to-column nut.
    2. Carefully, install the SAS module to the steering wheel and connect the electrical connector.
    3. Install the steering wheel-to-SAS module bolts.
    4. At both sides of the steering wheel, install the cover clips.
  19. Connect the heater hoses to the heater core.
  20. Refill the cooling system.
  21. Connect the negative battery cable.
  22. Evacuate and charge the air conditioning system.
  23. Run the engine to normal operating temperatures; then, check the climate control operation and check for leaks.

Previous Next