Previous Next

Wheel Bearings

ADJUSTMENT

2-WHEEL DRIVE VEHICLES
  1. Before servicing the vehicle, refer to the precautions in the beginning of this section.
  2. Remove the grease cap from the hub and wipe the excess grease from the end of the spindle. Remove the cotter pin and retainer. Discard the cotter pin.
  3. Loosen the adjusting nut 3 turns.

    WARNING
    Obtain running clearance between the disc brake rotor surface and shoe linings by rocking the entire wheel assembly in and out several times in order to push the caliper and brake pads away from the rotor. An alternate method to obtain proper running clearance is to tap lightly on the caliper housing. Be sure not to tap on any other area that may damage the disc brake rotor or the brake lining surfaces. Do not pry on the phenolic caliper piston. The running clearance must be maintained throughout the adjustment procedure. If proper clearance cannot be maintained, the caliper must be removed from its mounting.

    To install:

  4. While rotating the wheel assembly, tighten the adjusting nut to 17–25 ft. lbs. (23–34 Nm) in order to seat the bearings. Loosen the adjusting nut a half turn. Retighten the adjusting nut 18–20 inch lbs. (2.0–2.2 Nm).

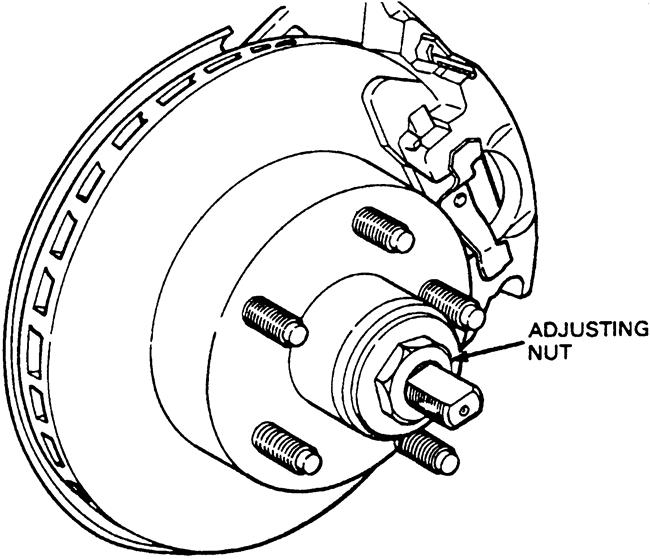
    Fig. 1: Loosen the adjusting nut 3 turns, then rock the entire wheel assembly in-and-out to spread the brake pads before attempting to adjust the bearing — 2wd vehicles

  5. Place the retainer on the adjusting nut. The castellations on the retainer must be in alignment with the cotter pin holes in the spindle. Once this is accomplished install a new cotter pin and bend the ends to insure its being locked in place.
  6. Check for proper wheel rotation. If correct, install the grease cap.
  7. Lower the vehicle and tighten the lug nuts to 100 ft. lbs., (136 Nm) if the wheel was removed. Before driving the vehicle, pump the brake pedal several times to restore normal brake pedal travel.

    CAUTION
    If the wheel was removed, retighten the wheel lug nuts to specification after about 500 miles (804km) of driving. Failure to do this could result in the wheel coming off while the vehicle is in motion causing loss of vehicle control or collision.
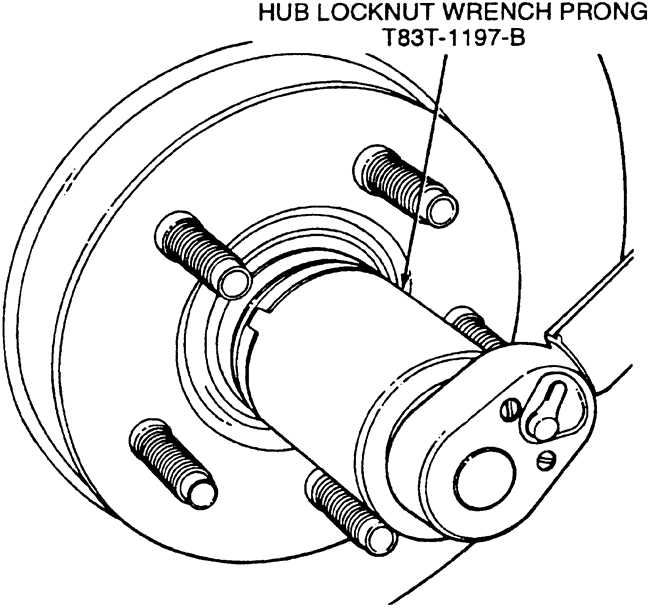
4-WHEEL DRIVE WITH MANUAL HUBS
  1. Before servicing the vehicle, refer to the precautions in the beginning of this section.
  2. Remove or disconnect the following:
  3. Check the end-play of the wheel and tire assembly on the spindle. End-play should be 0.001–0.003 in. (0.025–0.076mm) and the maximum torque to rotate the hub should be 25 inch lbs. (2.8 Nm).
4-WHEEL DRIVE WITH AUTOMATIC HUBS
  1. Before servicing the vehicle, refer to the precautions in the beginning of this section.
  2. Remove or disconnect the following:
  3. Use a magnet and remove the locking key from under the adjusting nut. If required, rotate the adjusting nut slightly to relieve pressure against the locking key.

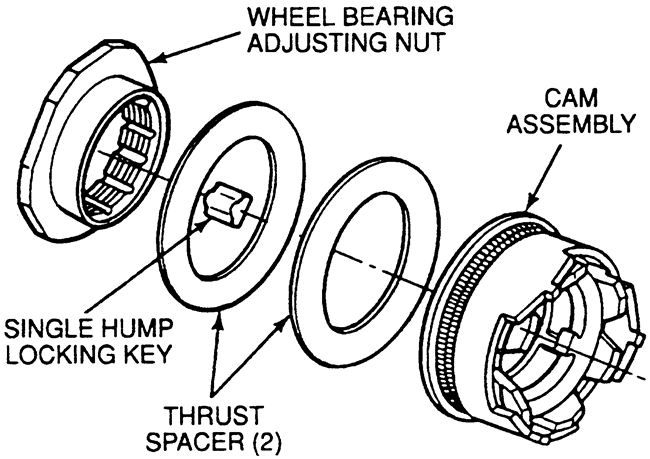
    Fig. 3: Exploded view of the wheel bearing adjusting nut and related components — automatic locking hub shown

    WARNING
    To prevent damage to the adjusting nut and spindle threads on vehicles equipped with automatic hubs, look into the spindle keyway under the adjusting nut and remove the separate locking key before removing the adjusting nut.

  4. Loosen the wheel bearing locknut using a 2 38 inch (60.3mm) hex socket, such as Hex Locknut Wrench T70T-4252-B.

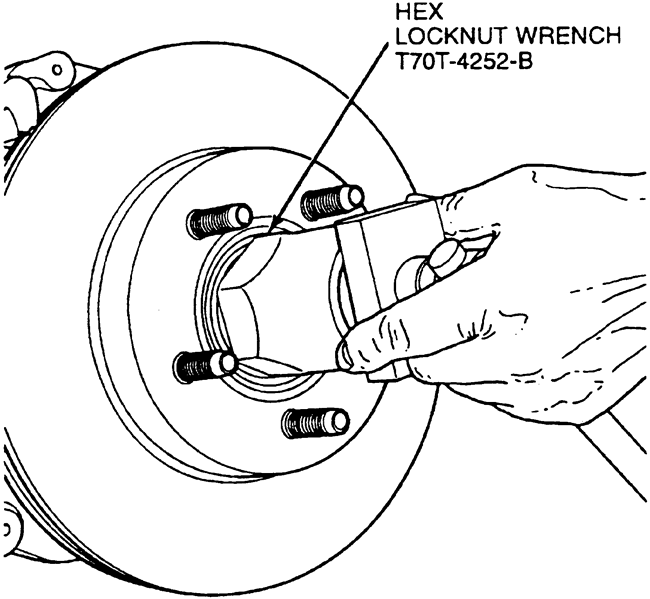
    Fig. 4: An oversize socket is needed to properly adjust the wheel bearing — automatic locking hub shown

  5. Tighten the inner locknut to 35 ft. lbs. (47 Nm) to seat the bearings.
  6. Spin the rotor and back off the inner locknut 14 turn (90°). Retighten the locknut to 16 inch lbs. (1.8 Nm).
  7. Align the closest lug in the bearing adjusting nut with the center of the spindle keyway slot. Advance the nut to the next if required.

    To install:

  8. Separate locking key in the spindle keyway under the adjusting nut.

    CAUTION
    Extreme care must be taken when aligning the adjusting nut with the center of the spindle keyway slot to prevent damage to the separate locking key. The wheel and tire assembly may come off while the vehicle is in motion if the key is damaged.

  9. Install or connect the following:

    WARNING
    Do not damage the locking key when installing the cam assembly.

  10. Check the end-play of the wheel and tire assembly on the spindle. End-play should be 0.001–0.003 in. (0.025–0.076mm) and the maximum torque to rotate the hub should be 25 inch lbs. (2.8 Nm).

Previous Next