Previous Next

Oil Pan

Removal & Installation

To Remove:

  1. Before servicing the vehicle, refer to the precautions in the beginning of this section.
  2. Put the vehicle in neutral and place it on a hoist.
  3. Remove the engine cooling fan.
  4. Remove the dipstick and tube.

    NOTE: Only the left side of the engine will be raised.

  5. Remove the left engine support insulator-to-engine bracket nuts.
  6. Install the lifting eyes (303-D030).
  7. Install the 3-bar engine support kit (303-F072) and raise the left side of the engine approximately 25 mm (1 in.).
  8. Drain the engine oil. Install the drain plug when finished.
  9. Detach the wiring harness retainers from the engine front cover.
  10. Remove the 4 engine front-cover-to-oil-pan bolts.
  11. Remove the transmission bracket-to-transmission bolts.
  12. Remove the 4 transmission-to-oil-pan bolts.

    CAUTION
    Do not loosen the transmission-to-engine bolts more than 5 mm (0.19 in.). This will prevent damage to the transmission.

  13. Loosen the 7 transmission-to-engine bolts 5 mm (0.19 in.).
  14. Slide the transmission rearward 5 mm (0.19 in.).

    NOTE: It may be necessary to lift the rear of the transmission to remove the oil pan.

  15. Remove the 13 oil pan bolts and the oil pan.

    CAUTION
    Do not use wire brushes, metal scrapers, power abrasive discs or other abrasive means to clean the sealing surfaces. These tools cause scratches and gouges, which will make leak paths. Use a plastic scraping tool to remove all traces of old sealant.

  16. Clean the sealing surface with silicone gasket remover and metal surface prep. Observe all warnings and cautions and follow all application directions contained on the packaging of the silicone gasket remover and metal surface prep.

To Install:

  1. Clean and inspect all mating surfaces.

    CAUTION
    Do not use wire brushes, metal scrapers, power abrasive discs or other abrasive means to clean the sealing surfaces. These tools cause scratches and gouges, which will make leak paths. Use a plastic scraping tool to remove all traces of old sealant.

    NOTE: The oil pan must be installed and the bolts tightened within four minutes of applying the silicone gasket and sealant.

    NOTE: It may be necessary to lift the rear of the transmission to install the oil pan.

  2. Apply a 2.5 mm (0.1 in.) bead of silicone gasket sealant to the oil pan then position the oil pan and install the bolts finger-tight.
  3. Install the engine front-cover-to-oil-pan bolts. Torque to 89 in-lb (10 Nm).
  4. Tighten the oil pan bolts in the sequence shown.

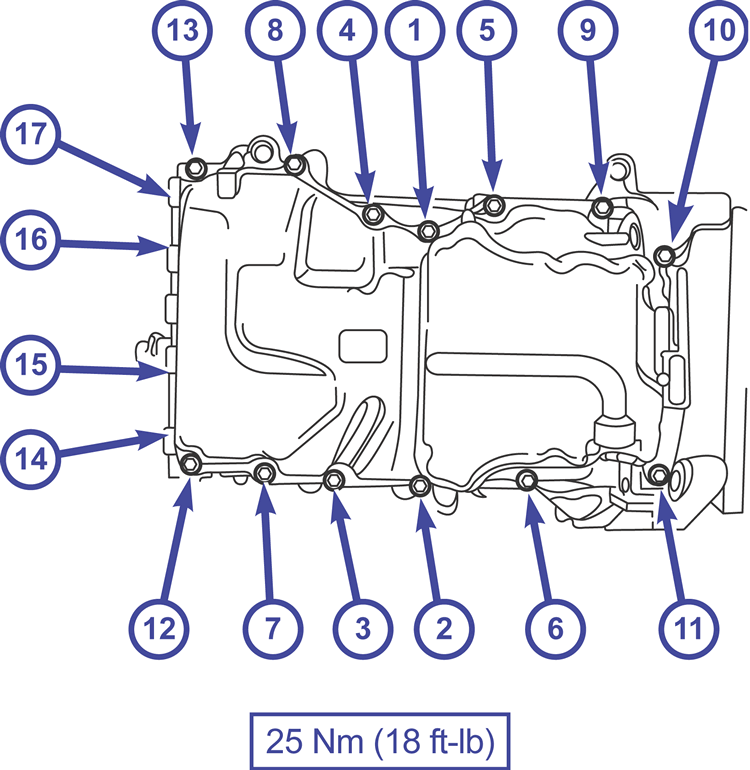
    Oil pan bolt torque sequence (2.3 L)

  5. Attach the wiring harness retainers to the engine front cover.
  6. Slide the transmission forward and tighten the 7 transmission-to-engine bolts.
  7. Install the 4 transmission-to-oil-pan bolts.
  8. Install the transmission bracket-to-transmission bolts.
  9. Lower the engine and remove the lifting eyes and the 3-bar engine support kit.
  10. Install the engine support insulator nuts.
  11. Install the dipstick and tube.
  12. Install the engine cooling fan.
  13. Install a new oil filter.
  14. Fill the engine with clean engine oil.

Previous Next