To Remove:
- Remove the A/C compressor.
- On vehicles with leaf spring A/C clutch ONLY: To remove the A/C clutch disc and hub retaining bolt, hold the disc and hub with the wrench for 3.0L & 4.0L push-rod engines (205-036) and remove the bolt. Next, remove the A/C clutch disc and hub and the A/C clutch hub spacer by threading an 8 x 1.25 mm bolt onto the A/C clutch disc and hub to force it from the compressor shaft, then lift the A/C clutch disc and hub and spacer from the compressor shaft.
- On vehicles with a 3-eye A/C clutch ONLY: To remove the A/C clutch disc and hub retaining bolt, use the compressor clutch holding fixture for 2.3L & 4.0L engines (412-098) to remove the bolt. Next, remove the A/C clutch disc and hub and the A/C clutch hub spacer by threading an 8 x 1.25 mm bolt into the A/C clutch disc and hub to force it from the compressor shaft and lift the disc and hub and the A/C clutch hub spacer from the compressor shaft.
- Remove the A/C clutch pulley snap ring.
- Remove the A/C clutch pulley using the compressor pulley remover (412-001).
CAUTION
Do not use air tools because the A/C compressor clutch field coil can be damaged very easily.
- Remove the A/C compressor clutch field coil by using the compressor pulley remover (412-001) and the A/C compressor field coil remover (412-067).
To Install:
NOTE: If you are installing a new A/C compressor, the A/C clutch components should be reused unless signs of damage are seen. If you see excessive grooving you should install a new A/C clutch disc and hub and A/C compressor pulley, which must be installed together. If this is not the case, each component can be installed individually as necessary.
- Examine the A/C clutch disc and hub, A/C clutch field coil, and A/C compressor pulley for damage. Such damage includes: melted or cracked components, components that were discolored because of excessive heat, components with excessive wear (e.g. grooving in the compressor pulley or clutch disc and hub that is greater than fingernail depth), or roughness in the compressor pulley bearing.
- Clean the mounting surfaces of the A/C compressor clutch field coil and bearing.
CAUTION
Do not use air tools because the A/C compressor clutch field coil can be damaged very easily.
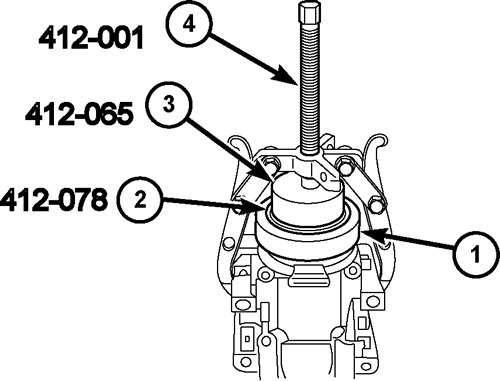
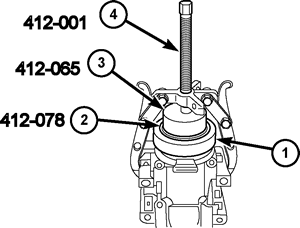
- Install the A/C compressor clutch field coil by using the A/C compressor field coil installer (412-078), the A/C compressor coil installer (412-065), and the compressor pulley remover (412-001).
| Use the special tools to install the field coil on the compressor
|
NOTE: The A/C clutch pulley fits tightly on the A/C compressor head, and it must be correctly aligned when installed.
- Install the A/C clutch pulley.
- Install the A/C clutch pulley snap ring with the bevel side facing out.
- Place one A/C clutch hub spacer of nominal thickness inside the clutch hub spline opening.
- On vehicles with leaf spring A/C clutch ONLY: Install the A/C clutch disc and hub then install the retaining bolt using the wrench for 3.0L & 4.0L push-rod engines (205-036).
- Torque to 10 ft-lb (13 Nm).
- On vehicles with a 3-eye A/C clutch ONLY: Install the A/C clutch disc and hub and bolt using the compressor clutch holding fixture for 2.3L & 4.0L engines (412-098).
- Torque to 10 ft-lb (13 Nm).
- Measure and adjust the clutch air gap by adding or removing A/C clutch hub spacers as needed. Measurement should be 0.014-0.030 in (0.35-0.75 mm).
- Install the A/C compressor.