To Remove:
- Disconnect the negative battery cable.
- Disconnect the ignition coil.
CAUTION
Do not pull on the spark plug wire because it may separate from the spark plug wire connector inside the spark plug boot.
- Disconnect the spark plug wires by twisting while pulling upward.
- Disconnect the heater hose support from the stud.
- Disconnect the spark plug wire holders.
- Disconnect the engine control sensor wiring from the mass airflow (MAF) sensor. Move the engine control sensor wiring to the side.
- Disconnect the vacuum hose.
- Disconnect the wiring harness from the valve cover studs.
- Disconnect the crankcase ventilation tube.
NOTE: Loosen silicone sealant from the cylinder head by sliding a flat knife between the valve cover gasket and cylinder head. This will prevent stretching of the valve cover gasket.
- Remove the 8 bolts and remove the valve cover.
- Remove the valve cover gasket, if needed.
To Install:
CAUTION
Do not clean the valve cover gasket with solvent. This can cause damage to the valve cover gasket.
- Clean all mating surfaces.
- Install the valve cover gasket, if it had been removed earlier.
NOTE: The valve cover must be installed within 4 minutes. If it is not, remove the sealant and reapply.
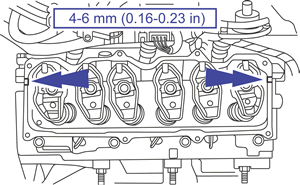
- Apply a bead of silicone gasket and sealant in the two places where the cylinder head and lower intake manifold meet, as illustrated below.
| Apply silicone for valve cover installation (3.0L)

|
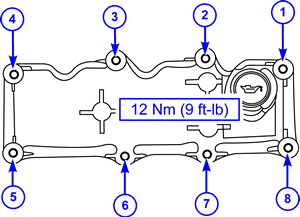
- Install the valve cover by positioning the valve cover then tightening the 8 bolts in the sequence shown below.
- Torque to 9 ft-lb (12 Nm).
| Valve cover bolt tightening sequence (3.0L)

|
- Connect the crankcase ventilation tube.
- Connect the wiring harness to the valve cover studs.
- Connect the vacuum hose.
- Connect the engine control sensor wiring to the MAF sensor.
- Connect the spark plug wires to the right-hand spark plug wire holders.
- Connect the heater hose support.
- Install the spark plug wires.
- Connect the ignition coil electrical connector.
- Connect the negative battery cable.
To Remove:
- Remove the upper intake manifold.
- Disconnect the left spark plug wire holders.
- Disconnect the engine control harness from the valve cover studs.
- Remove the 3 bolts and the 5 stud bolts.
NOTE: Loosen silicone sealant from the cylinder head by sliding a flat knife between the valve cover gasket and cylinder head. This will prevent stretching of the valve cover gasket.
- Remove the valve cover.
- Remove the valve cover gasket, if necessary.
To Install:
CAUTION
Do not clean the valve cover gasket with solvent. This can cause damage to the valve cover gasket.
- Clean all mating surfaces.
- If removed, install the valve cover gasket.
NOTE: The valve cover must be installed within 4 minutes. If it is not, remove the sealant and reapply.
- Apply a bead of silicone gasket and sealant in two places where the cylinder head and the lower intake manifold meet.
| Apply silicone for valve cover installation (3.0L)

|
- Install the valve cover by positioning the valve cover and tightening the 3 bolts and the 5 stud bolts in the sequence shown below.
- Torque to 9 ft-lb (12 Nm).
| Valve cover bolt tightening sequence (3.0L)

|
- Connect the engine control harness to the valve cover.
- Connect the left-hand spark plug wire holders.
- Install the upper intake manifold.

