Previous Next

Automatic Transmission Assembly

Removal & Installation

To Remove:

NOTE: If the transmission will be removed for an extended period of time, make sure to support the engine with a safety stand and a wood block.

  1. Put the vehicle in NEUTRAL then raise and safely support the vehicle.
  2. Disconnect the negative battery cable.
  3. If it is necessary to disassemble the transmission, drain the transmission fluid.
  4. In 4x4 vehicles ONLY: Remove the transfer case.
  5. To keep the driveshaft balance the same, draw marks on the driveshaft yoke and axle flange to ensure they can be installed with their original alignment.
  6. Remove the bolts on the rear driveshaft then remove the rear driveshaft.
  7. Remove the starter motor.

    CAUTION
    Engine damage can be caused during the removal of the torque converter nuts if the correct removal procedure is not followed. When removing the torque converter nuts, ONLY rotate the crankshaft in a clockwise direction. The crankshaft, crankshaft sprocket, and pulley are fitted together by friction between the flange faces on each part. Because of this, the crankshaft sprocket is able to be moved even when the crankshaft pulley is turned in the counterclockwise direction.

    NOTE: To access the flexplate nuts, it may be necessary to reach them through the wheel well.

    NOTE: Mark the torque converter and flexplate to ensure correct alignment at installation.

  8. Rotate the flexplate to access the nuts then remove and discard the converter nuts.
  9. Disconnect the shift cable from the bracket and from the manual control lever. Remove the transmission wiring harness from the shift cable bracket and the shift cable retainer from the case. Disconnect the transmission wiring harness by disconnecting the intermediate shaft speed (ISS) sensor, the transmission connector, the output shaft speed (OSS) sensor, and the digital transmission range (TR) sensor. Remove the 3-way catalytic converter.

    CAUTION
    Be very careful to not damage or bend the cooler lines.

  10. Hold the case fitting and remove the transmission cooler lines.
  11. Remove the nuts.

    CAUTION
    Do not let the transmission hang freely.

  12. Place a High-Lift Transmission Jack under the transmission. Raise and support the transmission.
  13. Remove the crossmember by removing the bolts on each side.
  14. Remove the transmission mount and screws.
  15. Remove the transmission upper fill tube.
  16. Lower a High-Lift Transmission Jack to get access to the screws to remove them.
  17. On 4x4 vehicles ONLY: Remove the vent tube assembly.

    WARNING
    The torque converter is heavy and can cause injury if it falls out of the transmission. Make sure the torque converter is secured in the transmission. Failure to do this can cause personal injury and/or damage to the vehicle.

  18. Install the torque converter retainer (307-346) before lowering the transmission from the vehicle.

    WARNING
    Make sure to secure the transmission to the transmission jack with a safety chain. Failure to do this can cause personal injury and/or damage to the vehicle.

  19. Lower the transmission.
  20. If the transmission is being overhauled or if a new or remanufactured transmission is being installed, perform transmission fluid cooler backflushing and cleaning.

To Install:

  1. On 4x4 vehicles ONLY: Install the vent tube assembly.

    WARNING
    Make sure to secure the transmission to the transmission jack with a safety chain. Failure to do this can cause personal injury and/or damage to the vehicle.

  2. Raise and position the transmission.
  3. Remove the torque converter retainer (307-346)
  4. Using the marks made during removal, align the flexplate to the converter and install the transmission-to-engine screws as indicated below:

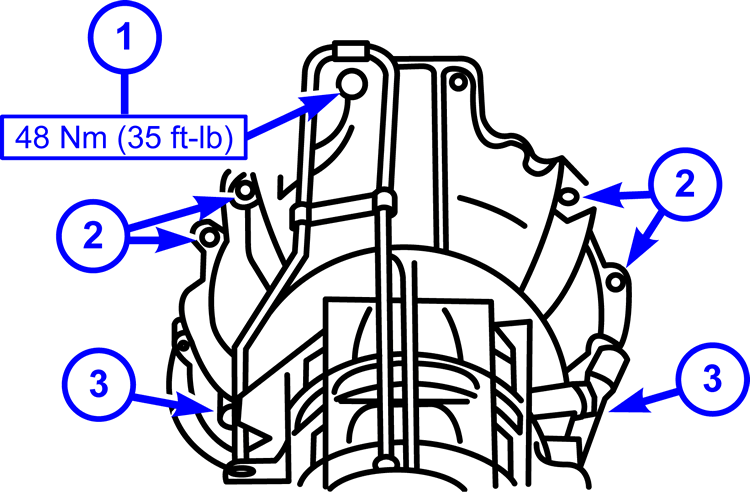
    Transmission-to-engine screw types (3.0L)

  5. First install the upper fluid filler tube as shown in the diagram below. Next, install the M10 x 1.6 in (40 mm) bracket screw and torque to 35 ft-lb (48 Nm).

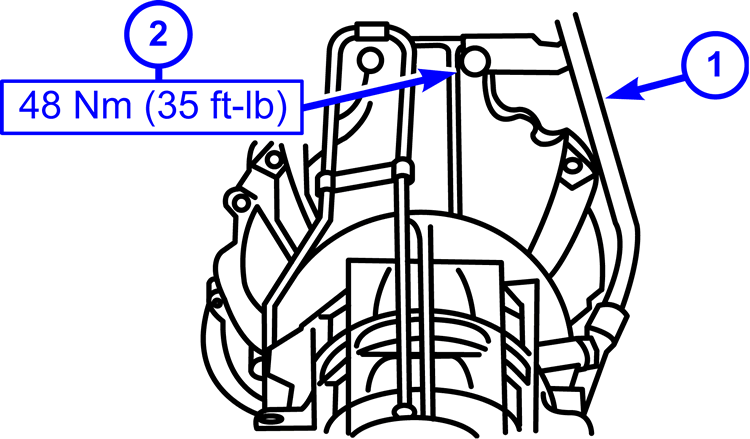
    Install the upper fluid filler tube & bracket screw (3.0L)

  6. On 4x4 vehicles ONLY: Install the transfer case.
  7. Install the exhaust bracket and screws.
  8. Position the crossmember and install the bolts.
  9. Install the transmission mount into the crossmember and tighten the nuts.
  10. Install the rear vibration damper.

    CAUTION
    Be careful to not damage or bend the cooler lines.

  11. Before installing the cooler lines to the case, check the O-rings. If damaged, new O-rings must be installed. Hold the case fitting and install the transmission cooler lines.

    CAUTION
    Engine damage can be caused during the installation of the torque converter nuts if the correct procedure is not followed. When installing the torque converter nuts, ONLY rotate the crankshaft in a clockwise direction. The crankshaft, crankshaft sprocket, and pulley are fitted together by friction between the flange faces on each part. Because of this, the crankshaft sprocket is able to be moved even when the crankshaft pulley is turned in the counterclockwise direction.

  12. Install the new torque converter nuts.
  13. Install the starter motor.
  14. Install the catalytic converter assembly.
  15. Clip the transmission wiring harness to the shift cable bracket then clip the harness retainer to the case.
  16. Connect the transmission wiring harness by connecting the following: the transmission connector, the digital transmission range (TR) sensor, the intermediate shaft speed (ISS) sensor, and the output shaft speed (OSS) sensor.
  17. Install the shift cable by connecting the cable to the manual control lever then to the bracket.
  18. Using the marks you made during removal, align the driveshaft yoke and the axle shaft to maintain the driveline balance.
  19. Align and install the rear driveshaft then torque bolts to 83 ft-lb (112 Nm).
  20. Prior to lowering the vehicle, observe the following guidelines for installing the in-line transmission fluid filter.
  21. Connect the negative battery cable.
  22. Fill the transmission with clean automatic transmission fluid to the correct level.
  23. Check the transmission to make sure it is operating properly.
  24. Make sure the shift cable is adjusted correctly.

Previous Next