To Remove:
NOTE: Although Ford suggests that is the camshaft and valve liters are removable with the engine installed, depending on the particular options with which your truck is equipped, working clearance may be extremely tight. This procedure may be much easier to perform with the engine removed. Before beginning, read this procedure and make certain enough clearance, or working room, exists with the engine in the vehicle. If there is not enough space, remove the engine.
- Before servicing the vehicle, refer to the precautions in the beginning of this section.
- Disconnect the negative battery cable.
- Remove the camshaft roller followers.
- Remove the left camshaft chain tensioner.
- Remove the bolt and the camshaft sprocket.
NOTE: Mark the position of the camshaft bearing caps so they can be installed in their original position.
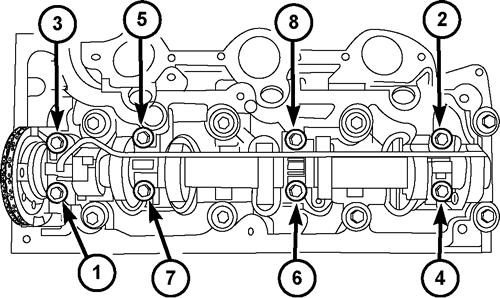
- Remove the bolts in the sequence shown and remove the camshaft bearing caps and the oil supply tube.
| Remove the bolts in this sequence - 4.0L engine

|
- Remove the camshaft.
To Install:
- Lubricate all of the moving parts with clean engine oil before installing.
- Install the camshaft.
NOTE: All camshaft bearing caps must be installed back in their original positions.
- Position the camshaft bearing caps, the oil supply tube, and the bolts.
NOTE: Once the bolts have been installed, check the camshaft for free rotation.
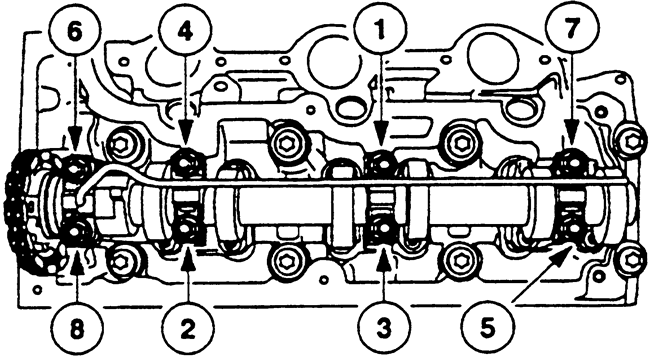
- Tighten the camshaft bearing cap bolts in two steps in the sequence shown below:
- Step 1: Tighten the bolts to 53 in-lb (6 Nm).
- Step 2: Tighten the bolts to 12 ft-lb (16 Nm).
| Install the bolts in this sequence - 4.0L engine
|
- Retime both of the camshafts.
- Install the camshaft roller followers.
- Connect the negative battery cable.
- Start the engine, check for leaks, and repair if necessary.
To Remove:
- Before servicing the vehicle, refer to the precautions in the beginning of this section.
- Remove the camshaft roller followers.
- Remove the right-hand camshaft chain tensioner.
CAUTION
The right-hand camshaft sprocket bolt is a left-handed threaded bolt.
- Remove the bolt and camshaft sprocket with the torque wrench extension tool (303-575).
NOTE: Mark the position of the camshaft bearing caps so they can be installed in their original positions.
- Remove the bolts in the sequence shown and remove the camshaft bearing caps and the oil supply tube.
| Remove the bolts in this sequence - 4.0L engine
|
- Remove the camshaft.
To Install:
NOTE: Lubricate all of the parts with clean engine oil before installing them.
- Install the camshaft.
NOTE: All of the camshaft bearing caps must be installed in their original positions.
- Position the camshaft bearing caps, the oil supply tube, and the bolts.
NOTE: After installing the bolts, check the camshaft to see if it rotates freely.
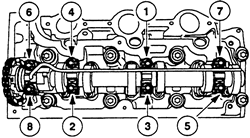
- Tighten the camshaft bearing cap bolts in two steps in the sequence shown below:
- Step 1: Tighten the bolts to 53 in-lb (6 Nm).
- Step 2: Tighten the bolts to 12 ft-lb (16 Nm).
| Torque the bolts in this sequence - 4.0L engine
|
- Retime both camshafts.
- Install the camshaft roller followers.