Previous Next

Hoses

REMOVAL & INSTALLATION

Except RX-7
  1. Remove the radiator cap.
  2. Drain the coolant from the radiator by opening the radiator petcock, if so equipped, or by disconnecting the lower radiator hose. If your car is equipped with a petcock, it might be a good idea to squirt a little penetrating oil on it first.

    CAUTION
    When draining coolant, keep in mind that cats and dogs are attracted by ethylene glycol antifreeze, and are quite likely to drink any that is left in an uncovered container or in puddles on the ground. This will prove fatal in sufficient quantity. Always drain the coolant into a sealable container. Coolant should be reused unless it is contaminated or several years old.

  3. To replace the bottom hose, drain all the coolant from the radiator. If only the top hose is to be replaced, drain just enough fluid to bring the level down below the level of the top hose.

    NOTE: If the fluid is more than two years old, this might be a good time to drain and refill the cooling system.

  4. Loosen and slide the hose clamps in toward the center of the hose(s) being removed, then disconnect the hose(s). If a hose is tight, try using a twisting motion to break it free.

    To install:

  5. If the old clamps are badly rusted or damaged in any way, replace them with new ones.
  6. When installing the new hose, slide the clamps over each end of the hose, approximately 2 inches (51mm) from each end. Slide each end of the hose over the bead and onto its fitting as far as it can go.
  7. Position each clamp about 14 in. (6.35mm) from the end of the hose and tighten.

    CAUTION
    Do not overtighten at the radiator connections as it is very easy to crush the metal.

  8. Close the radiator petcock, if applicable, and refill with the old coolant or with a new mixture of 50/50 coolant/water. (To determine cooling system capacity, please refer to the chart at the end of this section.) Run the engine for a few minutes and check for leaks. Top up the radiator with coolant if necessary.

    NOTE: If those old hoses do not leak, you might want to stick them in a plastic bag and store them in the vehicle. In an emergency, an old hose makes a good short term repair should a hose fail when you are "in the middle of nowhere''.

    Fig. 1: Position the clamp so the end of the clamp is approximately 14 in. (6.35mm) from the hose edge

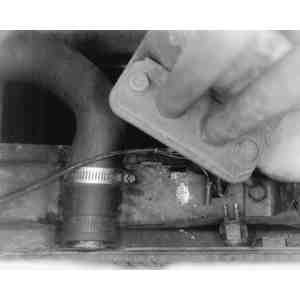
    Fig. 2: Drain the radiator and loosen the hose clamp before removing the lower radiator hose

RX-7

The coolant in the RX-7 circulates in a similar manner to that of a conventional piston engine. The water pump sucks cool liquid out from the bottom of the radiator and pushes hot liquid back in at the top of the radiator. Hoses connect the top and bottom of the radiator to the engine. Check the condition of these hoses and the two smaller hoses which pass through the firewall and into the heater assembly often, and especially before long trips.

NOTE: The radiator must be drained somewhat to remove the upper hose, and must be drained completely to remove the lower hose. Allow the engine to cool before draining.

  1. On 1979–85 vehicles, raise the front of the vehicle and support it safely.
  2. Remove the radiator cap and drain the cooling system as described later in this section.

    CAUTION
    When draining coolant, keep in mind that cats and dogs are attracted by ethylene glycol antifreeze, and are quite likely to drink any that is left in an uncovered container or in puddles on the ground. This will prove fatal in sufficient quantity. Always drain the coolant into a sealable container. Coolant should be reused unless it is contaminated or several years old. Never remove the radiator cap when the engine is hot. Wrap a thick cloth around the cap and slowly remove it.

  3. If the lower hose is being removed, remove the splash panel from under the front of the engine.
  4. Loosen and slide the hose clamps in toward the center of the hose(s) being removed, then disconnect it. If the hose is tight, try using a twisting motion to break it free.

    To install:

  5. If the old clamps are badly rusted or damaged in any way, replace them with new ones.
  6. If a new hose is being installed, slide a hose clamp over the hose, approximately 2 inches (51mm) from each end. Slide each end of the hose over the bead and onto its fitting as far as it can go.
  7. Slide the hose clamps so that the end of each clamp is approximately 14 in. (6.35mm) from the end of the hose. Tighten the hose clamps enough to seal, but not so much that the clamp cuts into or internally damages the hose.
  8. Make sure the drain plugs are tightened properly. Fill the cooling system with the proper amount of coolant as described in this section.
  9. Refit the splash panel and/or lower the car, if applicable. Run the engine for a few minutes and check for leaks. Top up the radiator with coolant if necessary.

    NOTE: If those old hoses do not leak, you might want to stick them in a plastic bag and store them in the vehicle. In an emergency, an old hose makes a good short term repair should a hose fail when you are "in the middle of nowhere''.

Previous Next