NOTE: For all brake caliper/disc removal and installation
procedures, please refer to Section 9 of this manual.
- Raise the front end and safely support it on jackstands.
- Remove the front wheel.
- Remove the disc brake caliper with the brake hose attached and secure
it to the coil spring with wire or twine.
- Remove the grease cap from the wheel hub. This can usually be done by
prying between it and the wheel hub with a flat blade screwdriver. Be careful
not to bend or gouge the cap.
- Wipe some of the grease away and remove the cotter pin in the end of the
spindle.
- Remove the nut lock and adjusting nut, the thrust washer, and the outer
wheel bearing. If the washer and bearing will not readily come out, try
tilting the hub a little to one side.
- Remove the brake disc/hub assembly from the spindle.
- Remove the inner grease seal. This can usually be done using a screwdriver
and prying from the inside of the seal. Do not try to force the screwdriver
between the seal and the hub, as you may scratch the hub. Remove the inner
bearing.
- If necessary, drive out the bearing outer race with a brass drift applied
to the slots provided for this purpose.
NOTE: Never remove the outer races unless you are replacing
them.
- Clean the inner and outer bearings completely and dry them with compressed
air.
WARNING
Do not use compressed air to spin the bearings dry.
- Clean the spindle and the hub cavity with solvent.
| Fig. 1: Remove the grease cap, cotter pin and lock
nut to access the wheel bearing adjusting nut
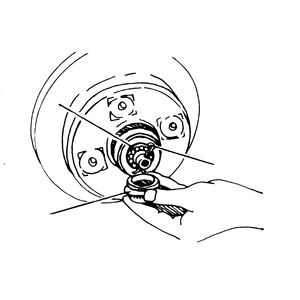
|
| Fig. 2: Pack the front wheel bearings with lithium
base grease before installing them
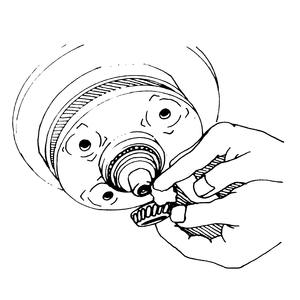
|
- Repack the bearings and the hub cavity with lithium grease. Do not overpack
them.
- If the bearing outer race was removed, install a new race into the hub,
using either a tool made for that purpose, or a socket of large enough diameter
to press on the outside rim of the race only.
WARNING
Use care not to cock the bearing race in the hub. If it is not fully seated,
the bearings cannot be adjusted properly.
- Install the inner bearing into its race, then press a new grease seal
over it.
- Position the brake disc/hub assembly on the spindle. Install the outer
bearing in the hub.
- Apply a thin coat of grease to the washer and the threaded portion of
the spindle, then loosely install the thrust washer and adjusting nut.
- Adjust the bearing preload, as described later in this section.
- Remove the wire or twine and install the brake caliper. Torque the retaining
bolts to 58–72 ft. lbs. (79–97 Nm)
- Install the wheel.
- Repeat Steps 2–19 for the other front wheel, if necessary.
- Lower the vehicle.
NOTE: To remove the wheel bearing from the rotor disc hub,
you will need special driving tools 49 B001 797 and 49 H033 101 or their equivalents.
To install the wheel bearing, special installer tool 49 F027 007 or equivalent
is required.
- Raise the front of the car and safely support it on jackstands.
- Remove the front wheel.
- Remove the brake caliper and its bracket. Do not disconnect the brake
line from the caliper. Instead, suspend the caliper from the strut assembly
with a piece of wire or twine.
NOTE: Never allow the caliper to hang by the brake line.
- Gently pry the grease cap from the rotor disc. Be careful not to bend
or gouge the cap.
- Using a small cold chisel, unstake the tab on the bearing locknut. Loosen
the locknut and remove it from the spindle shaft along with the washer.
Discard the locknut (which must be replaced) and set the washer aside.
- Pull the rotor disc from the spindle shaft with a back and forth rocking
motion.
- Pry the oil seal from the rotor disc and discard it. Using snapring pliers,
separate the ends of the retaining ring and remove it from the rotor disc.
Purchase a new oil seal.
| Fig. 3: Pressing the front wheel bearing from the
rotor disc — 929
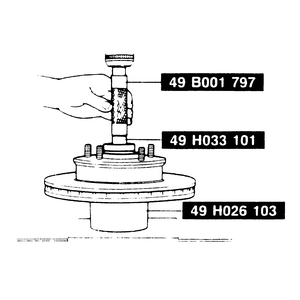
|
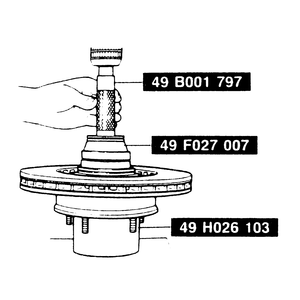
| Fig. 4: Installing the front wheel bearing — 929
|
| Fig. 5: To properly stake the locknut, leave a
0.16 in. (4.06mm) clearance between the nut and spindle groove
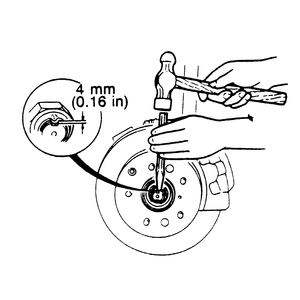
|
- Place the rotor disc on special press base 49 H026 103 or its equivalent
with the wheel studs facing up. Press the bearing from the rotor disc using
special tools 49 B001 797 and 49 H033 101 or their equivalents. Discard
the bearing and purchase a new one. DO NOT reuse it.
NOTE: On vehicles equipped with Anti-Lock Brake Systems
(ABS), take care not to damage the teeth of the sensor rotor, located
in the center of the rotor disc, when pressing the bearing out.
- Invert the rotor disc on the base so that the wheel studs are now facing
down.
- Install the new bearing and press it into the rotor disc using special
tool 49 F027 007 or its equivalent.
- Install the retaining ring.
- Drive the new oil seal into the rotor disc using the proper tool. Coat
the lip of the oil seal with lithium based NGLI No. 2 wheel bearing grease.
- Install the disc plate with the washer and new locknut. Torque the locknut
to 72–130 ft. lbs. (98–176 Nm). Once the specified torque is
reached, check that the tab on the locknut is aligned with the groove in
the spindle shaft. If not, use the torque wrench to tighten the locknut
until the tab is properly aligned, but do not exceed 130 ft. lbs. (176 Nm).
- Check the bearing end-play, as described previously in this section. Maximum
end-play is 0.002 in. (0.05mm).
- Stake the locknut tab with a small cold chisel. The tab should have a
0.16 in. (4.06mm) clearance from the shaft groove (see the illustration).
- Install the caliper assembly and torque the retaining bolts to 65–87
ft. lbs. (88–118 Nm).
- Install the wheel and torque the lug nuts to 65–87 ft. lbs. (88–118
Nm).
- Repeat Steps 2–17 for the other front wheel, if necessary.
- Lower the vehicle.
NOTE: The disc brake rotor and caliper must be removed to
inspect the inner wheel bearing.
- Raise the front of the car and safely support it on jackstands.
- Remove the front wheel.
- Remove the brake caliper and its bracket. Do not disconnect the brake
line from the caliper. Instead, suspend the caliper from the strut assembly
with a piece of wire or twine.
NOTE: Never allow the caliper to hang by the brake line.
- Remove the grease cap from the wheel hub. This can usually be done by
prying between it and the wheel hub with a flat blade screwdriver. Be careful
not to bend or gouge the cap.
- Wipe some of the grease away and remove the cotter pin in the end of the
spindle.
- Remove the nut lock and adjusting nut, the thrust washer, and the outer
wheel bearing. If the washer and bearing will not readily come out, try
tilting the hub a little to one side.
- Carefully pull the hub off the spindle.
NOTE: The inner bearing is held in place by a grease
seal. If you plan to inspect the inner bearing, you should have a new
grease seal on hand, since replacement is recommended whenever the old
one is removed.
- Remove the inner grease seal. This can usually be done using a screwdriver
and prying from the inside of the seal. Do not try to force the screwdriver
between the seal and the hub, as you may scratch the hub. Remove the inner
bearing.
- Clean both bearings in clean, unused solvent and inspect the bearings
for wear. Clean all of the grease out of the hub with clean solvent and
check the bearing outer race for wear. The outer race can be removed by
driving it out using a suitable drift in the slots provided for that purpose.
NOTE: Never remove the outer races unless you are replacing
them.
- If the outer race was removed, install a new race into the hub, using
either a tool made for that purpose, or a socket of large enough diameter
to press on the outside rim of the race only.
WARNING
Use care not to cock the bearing race in the hub. If it is not fully seated,
the bearings cannot be adjusted properly.
- Pack the inside area of the hub and cups with grease. Pack the inside
of the grease cap, but do not yet install the cap into the hub.
- Completely pack the inner bearing with grease, by placing a large glob
of grease in your palm, then repeatedly sliding the bearing through the
grease. The grease must be forced through the side of the bearing and in
between each roller. Continue until the grease begins to ooze out the other
side through the gaps between the rollers. Install the inner bearing into
its race in the hub, then press a new grease seal over it.
- Install the hub and rotor onto the spindle. Pack the outer bearing with
grease in the same manner as the inner bearing, then install the outer bearing
in the hub.
- Apply a thin coat of grease to the washer and the threaded portion of
the spindle, then loosely install the washer and adjusting nut.
- Perform the bearing preload adjustment, as described later in this section.
- Remove the wire or twine and install the brake caliper.
- Install the wheel.
- Repeat Steps 2–17 for the other front wheel, if necessary.
- Lower the vehicle.
- Raise the front of the car and safely support it on jackstands.
- Remove the front wheel.
- Remove the brake caliper and its bracket. Do not disconnect the brake
line from the caliper. Instead, suspend the caliper from the strut assembly
with a piece of wire or twine.
NOTE: Never allow the caliper to hang by the brake line.
- Remove the grease cap, cotter pin, set cover (nut lock) and hub nut.
- Carefully remove the wheel hub and rotor disc from the wheel spindle,
along with the thrust washer and outer wheel bearing.
- Place the rotor disc on two wood blocks. Pry the oil seal from the wheel
hub and remove the bearing. Discard the used oil seal.
- Clean the inner and outer bearings in clean, unused solvent and inspect
the bearings for wear. Clean all of the grease out of the hub with clean
solvent and check the bearing outer races for wear.
NOTE: If the hub is worn, the inner and outer bearings
and the hub must be replaced as an assembly.
- Pack the inner and outer bearing cones with lithium based, NLGI No. 2
wheel bearing grease.
- Insert the inner bearing into the hub. Mount the hub on wood blocks and
drive the new oil seal into the hub with a suitable press. The lip of the
seal must be flush with the surface of the hub.
- Install the wheel hub and rotor disc.
- Pack the outer bearing with grease in the same manner as the inner bearing,
then install the outer bearing in the hub.
- Apply a thin coat of grease to the washer and the threaded portion of
the spindle, then loosely install the thrust washer and hub nut.
- Adjust the bearing preload, as described later in this section.
- Remove the wire or twine and install the brake caliper. Torque the retaining
bolts to 58–72 ft. lbs. (79–97 Nm)
- Install the wheel.
- Repeat Steps 2–15 for the other front wheel, if necessary.
- Lower the vehicle.

