- Remove the trim panel, if so equipped, by unfastening its two securing screws.
- Loosen the clamps at both ends of the filter and detach both hoses from
the filter.
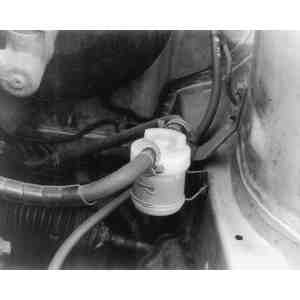
| Fig. 1: A disposable, cartridge type fuel filter
is commonly mounted in the fuel line between the fuel tank and the
fuel pump
|
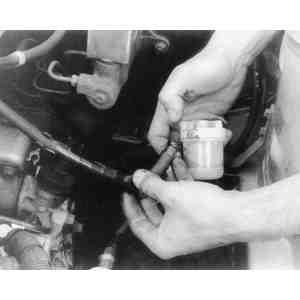
| Fig. 2: Inlet and outlet hoses are fastened to the
fuel filter's connectors
|
- Note which way the directional arrows are facing, then unfasten the filter
from its mounting bracket.
To install:
- Install the new filter in its mounting bracket. Make sure that the arrows
are properly positioned.
- Connect the inlet and outlet hoses to the filter and secure with the hose
clamps.
NOTE: If the fuel lines are connected to the filter with
spring tension clamps, it is advisable to replace them with new clamps when
the filter is changed.
- Start the engine and check the filter connections for leaks by running the
tip of your finger around the circumference of each hose.
- Install the trim panel, if so equipped.
- Raise the rear of the car and safely support it on jackstands. Locate the
filter; use the illustration as a guide to its shape and location.
- Loosen the clamps at both ends of the filter and place a collection pan
beneath it to catch any of the fuel that is in the lines.
| Fig. 3: 1979–85 RX-7 fuel filter location.
The arrow shows the direction of fuel flow
|
- Disconnect the fuel filter lines and remove the filter from its retainer.
To install:
- Install the new filter, paying close attention to the direction of the filter
in relation to the direction of fuel flow. See the illustration for correct
positioning.
- Connect the inlet and outlet hoses to the filter and secure with the hose
clamps.
NOTE: If the fuel lines are connected to the filter with
spring tension clamps, it is advisable to replace them with new clamps when
the filter is changed.
- Start the engine and check the fuel filter connections for leaks.
CAUTION
On fuel injected engines, there is considerable residual pressure inside the
fuel lines even when the engine is not running. To avoid the possibility of
fire or personal injury, fuel pressure must first be relieved from the system
as described in this section.
- Relieve the pressure from the fuel system, as described later in this section.
- Disconnect the negative battery cable.
- Slide the fuel line clamps back off the connections on the filter. Then,
slowly pull one connection off just until fuel begins to seep out. Place a
small plastic container or stuff a couple of rags under the filter to absorb
any excess fuel.
| Fig. 4: On some applications, a "banjo'' fitting
connects the fuel line and fuel filter
|
- Pull both fuel hoses off the connectors or loosen the union bolts on the
"banjo'' fittings. Remove the filter from the clamp. On some models, it will
be necessary to unbolt the fuel filter from the mounting bracket.
NOTE: If the fuel filter is equipped with "banjo'' type
fittings, discard the copper crush gaskets and replace them with new ones.
To install:
- Place the new filter in the clamp or attach it to the bracket, if so equipped.
- On "banjo'' type fittings, install new copper washers and torque the union
bolts to 25 ft. lbs. (34 Nm).
- Attach the hoses to the filter connectors. Make sure the hoses are pushed
all the way over the raised portion of the connectors, then secure with hose
clamps.
NOTE: If the fuel lines are connected to the filter with
spring tension clamps, it is advisable to replace them with new clamps when
the filter is changed.
- Connect the negative battery cable.
- Start the engine and check the fuel filter connections for leaks.
- Relieve the pressure from the fuel system, as described later in this section.
- Disconnect the negative battery cable.
- On 1984–85 models, raise the rear of the vehicle and support it safely.
On 1986–89 models, raise the front of the vehicle and support it safely.
- Loosen the clamps on both hoses and disconnect the hoses from the filter.
- Loosen the clamp bolts and remove the filter from the bracket.
To install:
- Install the new filter in the bracket and tighten the clamp bolts.
- Push the inlet and outlet hoses all the way onto the fittings and secure
them with hose clamps.
NOTE: If the fuel lines are connected to the filter with
spring tension clamps, it is advisable to replace them with new clamps when
the filter is changed.
- Lower the vehicle and connect the negative battery cable.

