Idle mixture adjustment for all 1978–82 Mazda piston engine cars, as well as 1983 GLC Wagons and 1986–87 carburetor-equipped 323s, requires the use of an HC/CO analyzer. Since this is an extremely expensive piece of equipment, the adjustment procedure is complex, and this adjustment is not required as a part of ordinary maintenance, no procedures are included here. This adjustment can, however, be checked at a reasonable cost at many diagnostic centers, or may be checked during mandatory vehicle emission inspections, where applicable. If the engine exhibits a rough idle and/or smoke, combined (in some cases) with hesitation or poor running at low speeds, the idle mixture might be at fault. First, check all the basic tune-up adjustments such as dwell, ignition timing, and spark plug condition, and verify that there are no vacuum leaks due to disconnected or leaking hoses. Then, if these symptoms persist, have the idle mixture checked with an HC/CO meter at a dealer or diagnostic center.
NOTE: If incorrect readings are detected, we suggest you take the vehicle to a shop or dealer familiar with Mazdas and have the idle mixture adjusted according to the procedure specified by the factory.
NOTE: The carburetor must be removed and disassembled to gain access to the mixture screw since an idle mixture adjustment is normally only necessary in the event of carburetor overhaul. For information on carburetor removal and installation, please refer to Section 5 of this manual.
The air/fuel mixture for most 1983–85 carbureted piston engine models can readily be checked with a dwell/tachometer. An incorrect reading can indicate either an improper idle mixture or a faulty oxygen sensor. Make sure that the engine is properly tuned and that all vacuum hoses are properly connected before suspecting an improper idle mixture.
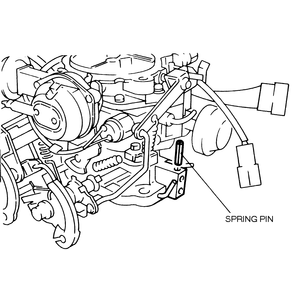
NOTE: Do not secure the spring pin (which locks the mixture adjusting screw) until the adjustment has been performed.
To check/adjust the idle mixture:
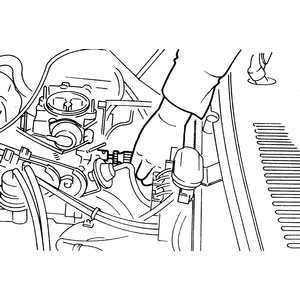
| Fig. 1: The mixture adjusting screw can be turned
with a screwdriver
|
| Fig. 2: A spring pin is used to lock the mixture
adjusting screw in place
|
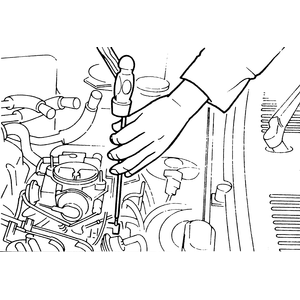
| Fig. 3: Gently tap the spring pin into position after
adjusting the idle mixture
|
NOTE: Idle speed of the GLC with automatic transaxle should now be checked with the gear selector in D (Drive), but MAKE SURE the parking brake is set and the drive wheels are blocked. The correct reading is 750 rpm.
On all 1986–89 fuel injected piston engine vehicles covered by this manual, idle mixture is automatically maintained by the electronic engine control unit, and thus, cannot be manually adjusted.