Although lightly pitted points may be cleaned with a point file, a new set
of points and new condenser should be installed every 12 months or 10,000 miles
(16,100 km).
NOTE: The condenser capacity is 0.27 mfd (micro-Farads).
- Unfasten the clips and remove the distributor cap. Leave the ignition cables
attached to the cap.
- Remove the rotor from the distributor.
- Unplug the blade type electrical connector from the contact set (breaker
points).
- Remove the two mounting screws, noting the location of any condenser lead.
Unfasten the condenser lead terminal and remove the contact set.
- Unfasten the condenser retaining screw located on the outside of the distributor
housing, and remove the condenser.
NOTE: The smaller condenser, mounted next to the ignition
condenser, is for radio noise suppression. It need only be replaced if a
clicking sound is heard over the radio.
To install:
- Attach the new condenser to the distributor housing.
- Install the new contact set, the condenser lead terminal, and the screws.
Tighten the screws just enough to hold the contact set in place.
- Reattach the blade connector to the contact set.
NOTE: The following step covers adjustment of the ignition
points after replacement or cleaning. See the DWELL ANGLE ADJUSTMENT procedure,
later in this section, for checking and fine-tuning the adjustment with
an electronic dwell meter.
- Adjust the point gap as follows:
- Rotate the engine by using a remote starter switch, or have someone
inside the car operate the ignition key to "bump the starter'' until the
rubbing block is at the top of the cam.
- Check the point gap with a feeler gauge. The gap should be 0.020 in.
(0.50mm).
- Adjust the gap with a screwdriver. Loosen the lockscrew just enough
to permit the stationary contact to be moved, using the screwdriver as
a lever in the slot provided. The lockscrew must be tight enough, however,
to hold the stationary contact in one place while you adjust it. Use a
clean, flat type feeler gauge to check the gap, and make sure the blade
is sliding straight through the gap, not at an angle. Recheck the gap
after tightening the lockscrew to make sure the gap has not changed, and
readjust as necessary.
- Make sure that the cam follower is properly lubricated. If necessary, wipe
dirty grease off the follower and cam, then apply contact point lubricant
with a high melting point to the leading edge of the cam follower and cam.
- Install the rotor and distributor cap.
- Check and adjust the dwell angle, as necessary.
- Unsnap the clips and remove the distributor cap. Remove the rotor.
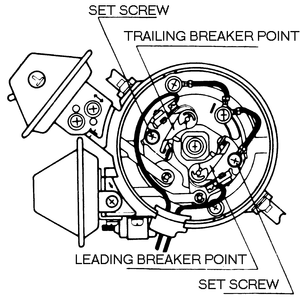
- Unplug the blade type connector from the set of leading points.
- Remove the mounting screw (or "set screw'') which retains the leading set
of breaker points and note the position of any condenser wire. Unfasten the
condenser lead terminal, if applicable, and remove the point set.
- Install a new leading set of breaker points, making sure the points fit
over any mounting dowels. Install the mounting screw with its wire and tighten.
- Unplug the blade type connector from the set of trailing points.
- Remove the mounting screw (or "set screw'') which retains the trailing set
of breaker points and note the position of any condenser wire. Unfasten the
condenser lead terminal, if applicable, and remove the point set.
- Install a new trailing set of breaker points, making sure the points fit
over any mounting dowels. Install the mounting screw with its wire and tighten.
| Fig. 1: Adjust dwell by slightly loosening the set
screw and moving the stationary contact

|
- Unfasten the condenser retaining screw(s) located on the outside of the
distributor housing, and remove the condenser(s).
NOTE: The smaller condenser, mounted near the ignition
condenser(s), is for radio noise suppression. It need only be replaced if
a clicking sound is heard over the radio.
- Attach the new condenser(s) to the distributor housing, then attach the
condenser lead terminal(s) to the contact set(s).
NOTE: The following step covers adjustment of the ignition
points after replacement or cleaning. See the DWELL ANGLE ADJUSTMENT procedure,
later in this section, for checking and fine-tuning the adjustment with
an electronic dwell meter.
- Adjust the point gap of each contact set as follows:
- Rotate the engine using a remote starter switch, or have someone inside
the car operate the ignition key to "bump the starter'' until the rubbing
block on the leading set of points is at the top of the cam.
- Check the point gap with a feeler gauge. The gap should be 0.016–0.020
in. (0.40–0.50mm).
- Adjust the point gap with a screwdriver. Loosen the set screw just enough
to permit the stationary contact to be moved, then use the screwdriver
as a lever. The set screw must be tight enough, however, to hold the stationary
contact in one place while you adjust it. Use a clean flat bladed feeler
gauge to check the gap, and make sure the blade slides straight through
the gap, not at an angle. Recheck the gap after tightening the set screw
to make sure the gap didn't change. A good idea is to use a second screwdriver
to tighten the set screw while keeping the first screwdriver on the stationary
contact to prevent the gap from changing.
- Make sure that the rubbing block cam is properly lubricated. If necessary,
wipe dirty grease off the cam and rubbing block, then apply contact point
lubricant with a high melting point to the contact surfaces of these components.
- Install the rotor and distributor cap.
- Check and adjust the dwell angle, as necessary.


