NOTE: Perform this operation on a cold engine only.
WARNING
Do not remove the camshaft sprocket from the timing chain. Be sure that the
sprocket and chain relationship is not disturbed. Wire the timing chain and
sprocket together, so that they will not fall into the front cover. Maintain
tension on the chain to avoid loss of timing at the crankshaft sprocket.
- Remove the water pump (except GLC front wheel drive).
- Rotate the crankshaft so that the No. 1 cylinder is at TDC.
- Remove the distributor, as described earlier in this section.
- Remove the rocker arm cover.
- Release the tension on the timing chain by using an appropriate clamping
tool (rear wheel drive models) or by removing the tensioner (front wheel drive
GLC). Refer to the procedures earlier in this section.
- Remove the cylinder head bolts using several passes in the reverse of the
torque sequence (refer to the Cylinder Head Removal & Installation procedure,
earlier in this section).
- Remove the rocker arm assembly.
- If so equipped, remove the nut, washer and distributor drive gear from the
camshaft.
- Remove the nut and washer securing the camshaft sprocket.
- Remove the camshaft and inspect for wear, as described later in this section.
To install:
- Position the camshaft in the cylinder head, and fasten the timing chain
sprocket. Coat the bearing surfaces with engine oil.
- If applicable, install the distributor drive gear, washer and nut on the
camshaft.
- Re-tension the timing chain, as described earlier in this section.
- Check that the camshaft end-play is within specifications, and correct if
necessary.
- Install the rocker arm assembly, then tighten the cylinder head bolts in
several stages, using the appropriate torquing sequence. Check and adjust
the valves, as described in Section 2.
- Install the rocker arm cover with a new gasket.
- Install the distributor, as described earlier in this section.
- If applicable, install the water pump.
- Loosen the alternator mounting bolts, release belt tension, and remove the
alternator belt.
- Remove the cylinder head cover and gasket, then remove the upper timing
belt cover and gasket.
- Using a wrench on the crankshaft pulley bolt, turn the engine in its normal
direction of rotation until the camshaft pulley "A'' mark aligns with the
V-notch at the top of the front housing.
- Loosen the tensioner lockbolt until it can be turned by hand.
- Block the camshaft pulley from turning by putting a socket and extension
(or prybar of some sort) through one of the holes in the pulley. Secure this
"wedge'' against one of the front housing bolts, while loosening the pulley's
lockbolt.
- Remove the pulley from the camshaft, being careful to maintain tension on
the timing belt so it won't slip off the timing belt crankshaft pulley below.
NOTE: If the belt does not maintain sufficient contact
with the timing belt pulley, you will have to remove the crankshaft pulley
and realign the timing marks.
- Loosen the rocker assembly mounting bolts in several stages, following the
proper sequence (refer to the Rocker Shafts Removal & Installation procedure,
earlier in this section). Remove the rocker assembly (with the bolts intact),
then remove the camshaft.
To install:
- Before replacing or reinstalling the camshaft and related parts, check the
bearing clearance, end-play, along with the cam and journal dimensions, as
described later in this section.
- Lubricate all parts thoroughly with clean engine oil and position the camshaft
on the cylinder head with the pin in the front positioned at the top.
- Lubricate the bearing surfaces and position the rocker assembly on the cylinder
head. Torque the bolts in several stages to 13–19 ft. lbs. (18–26
Nm), following the appropriate sequence.
- Raise the camshaft pulley into position at the front of the camshaft without
losing the timing. To do this, maintain upward tension on the pulley while
carefully levering the tensioner upward against spring tension. When the pulley
is high enough, position it on the front of the camshaft so that the lockpin
engages the hole in the pulley. Install and tighten the pulley lockbolt to
35–48 ft. lbs. (47–65 Nm), while keeping the pulley from turning,
as described above.
- Using a wrench on the crankshaft pulley bolt, turn the engine two revolutions
in its normal direction. You can check that belt timing is correct by aligning
the crankshaft pulley and oil pump body timing marks, then checking that the
marks on the camshaft pulley and timing cover are still aligned. Torque the
tensioner bolt to 28–38 ft. lbs. (38–51 Nm).
- Check and adjust the valves, as described in Section 2.
- Install the timing belt cover, with a new gasket if necessary, and torque
the bolts to 5–7 ft. lbs. (7–9 Nm).
- Reinstall the cylinder head cover with a new gasket.
- Install and properly tension the alternator belt.
- Remove the cylinder head cover, as described previously in this section.
- Remove the camshaft pulley after inserting a small prytool in one of the
slots on the face of the pulley to hold it in place while loosening the bolt
with a wrench. After removing the bolt, withdraw the pulley from the camshaft.
- Remove the rocker shaft assembly, as described earlier in this section.
- Unfasten the attaching bolt, then remove the camshaft thrust plate from
the front bearing. Carefully pry the camshaft oil seal out of the front cylinder
head bore with a small prytool. Be careful not to damage the bore or camshaft!
Slide the camshaft out of the bearing bores in the head.
- Inspect the camshaft bearing surfaces and bearing clearances, then check
the camshaft dimensions as described later in this section. Replace any worn
parts.
To install:
- Thoroughly lubricate all bearing surfaces (bores and cam journals), then
carefully slide the camshaft into position in the block.
- Install the camshaft thrust plate and attaching bolt. Torque the thrust
plate attaching bolt to 6–8 ft. lbs. (8–11 Nm).
- Coat the outer bore of a new camshaft oil seal and the inner bore of the
cylinder head with a thin coat of engine oil. With a piece of pipe approximately
the diameter of the oil seal (but not larger), gently tap the seal straight
into position around the front of the camshaft.
- Install the camshaft pulley onto the dowel pin with the pin groove facing
straight upward, then torque the camshaft pulley bolt to 36–45 ft. lbs.
(49–61 Nm).
- Install the rocker shaft assembly, as described previously in this section.
Check and adjust the valve clearances.
- Install the cylinder head cover with a new gasket, as described previously
in this section.
- Remove the cylinder head cover, as described previously in this section.
- Engage the camshaft journal that is closest to the seal plate with an adjustable
wrench to hold it stationary. Using a box wrench, loosen the camshaft pulley
bolt. Remove the bolt and washer, then slide the camshaft pulley from the
camshaft. The remaining camshaft pulley is removed in exactly the same manner.
- Unbolt and remove the seal plate from the cylinder head. Gently insert the
end of a suitable prying tool between the cylinder head and the camshaft oil
seal, then remove the seal. Be careful not to damage the seal bore during
removal. Remove the remaining oil seal in the same manner.
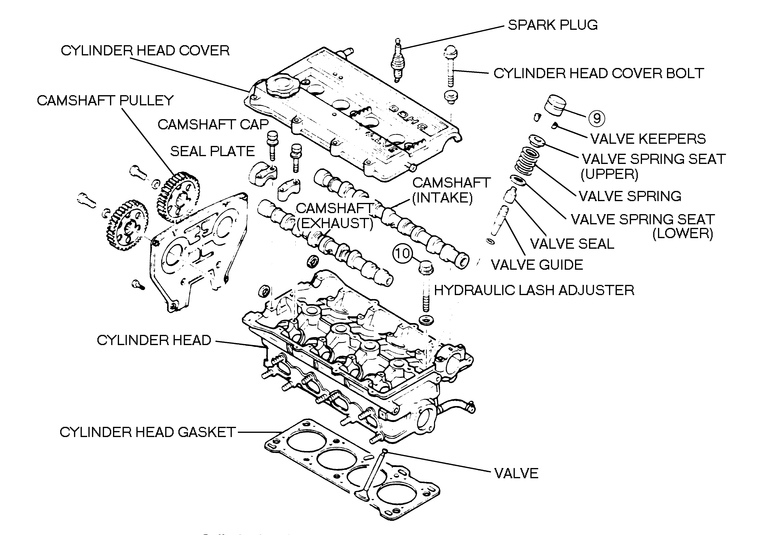
| Fig. 1: Cylinder head components — 323
turbo

|
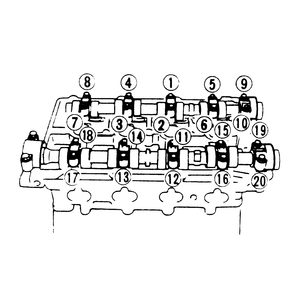
| Fig. 2: Camshaft cap bolt tightening sequence — 323
turbo
|
- Remove the camshaft cap retaining bolts in reverse of the tightening sequence
and remove the caps. (Although the caps are numbered, it might be advisable
to record fore and aft orientation for easier reference.)
- Lift the intake and exhaust camshafts from the bearing saddles in the cylinder
head. Clean the camshafts thoroughly with a lint-free rag and set the camshaft
on V-blocks. Proceed to the inspection procedures, as described later in this
section.
To install:
- Coat the bearing, journal and lobe surfaces of the camshaft with clean engine
oil. Gently place the camshafts into the cylinder head.
- Apply a thin coat of oil to the camshaft oil seal bores and the lip of the
new seals. Install the seals into the cylinder head using a hammer and socket
or a length of pipe that closely approximates the diameter of the seal. Tap
the seals evenly into the seal bores.
- Wipe each cap with a clean rag. Locate the front camshaft cap and apply
a thin coat of non-hardening sealant to the cap surface. Do not apply sealant
to the bearing surface!
- Install the camshaft caps in their original locations. Gradually torque
the camshaft cap bolts in the proper sequence to 8–11 ft. lbs. (11–15
Nm).
- Install the exhaust side camshaft pulley so that the E mark
stamped on its face is aligned with the upper timing mark on the front housing.
Similarly, install the intake side camshaft pulley so that the I mark
is aligned with the upper timing mark on the front housing. Install the pulley
bolts and washers. Hold the camshaft stationary as described earlier and torque
the bolts to 36–45 ft. lbs. (49–61 Nm).
- Install the cylinder head cover with a new gasket and seal washers, as described
previously in this section.
- Disconnect the negative battery cable.
- Tag and disconnect the spark plug wires, then remove the spark plugs (for
easier crankshaft rotation).
- Remove the engine side cover and the accessory drive belts.
- Unbolt the crankshaft pulley, then remove the upper and lower timing belt
covers and gaskets. Remove the crankshaft pulley baffle plate and note how
it is installed. The curved side should be facing out.
- Engage the timing belt pulley's lockbolt with an appropriate size metric
socket and breaker bar, then turn the crankshaft in its normal direction of
rotation until the "arrowed'' 1 mark on the camshaft is aligned
with the mark on top of the front housing (see illustration). Unbolt and remove
the tensioner, then disconnect the tensioner spring from its mount.
- Remove the timing belt. If the old timing belt is to be reused, mark the
direction of rotation, prior to removal.
- Block the camshaft pulley from turning by putting a socket and extension
(or prybar of some sort) through one of the holes in the pulley. Secure this
"wedge'' against one of the front housing bolts, while loosening the pulley's
lockbolt and washer.
- Remove the pulley from the camshaft.
- Remove the cylinder head cover, as described earlier in this section.
- Unfasten and remove the front and rear cylinder head housings, along with
their gaskets.
- Wipe all the camshaft journals with a clean lint-free rag. Before removing
the rocker arm shafts, refer to the inspection procedures, later in this section,
then check the camshaft end-play and journal oil clearances. These measurements
will help you determine if the camshaft is acceptable for reinstallation or
whether it should be replaced.
- Loosen the rocker arm shaft bolts following the appropriate sequence, as
described earlier in this section. Loosen each bolt gradually, in several
stages, and remove along with the spacers. Mark the shafts based on which
side of the head they are installed (intake or exhaust), and keep the components
of each shaft in a separate plastic bag. Look at the amount of holes in both
shafts to determine on what side they are installed. The intake shaft has
twice the amount of holes as the exhaust side. The stepped ends of both shafts
go toward the rear of the head.
NOTE: Do not remove the hydraulic lash adjusters, unless
it is absolutely necessary to do so. The lash adjusters are sealed in the
rocker arms by an O-ring. If this O-ring is disturbed or damaged, the lash
adjusters may leak. If they are removed, make sure that new O-ring are installed
and that the oil reservoirs in the rocker arms are filled with clean engine
oil.
- The camshaft caps are marked with arrows that show the installation position.
Note the direction of the arrows, so that they will be installed in the original
positions. Remove the camshaft caps and lift the camshaft from the bearing
saddles in the cylinder head. There are five camshaft caps, with No. 3 at
the center. The No. 3 cap has a drilled oil passage from which it receives
oil from the cylinder head. It must be reinstalled in its original position.
Clean the shaft thoroughly and set the camshaft on V-blocks. Proceed to the
inspection section.
To install:
- Liberally coat all the camshaft bearing, journal and lobe surfaces with
clean engine oil. Gently place the camshaft into the cylinder head. Rotate
the camshaft until the dowel pin on the end of the shaft is facing straight
up.
- Install the camshaft caps so that the arrows are facing in the original
direction. Make sure that the No. 3 cap is installed correctly.
- Install the rocker arm shafts so that the stepped ends are facing the rear
of the head. Install the rocker arm shaft retaining bolts and spacers. Torque
the bolts gradually in the proper sequence to 13–20 ft. lbs. (18–27
Nm). When tightening the bolts, prevent the rocker arm and spacers from being
pinched between the shaft and the camshaft cap.
- Apply engine oil to a new oil seal and to the front housing bore, then press
the seal in place.
- Apply engine oil to the oil seal lip, then install the cylinder head front
housing with a new gasket.
- Install the cylinder head rear housing with a new gasket.
- Attach the cylinder head cover with sealant and bolts, as described earlier
in this section.
- Install the timing belt tensioner and timing belt, as described earlier
in this section. Install the crankshaft pulley baffle plate.
- Install the timing belt covers, using new gaskets if necessary.
- Position the crankshaft pulley, and torque the botls to 9–13 ft. lbs.
(12–17 Nm).
- Install and properly tension the accessory drive belts. Install the engine
side cover.
- Install the spark plugs and connect the plug wires.
- Connect the negative battery cable.
NOTE: The following procedure applies to the camshaft in either
cylinder bank.
- Rotate the engine so that the No. 1 piston is at TDC. Properly relieve the
fuel system pressure, as described in Section 5.
- Disconnect the negative battery cable and drain the cooling system.
- Tag and disconnect the spark plug wires, then remove all six spark plugs
(to make crankshaft rotation easier).
- Remove the fresh air duct, the cooling fan and radiator cowling. Remove
the drive belts.
- Remove the air conditioning compressor idler pulley. If necessary, unfasten
the compressor and position it to the side.
- Remove the crankshaft pulley and baffle plate. Remove the coolant bypass
hose and the upper radiator hose.
- Remove the timing belt cover assembly retaining bolts. Remove the left and
right timing belt covers and gaskets. Turn the crankshaft to align the mating
marks of the pulleys.
- Remove the upper idler pulley. Remove the timing belt. If reusing the belt,
be sure to mark the direction of rotation. Remove the timing belt auto tensioner.
- Remove the cylinder head cover and gasket. If necessary, first remove/reposition
any components which interfere.
- Engage the camshaft pulley with a suitable spanner wrench type holding tool
and loosen the retaining bolt. Remove the pulley from the end of the camshaft.
- Loosen the rocker arm shaft retaining bolts in the sequence shown in Rocker
Arm/Shaft Removal and Installation section described earlier in this section.
Loosen the bolts gradually and in several stages. Remove the rocker arm and
shaft assemblies.
NOTE: Do not remove the hydraulic lash adjusters, unless
it is absolutely necessary to do so. The lash adjusters are sealed in the
rocker arms by an O-ring. If this O-ring is disturbed or damaged, the lash
adjusters may leak. If they are removed, make sure that new O-rings are
installed and that the oil reservoirs in the rocker arms are filled with
clean engine oil.
- Insert the blade of a small prytool between the camshaft oil seal and gently
pry the seal from the cylinder head bore. Be careful not to damage the seal
bore. Discard the seal and purchase a new one.
- Before removing the camshaft thrust plate, proceed to the inspection section
to measure the camshaft end-play. This will determine if the thrust plate
or the camshaft have to be replaced.
- Remove the thrust plate, then slowly and carefully withdraw the camshaft
from the cylinder head. Clean off the lobe and journal surfaces, then proceed
to the inspection section, which follows.
NOTE: The camshaft in the left cylinder bank fits into
a distributor/oil pump drive gear. Since this drive gear engages both the
distributor shaft and the oil pump driveshaft gear, you must also remove
the necessary parts to disengage the gears, before the left camshaft can
be removed.
To install:
- If applicable, apply sealant to the end of the distributor/oil pump drive
gear which mates with the left camshaft, then fully seat the gear.
- Apply a liberal coating of clean engine oil to the surfaces of the cam lobes,
bearing and journal surfaces. Slowly and carefully insert the camshaft into
the cylinder head. Install the camshaft thrust plate and torque the retaining
bolt to 6–8 ft. lbs. (8–11 Nm).
- Wipe down the surface of the seal bore with a clean rag and coat the lip
of the new oil seal with clean engine oil. Install the seal into the cylinder
head using a socket or a length of pipe (that closely approximates the diameter
of the seal) as an installation tool. Tap the seal evenly into the seal bore.
- Coat the surfaces of the rocker arm and the rocker arm shafts with clean
engine oil. Install the rocker shafts in their original positions. The intake
side shaft has twice as many oil holes as the exhaust side. Torque the rocker
shaft bolts to 14–19 ft. lbs. (19–26 Nm) in several stages of
the proper sequence. When tightening the rocker shaft bolts, makes sure the
rocker arm shaft spring does not get pinched between the shaft and the mounting
boss.
- Align the camshaft so that its key points upward, then install the camshaft
pulley. On the left cylinder bank, the L mark on the face
of the pulley should be at the top, while on the right cylinder bank, the R mark
should be at the top. Tighten the retaining bolt to 52–59 ft. lbs. (71–80
Nm).
- Install the cylinder head cover with a new gasket and new seal washers.
- If applicable, install the oil pump drive gear and gear cover, as well as
the distributor spacer and distributor on the left cylinder head. Be sure
to replace the O-rings with new ones and to lubricate the drive gears and
O-rings with engine oil.
- The remainder of the installation is the reverse of the removal procedure.
Be sure to reload the timing belt tensioner and install the timing belt, as
described earlier in this section.
- Fill the cooling system to the proper level and reconnect the negative battery
cable.